【springboot系列】springboot整合mybatis实现增删改查
大家好,我是walker一个从文科自学转行的程序员~爱好编程,偶尔写写编程文章和生活欢迎关注公众号【I am Walker】,一块学习和成长!源码地址:https://gitee.com/shen-chuhao/walker.git步骤1、创建springboot项目点击finish之后就可以了插件安装因为前面导入了lombok依赖,所以如果lombok插件没有安装的话,可以先安装一下lombok
大家好,我是walker
一个从文科自学转行的程序员~
爱好编程,偶尔写写编程文章和生活
欢迎关注公众号【I am Walker】,回复“电子书”,就可以获得200多本编程相关电子书哈~
源码地址:https://gitee.com/shen-chuhao/walker.git
步骤
1、创建springboot项目


点击finish之后就可以了
插件安装
因为前面导入了lombok依赖,所以如果lombok插件没有安装的话,可以先安装一下lombok插件

2、配置application.yml
可以再resource下面删除掉,application.properties,然后新建个application.yml
yml的编写会比较舒服

# 服务端口
server:
  port: 10500


spring:
  # 数据库连接
  datasource:
    driver-class-name: com.mysql.cj.jdbc.Driver
    username: root
    password: 123456
    url: jdbc:mysql://localhost:3306/walker_test?useUnicode=true&characterEncoding=utf-8&useSSL=true&serverTimeZone=UTC

# mybatis配置
mybatis:
  # 映射文件,这个决定的是mapper.xml的防止位置
  mapper-locations: classpath:mapping/*.xml
  #entity的映射位置
  type-aliases-package: com.walker.mybatis.entity
3、创建基础目录和配置Application扫描路径
- 创建包
entity:用于存放实体类
mapper:mapper接口包
mapping:用于存放xml

- 配置@mapperScan
package com.walker.mybatis;

import org.mybatis.spring.annotation.MapperScan;
import org.springframework.boot.SpringApplication;
import org.springframework.boot.autoconfigure.SpringBootApplication;

@SpringBootApplication
//添加MapperScan  路径为mapper的路径
@MapperScan("com.walker.mybatis.mapper")
public class SpringbootMybatisApplication {

    public static void main(String[] args) {
        SpringApplication.run(SpringbootMybatisApplication.class, args);
    }

}
4、创建表和实体类
- 在mysql中创建学生表
CREATE TABLE `student` (
  `id` varchar(32) NOT NULL,
  `class_no` varchar(32) DEFAULT NULL,
  `name` varchar(128) DEFAULT NULL,
  `age` int NOT NULL,
  `idcard` varchar(32) DEFAULT NULL,
  PRIMARY KEY (`id`)
) ENGINE=InnoDB DEFAULT CHARSET=utf8mb4 COLLATE=utf8mb4_0900_ai_ci;
- 创建entity类
在entity包下简历学生实体类

可以使用sql转java类在线工具
https://www.bejson.com/devtools/sql2pojo/

之后复制生成的结果,生成的结果可能有些多余的东西,这个时候复制自己想要的即可

我这边只复制了属性,然后因为使用了lombok依赖,所以只要使用@Data 就会自动生成get和set方法了
5、创建Mapper接口类和xml|编写插入接口
在mapper包下创建Mapper接口类

package com.walker.mybatis.mapper;

import com.walker.mybatis.entity.StudentEntity;
import org.apache.ibatis.annotations.Mapper;
/**
 * @Author: WalkerShen
 * @DATE: 2022/3/29
 * @Description: 创建mapper接口,
 **/

//使用@Mapper,注入容器
@Mapper
public interface StudentMapper {

    //保存方法
    int save(StudentEntity studentEntity);
}
- 创建save方法之后,会出现红色下划线

- 之后创建需要创建mapper对应的xml,注意这里需要再resources下面的mapping中创建xml文件

xml文件的基础框架如下:
<?xml version="1.0" encoding="UTF-8"?>
<!DOCTYPE mapper PUBLIC "-//mybatis.org//DTD Mapper 3.0//EN" "http://mybatis.org/dtd/mybatis-3-mapper.dtd">
<!--namespace:命名空间,用来映射对应的mapper
相当于将mapper和mapper.xml连接起来,这一步很重要-->
<mapper namespace="com.walker.mybatis.mapper.StudentMapper">

</mapper>
- 之后点击Mapper的save方法,然后使用alt+Enter,点击
Generate statement
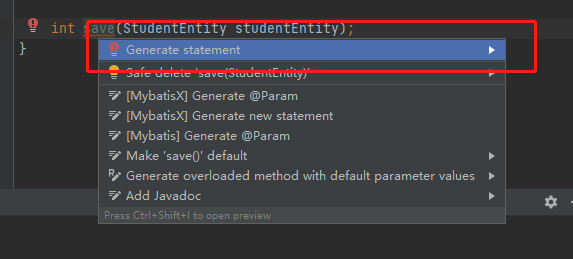
选择 insert statement

在xml文件中,就会删除语句了

这个时候发现是缺少传入参数StudentEntity的,因此需要获取使用parameterType,输入entity的全路径获取参数

- 编写insert语句
这个save方法主要是将entity中的5个字段加入数据库,其实mybatis大部分情况还是需要写sql的
<?xml version="1.0" encoding="UTF-8"?>
<!DOCTYPE mapper PUBLIC "-//mybatis.org//DTD Mapper 3.0//EN" "http://mybatis.org/dtd/mybatis-3-mapper.dtd">
<!--namespace:命名空间,用来映射对应的mapper
相当于将mapper和mapper.xml连接起来,这一步很重要-->
<mapper namespace="com.walker.mybatis.mapper.StudentMapper">

    <insert id="save" parameterType="com.walker.mybatis.entity.StudentEntity">
        insert into student
        <trim prefix="(" suffix=")" suffixOverrides=",">
            <if test="id!=null">id,</if>
            <if test="classNo!=null">class_no,</if>
            <if test="name!=null">`name`,</if>
            <if test="age!=null">age,</if>
            <if test="idcard!=null">idcard,</if>
        </trim>
        <trim prefix="values (" suffix=")" suffixOverrides=",">
            <if test="id!=null">#{id},</if>
            <if test="classNo!=null">#{classNo},</if>
            <if test="name!=null">#{name},</if>
            <if test="age!=null">#{age},</if>
            <if test="idcard!=null">#{idcard},</if>
        </trim>
    </insert>

</mapper>
6、测试
测试的方式有两种,一种是再springbootTest下面进行测试,这种方式是比较容易的。
另外一种是编写接口,使用接口调用
SpringbootTest测试
在test目录下,插件一个测试类

package com.walker.mybatis.mybatisTest;

import com.walker.mybatis.entity.StudentEntity;
import com.walker.mybatis.mapper.StudentMapper;
import org.junit.jupiter.api.Test;
import org.springframework.beans.factory.annotation.Autowired;
import org.springframework.boot.test.context.SpringBootTest;

import java.util.Random;

//1、标注springboot测试
@SpringBootTest
public class StudentTest {

    //2、注入mapper接口
    @Autowired
    private StudentMapper studentMapper;

    //3、标注测试方法
    @Test
    public void testSave(){
        //4、创建学生类
        StudentEntity studentEntity = new StudentEntity();
        studentEntity.setId("1");
        studentEntity.setAge(18);
        studentEntity.setClassNo(String.valueOf(new Random().nextInt(2)));
        studentEntity.setIdcard("441581199810113324");
        studentEntity.setName("walker");
        //5、调用方法
        studentMapper.save(studentEntity);
    }
}
执行结果:
发现数据库插入了一条数据了

接口测试
一般编写接口的时候,使用的是传统三层架构
分别是controller+service+mapper
一般controller是控制层
service:用于处理逻辑
mapper:用于和数据库的交互
1、编写controller
位置:

package com.walker.mybatis.controller;

import com.walker.mybatis.entity.StudentEntity;
import com.walker.mybatis.service.StudentService;
import org.springframework.beans.factory.annotation.Autowired;
import org.springframework.web.bind.annotation.PostMapping;
import org.springframework.web.bind.annotation.RequestBody;
import org.springframework.web.bind.annotation.RequestMapping;
import org.springframework.web.bind.annotation.RestController;

//1、定义@RestController
@RestController
//2、定义RequestMapping
@RequestMapping("/student")
public class StudentController {

    //3、引入service注解
    @Autowired
    private StudentService studentService;

    //4、编写方法
    @PostMapping("/save")
    public String save(@RequestBody StudentEntity studentEntity){
        //5、调用service方法
        studentService.save(studentEntity);
        return "success";
    }
}
注解解析:
**@RestController **
- @RestController的作用等同于@Controller + @ResponseBody
- @Controller注解的类注入Spring容器
- @ResponseBody表示方法的返回值直接以指定的格式写入Http response body中,而不是解析为跳转路径。
@RequestMapping
- @RequestMapping注解是用来映射请求的,即指明处理器可以处理哪些URL请求,该注解既可以用在类上,也可以用在方法上。
- 当使用@RequestMapping标记控制器类时,方法的请求地址是相对类的请求地址而言的;当没有使用@RequestMapping标记类时,方法的请求地址是绝对路径。
- @RequestMapping的地址可以是uri变量,并且通过@PathVariable注解获取作为方法的参数。也可以是通配符来筛选请求地址。
@Autowired
- @Autowired是用在JavaBean中的注解,通过byType形式,用来给指定的字段或方法注入所需的外部资源。
@PostMapping
- @PostMapping是一个复合注解,Spring framework 4.3引入了@RequestMapping注释的变体,以更好地表示带注释的方法的语义,作为@RequestMapping(method = RequestMethod.POST)的快捷方式。也就是可以简化成@PostMapping(value="/abc" )即可,主要是方便识记。
@RequestBody
- @RequestBody主要用来接收前端传递给后端的json字符串中的数据的(请求体中的数据的);
2、编写service
需要创建service类和实现类

- service
package com.walker.mybatis.service;

import com.walker.mybatis.entity.StudentEntity;

public interface StudentService {
    //抽象方法
    void save(StudentEntity studentEntity);
}
- serviceImpl
package com.walker.mybatis.service.impl;

import com.walker.mybatis.entity.StudentEntity;
import com.walker.mybatis.mapper.StudentMapper;
import com.walker.mybatis.service.StudentService;
import org.springframework.beans.factory.annotation.Autowired;
import org.springframework.stereotype.Service;

//1、service注解,注入容器
@Service
//2、实现StudentService
public class StudentServiceImpl implements StudentService {

    //3、注入mapper
    @Autowired
    private StudentMapper studentMapper;
//4、重写方法
    @Override
    public void save(StudentEntity studentEntity) {
        //5、调用mapper的方法
        studentMapper.save(studentEntity);
    }
}
3、mapper层
至于mapper的代码,则和前面是一致的,这里也将其放出来吧
package com.walker.mybatis.mapper;

import com.walker.mybatis.entity.StudentEntity;
import org.apache.ibatis.annotations.Mapper;
/**
 * @Author: WalkerShen
 * @DATE: 2022/3/29
 * @Description: 创建mapper接口,
 **/

//使用@Mapper,注入容器
@Mapper
public interface StudentMapper {

    int save(StudentEntity studentEntity);
}
- xml
<?xml version="1.0" encoding="UTF-8"?>
<!DOCTYPE mapper PUBLIC "-//mybatis.org//DTD Mapper 3.0//EN" "http://mybatis.org/dtd/mybatis-3-mapper.dtd">
<!--namespace:命名空间,用来映射对应的mapper
相当于将mapper和mapper.xml连接起来,这一步很重要-->
<mapper namespace="com.walker.mybatis.mapper.StudentMapper">

    <insert id="save" parameterType="com.walker.mybatis.entity.StudentEntity">
        insert into student
        <trim prefix="(" suffix=")" suffixOverrides=",">
            <if test="id!=null">id,</if>
            <if test="classNo!=null">class_no,</if>
            <if test="name!=null">`name`,</if>
            <if test="age!=null">age,</if>
            <if test="idcard!=null">idcard,</if>
        </trim>
        <trim prefix="values (" suffix=")" suffixOverrides=",">
            <if test="id!=null">#{id},</if>
            <if test="classNo!=null">#{classNo},</if>
            <if test="name!=null">#{name},</if>
            <if test="age!=null">#{age},</if>
            <if test="idcard!=null">#{idcard},</if>
        </trim>
    </insert>

</mapper>
4、调用测试
这边使用的postman进行接口调用测试
链接如下:https://www.postman.com/downloads/
a.先启动springboot项目
b.使用postman测试,点击send调用

url:[http://localhost:10500/student/save](http://localhost:10500/student/save)
json数据:
{
    "id":"10",
    "name":"路飞",
    "age":18,
    "classNo":"d112312",
    "idcard":"44158119941211277"
}
点击send调用之后,会返回结果

之后查看数据库,发现有数据,代表结果OK了

7、查询|删除|修改接口
下面这里包含了其他的方法,包括查询,删除,修改方法
- StudentMapper
package com.walker.mybatis.mapper;

import com.walker.mybatis.entity.StudentEntity;
import org.apache.ibatis.annotations.Mapper;
/**
 * @Author: WalkerShen
 * @DATE: 2022/3/29
 * @Description: 创建mapper接口,
 **/

//使用@Mapper,注入容器
@Mapper
public interface StudentMapper {

    int save(StudentEntity studentEntity);

    StudentEntity getById(String id);

    int deleteById(String id);

    int updateById(StudentEntity studentEntity);
}
- StudentMapper.xml
<?xml version="1.0" encoding="UTF-8"?>
<!DOCTYPE mapper PUBLIC "-//mybatis.org//DTD Mapper 3.0//EN" "http://mybatis.org/dtd/mybatis-3-mapper.dtd">
<!--namespace:命名空间,用来映射对应的mapper
相当于将mapper和mapper.xml连接起来,这一步很重要-->
<mapper namespace="com.walker.mybatis.mapper.StudentMapper">

    <insert id="save" parameterType="com.walker.mybatis.entity.StudentEntity">
        insert into student
        <trim prefix="(" suffix=")" suffixOverrides=",">
            <if test="id!=null">id,</if>
            <if test="classNo!=null">class_no,</if>
            <if test="name!=null">`name`,</if>
            <if test="age!=null">age,</if>
            <if test="idcard!=null">idcard,</if>
        </trim>
        <trim prefix="values (" suffix=")" suffixOverrides=",">
            <if test="id!=null">#{id},</if>
            <if test="classNo!=null">#{classNo},</if>
            <if test="name!=null">#{name},</if>
            <if test="age!=null">#{age},</if>
            <if test="idcard!=null">#{idcard},</if>
        </trim>
    </insert>
<!--    修改-->
    <update id="updateById" parameterType="com.walker.mybatis.entity.StudentEntity">
        update student
        <set>
            <if test="classNo!=null">class_no=#{classNo},</if>
            <if test="name!=null">`name`=#{name},</if>
            <if test="age!=null">age=#{age},</if>
            <if test="idcard!=null">idcard=#{idcard}</if>
        </set>
        where id=#{id}

    </update>
    <!--    根据id删除-->
    <delete id="deleteById">
        delete from student
        where id=#{id}
    </delete>

<!--    根据id查询-->
    <select id="getById" resultType="com.walker.mybatis.entity.StudentEntity">
        select * from student
        where id=#{id}
    </select>

</mapper>
- 测试方法
package com.walker.mybatis.mybatisTest;

import com.walker.mybatis.entity.StudentEntity;
import com.walker.mybatis.mapper.StudentMapper;
import org.junit.jupiter.api.Test;
import org.springframework.beans.factory.annotation.Autowired;
import org.springframework.boot.test.context.SpringBootTest;

import java.util.Random;

@SpringBootTest
public class StudentTest {

    @Autowired
    private StudentMapper studentMapper;

    /**
     * 测试保存功能
     */
    @Test
    public void testSave(){
        StudentEntity studentEntity = new StudentEntity();
        studentEntity.setId("1");
        studentEntity.setAge(18);
        studentEntity.setClassNo(String.valueOf(new Random().nextInt(2)));
        studentEntity.setIdcard("441581199810113324");
        studentEntity.setName("walker");
        studentMapper.save(studentEntity);
    }

    /**
     * 测试:根据id获取数据
     */
    @Test
    public void testGetById(){
        StudentEntity studentEntity = studentMapper.getById("1");
        System.out.println(studentEntity);
    }


    /**
     * 测试修改
     */
    @Test
    public void testUpdateById(){
        StudentEntity studentEntity = new StudentEntity();
        studentEntity.setId("1");
        studentEntity.setName("尼卡尼卡");
        studentMapper.updateById(studentEntity);
    }


    /**
     * 测试删除
     */
    @Test
    public void testDeleteById(){
        studentMapper.deleteById("1");
    }
}
辅助
安装插件
mapper和mapper.xml的切换有些麻烦,需要找到对应的文件,那我们能不能像接口和接口实现类一样切换呢?
答案是可以的,就是下载对应的插件,这里可以安装mybatisX
搜索mybatisX安装插件

之后mapper和xml中就会出现这小图标,之间可以实现跳转

问题
1、Invalid bound statement (not found): com.walker.mybatis.mapper.StudentMapper.save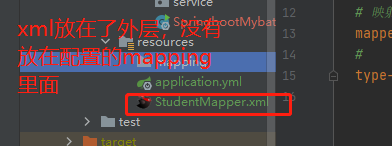
2、 nested exception is org.apache.ibatis.reflection.ReflectionException: There is no getter for property named ‘class_no’ in ‘class com.walker.mybatis.entity.StudentEntity’

都要使用classNo


为开发者提供学习成长、分享交流、生态实践、资源工具等服务,帮助开发者快速成长。
更多推荐


 4
4 0
0- 0


 已为社区贡献4条内容

所有评论(0)