Linux中安装及配置MySQL服务器的三种方式(最全最详细)
linux下安装和配置MySQL服务器的三种常用方法:一、源码安装(不推荐这种安装方式)二、使用二进制安装方式(只需解压无需编译)三、rpm包安装其中包括了MySQL安装过程中常见的报错问题及解决方法。对MySQL安装包的下载及配置,设置MySQL登录密码等设置............
目录
一、源码安装(不推荐这种安装方式)
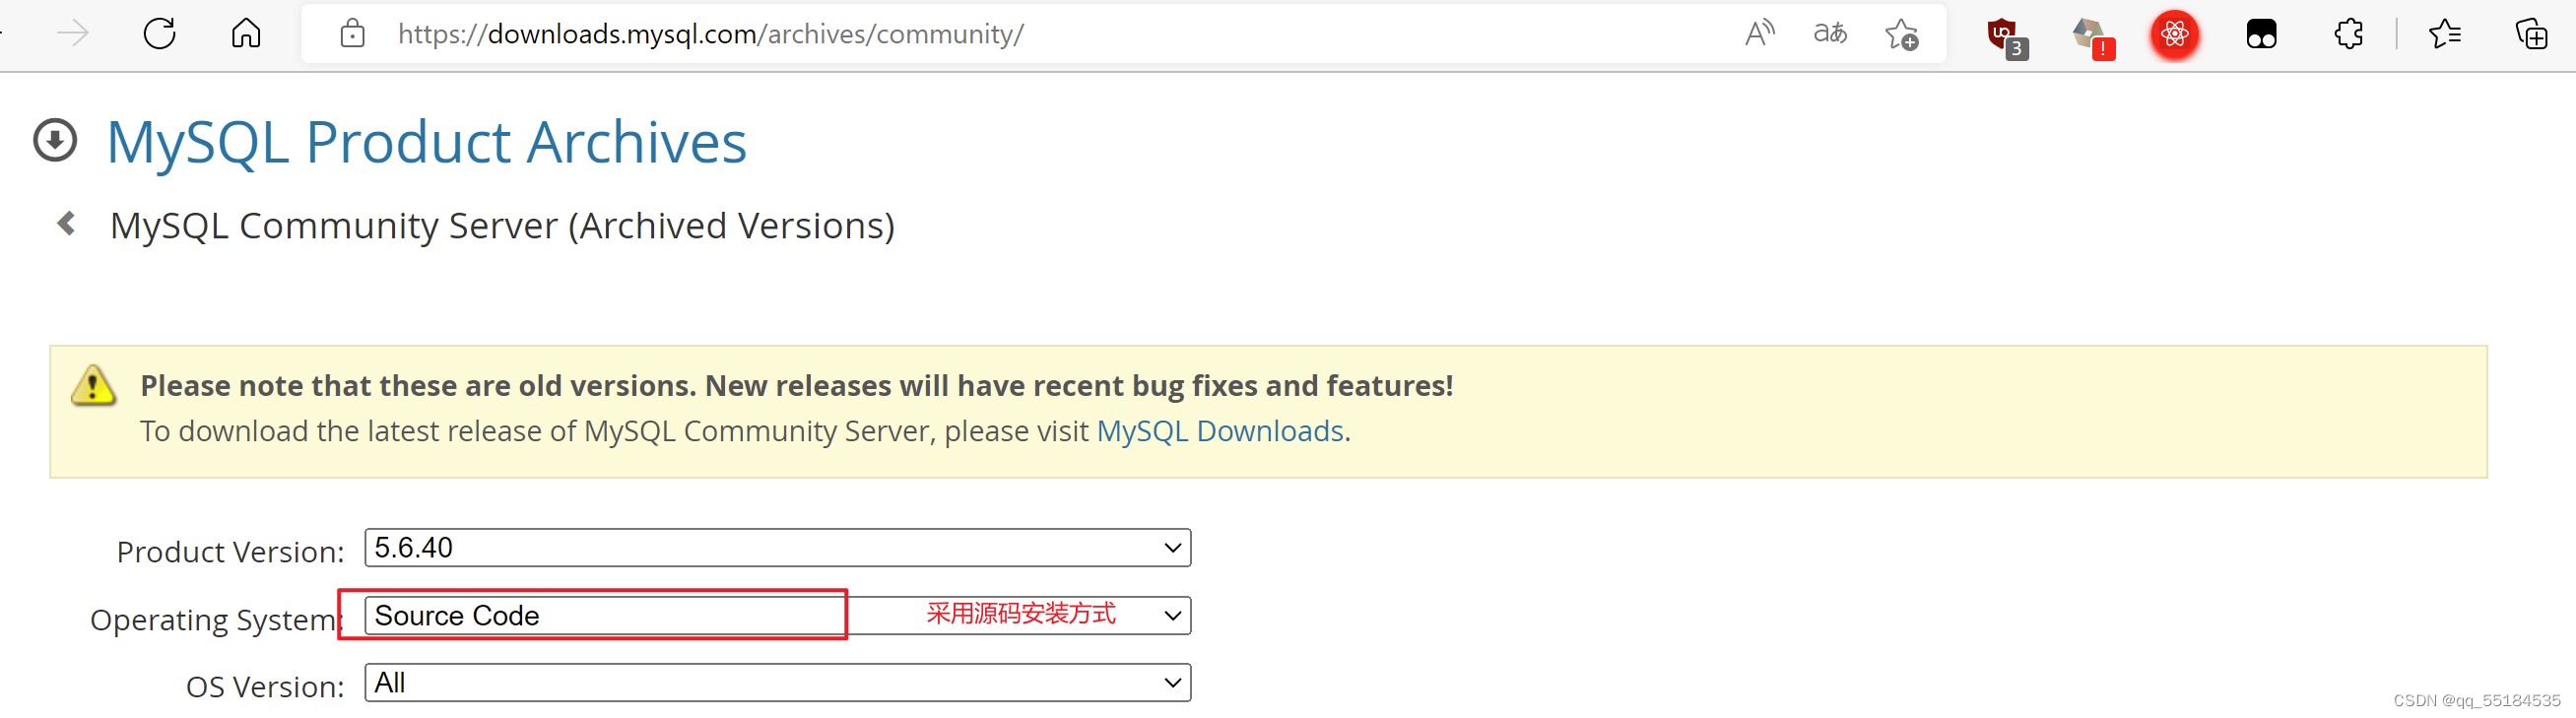
选择有.tar.gz后缀的源码包https://downloads.mysql.com/archives/get/p/23/file/mysql-5.6.40.tar.gz
 1、使用wget命令从网上下载源码包下载源码包
[root@rhel7-02 ~]# wget https://downloads.mysql.com/archives/get/p/23/file/mysql-5.6.40.tar.gz
2、使用tar命令解压MySQL源码包

4、在进行cmake编译之前需要安装些依赖
(1)先将本地yum仓库换成阿里云的yum仓库
[root@rhel7-02 yum.repos.d]# wget -O /etc/yum.repos.d/CentOS-Base.repo http://mirrors.aliyun.com/repo/Centos-7.repo
[root@rhel7-02 yum.repos.d]# yum clean all
[root@rhel7-02 yum.repos.d]# yum makecache
(2)安装cmake以及相关依赖包
[root@rhel7-02 mysql-5.6.40]# yum install -y ncurses-devel libaio-devel autoconf cmake gcc gcc-c++ glibc
5、创建目录程序存放位置的目录:[root@rhel7-02 mysql-5.6.40]#mkdir /usr/local/mysql
6、生成编译文件
#程序存放位置cmake . -DCMAKE_INSTALL_PREFIX=/usr/local/mysql \
#数据存放位置-DMYSQL_DATADIR=/usr/local/mysql/data \
#socket文件存放位置-DMYSQL_UNIX_ADDR=/usr/local/mysql/tmp/mysql.sock \
#使用utf8字符集 -DDEFAULT_CHARSET=utf8 \
#校验规则-DDEFAULT_COLLATION=utf8_general_ci \
#使用其他额外的字符集-DWITH_EXTRA_CHARSETS=all \
#支持的存储引擎-DWITH_INNOBASE_STORAGE_ENGINE=1 \
-DWITH_FEDERATED_STORAGE_ENGINE=1 \
-DWITH_BLACKHOLE_STORAGE_ENGINE=1 \
#禁用的存储引擎-DWITHOUT_EXAMPLE_STORAGE_ENGINE=1 \
#启用zlib库支持(zib、gzib相关)-DWITH_ZLIB=bundled \
#启用SSL库支持(安全套接层)-DWITH_SSL=bundled \
#启用本地数据导入支持-DENABLED_LOCAL_INFILE=1 \
#编译嵌入式服务器支持-DWITH_EMBEDDED_SERVER=1 \
#mysql5.6支持了google的c++mock框架了,允许下载,否则会安装报错
-DENABLE_DOWNLOADS=1 \
#禁用debug(默认为禁用-DWITH_DEBUG=0
一定不要打错,可以直接复制下面的代码!
[root@rhel7-02 mysql-5.6.40]# cmake . -DCMAKE_INSTALL_PREFIX=/usr/local/mysql \
-DMYSQL_DATADIR=/usr/local/mysql/data \
-DMYSQL_UNIX_ADDR=/usr/local/mysql/tmp/mysql.sock \
-DDEFAULT_CHARSET=utf8 \
-DDEFAULT_COLLATION=utf8_general_ci \
-DWITH_EXTRA_CHARSETS=all \
-DWITH_INNOBASE_STORAGE_ENGINE=1 \
-DWITH_FEDERATED_STORAGE_ENGINE=1 \
-DWITH_BLACKHOLE_STORAGE_ENGINE=1 \
-DWITHOUT_EXAMPLE_STORAGE_ENGINE=1 \
-DWITH_ZLIB=bundled \
-DWITH_SSL=bundled \
-DENABLED_LOCAL_INFILE=1 \
-DWITH_EMBEDDED_SERVER=1 \
-DENABLE_DOWNLOADS=1 \
-DWITH_DEBUG=0
7、编译make及安装make install
8、创建用户
[root@rhel7-02 mysql-5.6.40]# useradd mysql -s /sbin/nologin -M
9、更改mysql目录下文件的用户权限(否则MySQL服务会启动不成功)
[root@rhel7-02 scripts]# chown -R mysql.mysql /usr/local/mysql*
10、做软链接(可方便升级,也可不做):[root@rhel7-02 local]# ln -s mysql /application/mysql
11、配置my.cnf
[root@rhel7-02 mysql]# cd support-files/
[root@rhel7-02 support-files]# pwd
/usr/local/mysql/support-files
[root@rhel7-02 support-files]# ll
total 32
-rwxr-xr-x. 1 root root 1153 Jun 16 19:00 binary-configure
-rw-r--r--. 1 root root 773 Feb 26 2018 magic
-rw-r--r--. 1 root root 1126 Jun 16 19:00 my-default.cnf
-rwxr-xr-x. 1 root root 1061 Jun 16 19:00 mysqld_multi.server
-rwxr-xr-x. 1 root root 894 Jun 16 19:00 mysql-log-rotate
-rwxr-xr-x. 1 root root 10565 Jun 16 19:00 mysql.server
[root@rhel7-02 support-files]# cp my-default.cnf /etc/my.cnf
cp: overwrite ‘/etc/my.cnf’? y
[root@rhel7-02 support-files]#
12、拷贝启动脚本到默认启动位置
[root@rhel7-02 support-files]# cp mysql.server /etc/init.d/mysqld
13、创建socket文件所在目录
[root@rhel7-02 mysql]# mkdir /usr/local/mysql/tmp
14、初始化数据库文件
[root@rhel7-02 mysql]# cd scripts/
[root@rhel7-02 scripts]# ./mysql_install_db --user=mysql --basedir=/usr/local/mysql --datadir=/usr/local/mysql/data
16、启动MySQL
[root@rhel7-02 scripts]# /etc/init.d/mysqld start
Starting MySQL. SUCCESS!
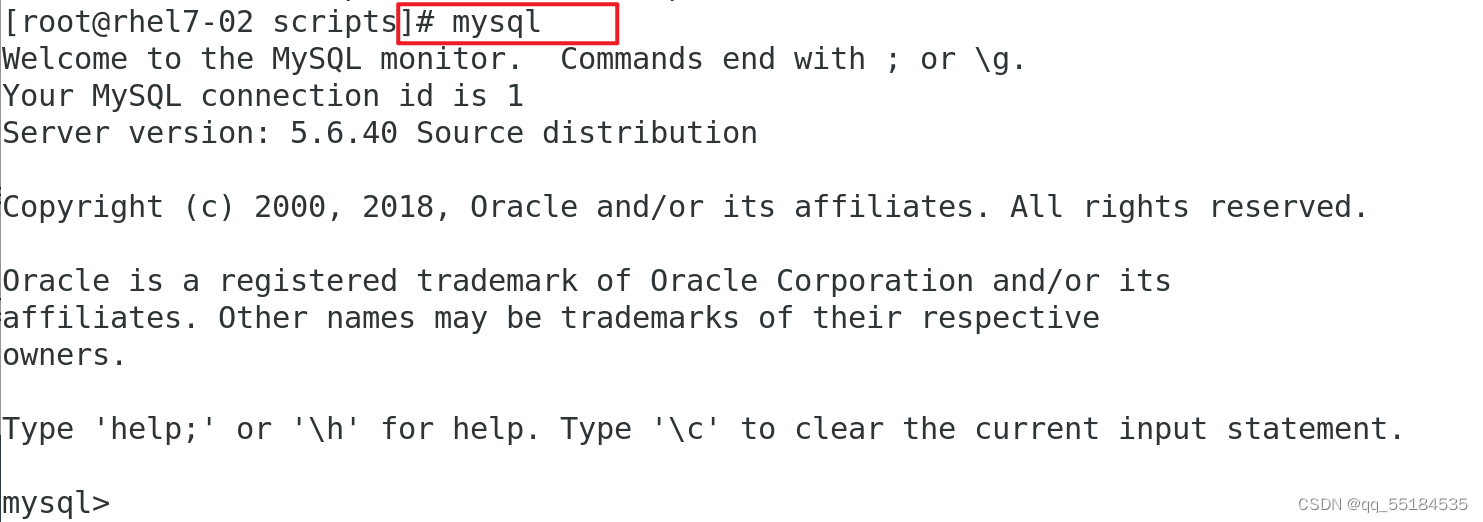
17、连接MySQL(初次连接不成功时需要添加环境变量)
[root@rhel7-02 scripts]# mysql //初次连接不需要密码
bash: mysql: command not found... //连接未成功
[root@rhel7-02 scripts]# vim /etc/profile.d/mysql.sh //添加环境变量
mysql.sh文件的内容:export PATH="/usr/local/mysql/bin:$PATH"[root@rhel7-02 scripts]# source /etc/profile //加载环境变量
成功连接MySQL:
18、修改MySQL登录密码
[root@rhel7-02 scripts]# mysqladmin -uroot -p password '123'
[root@rhel7-02 scripts]# mysql -uroot -p123
存在的问题
[root@rhel7-02 scripts]# /etc/init.d/mysqld start
Starting MySQL.Logging to '/usr/local/mysql/data/rhel7-02.err'.
220616 19:43:52 mysqld_safe Directory '/usr/local/mysql/tmp' for UNIX socket file don't exists.
ERROR! The server quit without updating PID file (/usr/local/mysql/data/rhel7-02.pid).原因:没有socket文件存放目录
解决方法:
mkdir /usr/local/mysql/tmp
[root@rhel7-02 scripts]# /etc/init.d/mysqld start
Starting MySQL.Logging to '/usr/local/mysql/data/rhel7-02.err'.
... ERROR! The server quit without updating PID file (/usr/local/mysql/data/rhel7-02.pid).[root@rhel7-02 scripts]# tail -100 /usr/local/mysql/data/rhel7-02.err
显示列报错内容:
2022-06-16 19:45:44 28236 [ERROR] Can't start server : Bind on unix socket: Permission denied
2022-06-16 19:45:44 28236 [ERROR] Do you already have another mysqld server running on socket: /usr/local/mysql/tmp/mysql.sock ?
2022-06-16 19:45:44 28236 [ERROR] Aborting原因:没有权限
解决方法:chown -R mysql.mysql /usr/local/mysql*
二、二进制安装方式(只需解压无需编译)
https://downloads.mysql.com/archives/get/p/23/file/mysql-5.6.40-linux-glibc2.12-x86_64.tar.gz

1、使用wget命令从网上下载MySQL二进制包
[root@rhel7-02 ~]# wget https://downloads.mysql.com/archives/get/p/23/file/mysql-5.6.40-linux-glibc2.12-x86_64.tar.gz
2、使用tar命令解压二进制包
[root@rhel7-02 ~]# ls
anaconda-ks.cfg initial-setup-ks.cfg Public
Desktop Music Templates
Documents mysql-5.6.40-linux-glibc2.12-x86_64.tar.gz Videos
Downloads Pictures
[root@rhel7-02 ~]# tar -xf mysql-5.6.40-linux-glibc2.12-x86_64.tar.gz
3、将解压后的软件包移到你想放置的程序安装位置
[root@rhel7-02 ~]# mv mysql-5.6.40-linux-glibc2.12-x86_64 /usr/local/mysql
[root@rhel7-02 ~]# cd /usr/local/mysql/
[root@rhel7-02 mysql]# ls
bin data include man README share support-files
COPYING docs lib mysql-test scripts sql-bench //软件包里面的内容
4、进入support-files目录下使用cp命令覆盖原来的/etc/my.cnf配置文件(若不覆盖的话启动MySQL式会报错)
[root@rhel7-02 support-files]# cp my-default.cnf /etc/my.cnf
5、拷贝启动脚本
[root@rhel7-02 support-files]# cp mysql.server /etc/init.d/mysqld
6、创建用户目录
[root@rhel7-02 mysql-5.6.40]# useradd mysql -s /sbin/nologin -M
7、初始化数据库
[root@rhel7-02 mysql]# cd scripts/
[root@rhel7-02 scripts]# ./mysql_install_db --user=mysql --basedir=/usr/local/mysql --datadir=/usr/local/mysql/data
这里有个问题是如果初始化时出错则需打下列命令:[root@rhel7-02 scripts]# yum install -y autoconf ncurses-devel libaio-devel glib
//安装相关依赖
8、启动MySQL
[root@rhel7-02 scripts]# /etc/init.d/mysqld start
Starting MySQL.Logging to '/usr/local/mysql/data/rhel7-02.err'.
. SUCCESS!
这里可能会出现启动不成功的问题,显示报错信息为/etc/init.d/mysqld: line 244: my_print_defaults: command not found
/etc/init.d/mysqld: line 264: cd: /usr/local/mysql: No such file or directory
Starting MySQL ERROR! Could't find MySQL server (/usr/local/mysql/bin/mysqld_safe)
报错原因:二进制安装的方法,程序默认的启动文件位置是在/usr/local/下的
当你的软件安装的目录不是在/usr/local下时,需要修改两个地方:
[root@rhel7-02 scripts]# sed -i 's#/usr/local#/(你软件的安装目录)#g' /etc/init.d/mysqld /你的安装目录/mysql/bin/mysqld_safe
二进制安装的方式不需要指定mysql.sock文件的安装位置,它自动安装在了/tmp/目录下
[root@rhel7-02 scripts]# ll /tmp/ //因为tmp文件什么权限都有
total 0
srwxrwxrwx. 1 mysql mysql 0 Jun 16 23:19 mysql.sock
9、添加环境变量
[root@rhel7-02 scripts]# vim /etc/profile.d/mysql.sh
文件内容如下:export PATH="/usr/local/mysql/bin:$PATH"
[root@rhel7-02 scripts]# source /etc/profile //加载环境变量
10、启动MySQL

11、修改用户登录密码
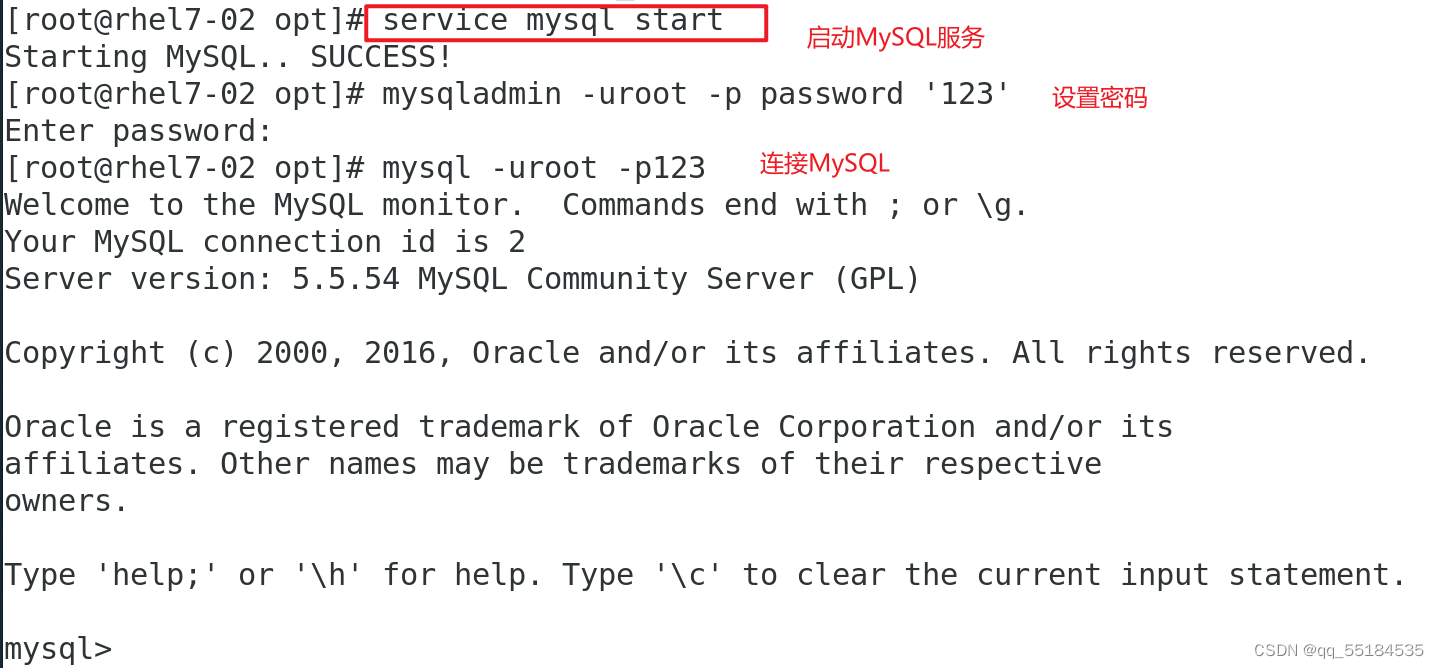
[root@rhel7-02 scripts]# mysqladmin -uroot -p password '123456'
[root@rhel7-02 scripts]# mysql -uroot -p123456
可自己手动写一个systemd的管理,这样就可使用systemctl start mysqld命令启动MySQL服务器
[root@rhel7-02 ~]# vim /usr/lib/systemd/system/mysqld.service
文件内容如下:
[Unit]
Description=MySQL Server
Documentation=man:mysql(8)
Documenttation=https://dev.mysql.com/doc/refman/en/usinng-systemd.html
After=network.target
After=syslog.target
[Install]
WantedBy=multi-user.target
[Service]
User=mysql
Group=mysql
ExecStart=/usr/local/mysql/bin/mysqld --defaults-file=/etc/my.cnf
LimitNOFILE=5000
[root@rhel7-02 ~]# ps -ef|grep mysqld
三、rpm包安装 (此方法比较简单,但是不可定制)
1、检查是否安装 mysql、mariadb软件
如果已安装使用rpm -e --nodeps命令将其卸载
[root@rhel7-02 /]# rpm -qa mariadb*
mariadb-libs-5.5.65-1.el7.x86_64
[root@rhel7-02 /]# rpm -e --nodeps mariadb-libs
从本地上传所需要的rpm到Linux系统中(需要rpm安装包的请添加wx免费获取: )
)


2、拷贝rpm安装包到/opt/目录下并进行安装
[root@rhel7-02 opt]# rpm -ivf MySQL-client-5.5.54-1.linux2.6.x86_64.rpm
[root@rhel7-02 opt]# rpm -ivf MySQL-server-5.5.54-1.linux2.6.x86_64.rpm
3、查询是否安装成功
[root@rhel7-02 opt]# rpm -qa|grep -i mysql
MySQL-server-5.5.54-1.linux2.6.x86_64
MySQL-client-5.5.54-1.linux2.6.x86_64
4、启动MySQL服务

为开发者提供学习成长、分享交流、生态实践、资源工具等服务,帮助开发者快速成长。
更多推荐


 6
6 1
1- 0


 已为社区贡献1条内容

所有评论(0)