解析RedisTemplate默认是否使用连接池
介绍在我们使用SpringBoot项目时使用Redis变的非常简单,我们只有引入springboot提供给我们的依赖就可以直接使用一个RedisTemplate的bean来操作redis了使用1、引入redis的依赖,这是一个starter自动装配组件<dependency><groupId>org.springframework.boot</groupId>&
介绍
在我们使用SpringBoot项目时使用Redis变的非常简单,我们只有引入springboot提供给我们的依赖就可以直接使用一个RedisTemplate的bean来操作redis了
使用
1、引入redis的依赖,这是一个starter自动装配组件
<dependency>
    <groupId>org.springframework.boot</groupId>
    <artifactId>spring-boot-starter-data-redis</artifactId>
</dependency>
2、在application.properties配置redis信息
spring.redis.host=localhost
spring.redis.port=6379
spring.redis.password=
3、直接注入bean使用
@RestController
public class RedisController {

    @Autowired
    private RedisTemplate redisTemplate;

    @GetMapping(value = "/setRedis")
    public String setRedis() {
        redisTemplate.opsForValue().set("aa", "测试", 1, TimeUnit.HOURS);
        return "OK";
    }
}
发现调用后成功了,但是查看redis设置后的数据是乱码
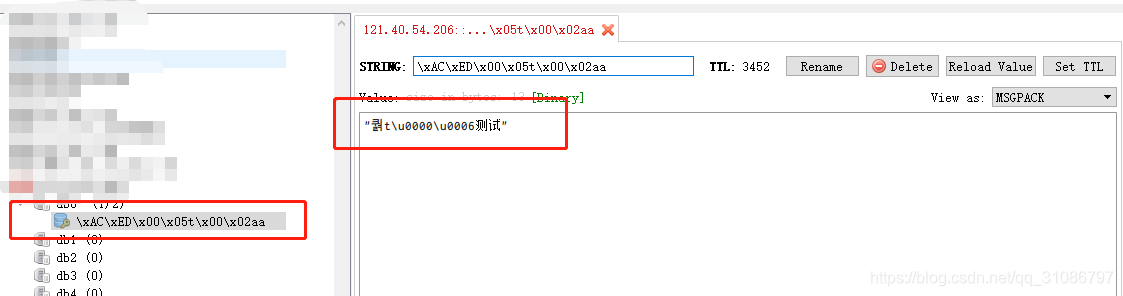
因为RedisTemplate默认使用的是自己的序列化编码类型,我们需要重新设置,或者直接使用StringRedisTemplate这个bean,这个bean使用的是StringRedisSerializer的序列化访视
@Configuration
public class RedisConfig {

    @Bean
    public RedisTemplate redisTemplate(RedisConnectionFactory factory) {
        RedisTemplate<String, Object> template = new RedisTemplate();
        template.setConnectionFactory(factory);
        Jackson2JsonRedisSerializer jackson2JsonRedisSerializer = new Jackson2JsonRedisSerializer(Object.class);
        ObjectMapper om = new ObjectMapper();
        om.setVisibility(PropertyAccessor.ALL, JsonAutoDetect.Visibility.ANY);
        om.enableDefaultTyping(ObjectMapper.DefaultTyping.NON_FINAL);
        jackson2JsonRedisSerializer.setObjectMapper(om);
        // 使用jackson2的序列化访视
        template.setDefaultSerializer(jackson2JsonRedisSerializer);
        template.afterPropertiesSet();
        return template;
    }
}
再次调用后发现数据没有乱码了,RedisTemplate提供了多种序列化的类型供我们设置
连接池
首先SpringBoot2.0版本之后spring-boot-starter-data-redis的底层默认使用了Lettuce来操作redis,早期的版本使用的是Jedis
我们在使用数据库时肯定都是使用到了连接池的,因为每一次和服务端创建连接都是很耗时以及占用资源的,那么RedisTemplate是否使用了连接池呢
我们看官方的介绍
There are also a few Lettuce-specific connection parameters that can be tweaked. By default, all LettuceConnection instances created by the LettuceConnectionFactory share the same thread-safe native connection for all non-blocking and non-transactional operations. To use a dedicated connection each time, set shareNativeConnection to false. LettuceConnectionFactory can also be configured to use a LettucePool for pooling blocking and transactional connections or all connections if shareNativeConnection is set to false.
简单来说就是使用Lettuce获取连接都是通过LettuceConnectionFactory这个工厂类来获取的,默认情况下Lettuce使用的是一个线程安全的共享的本地连接来操作redis,如果你不希望使用本地连接可以设置shareNativeConnection这个参数为false,如何可以配置LettucePool连接池来操作redis
直接看下源码
从redisTemplate.opsForValue().set开始看
public void set(K key, V value, long timeout, TimeUnit unit) {

		byte[] rawKey = rawKey(key);
		byte[] rawValue = rawValue(value);

		execute(new RedisCallback<Object>() {

			.....
	}
看execute方法
<T> T execute(RedisCallback<T> callback, boolean b) {
		return template.execute(callback, b);
	}
public <T> T execute(RedisCallback<T> action, boolean exposeConnection) {
		return execute(action, exposeConnection, false);
	}
@Nullable
	public <T> T execute(RedisCallback<T> action, boolean exposeConnection, boolean pipeline) {

		Assert.isTrue(initialized, "template not initialized; call afterPropertiesSet() before using it");
		Assert.notNull(action, "Callback object must not be null");

		RedisConnectionFactory factory = getRequiredConnectionFactory();
		RedisConnection conn = null;
		try {

			if (enableTransactionSupport) {
				// only bind resources in case of potential transaction synchronization
				conn = RedisConnectionUtils.bindConnection(factory, enableTransactionSupport);
			} else {
				// 核心代码
				conn = RedisConnectionUtils.getConnection(factory);
			}

			boolean existingConnection = TransactionSynchronizationManager.hasResource(factory);

			RedisConnection connToUse = preProcessConnection(conn, existingConnection);

			boolean pipelineStatus = connToUse.isPipelined();
			if (pipeline && !pipelineStatus) {
				connToUse.openPipeline();
			}

			RedisConnection connToExpose = (exposeConnection ? connToUse : createRedisConnectionProxy(connToUse));
			T result = action.doInRedis(connToExpose);

			// close pipeline
			if (pipeline && !pipelineStatus) {
				connToUse.closePipeline();
			}

			// TODO: any other connection processing?
			return postProcessResult(result, connToUse, existingConnection);
		} finally {
			RedisConnectionUtils.releaseConnection(conn, factory);
		}
	}
打断点看看核心代码处的factory,这就是官方说的RedisConnectionFactory

当代码断点走到这个位置时,connection会被赋予一个连接对象,多次调用发现都是同一个对象,并且shareNativeConnection都是true,这就是官方说的,默认情况下都使用的同一个本地连接
现在我们配置shareNativeConnection为false以及连接池试试看
先引入commons-pool2依赖,因为RedisTemplate底层使用commons-pool2来作为连接池,否则会报错
<dependency>
    <groupId>org.apache.commons</groupId>
    <artifactId>commons-pool2</artifactId>
</dependency>
配置文件配置
// 连接池最大连接数 使用负值表示没有限制
spring.redis.lettuce.pool.max-active=8
// 连接池最大阻塞等待时间(使用负值表示没有限制)
spring.redis.lettuce.pool.max-wait=-1
// 连接池中的最大空闲连接 默认 8
spring.redis.lettuce.pool.max-idle=8
// 连接池中的最小空闲连接 默认 0
spring.redis.lettuce.pool.min-idle=0
RedisConfig配置
@Bean
    public RedisTemplate redisTemplate(LettuceConnectionFactory factory) {
        RedisTemplate template = new RedisTemplate();
        template.setConnectionFactory(factory);
        Jackson2JsonRedisSerializer jackson2JsonRedisSerializer = new Jackson2JsonRedisSerializer(Object.class);
        ObjectMapper om = new ObjectMapper();
        om.setVisibility(PropertyAccessor.ALL, JsonAutoDetect.Visibility.ANY);
        om.enableDefaultTyping(ObjectMapper.DefaultTyping.NON_FINAL);
        jackson2JsonRedisSerializer.setObjectMapper(om);
        template.setDefaultSerializer(jackson2JsonRedisSerializer);
        template.afterPropertiesSet();

        // 配置共享本地连接设置
        factory.setShareNativeConnection(false);
        return template;
    }
重启项目,测试
我们看一下RedisConnectionUtils.getConnection(factory)的具体实现
public static RedisConnection getConnection(RedisConnectionFactory factory) {
		return getConnection(factory, false);
	}
public static RedisConnection getConnection(RedisConnectionFactory factory, boolean enableTranactionSupport) {
		return doGetConnection(factory, true, false, enableTranactionSupport);
	}
public static RedisConnection doGetConnection(RedisConnectionFactory factory, boolean allowCreate, boolean bind,
			boolean enableTransactionSupport) {

		......

		if (log.isDebugEnabled()) {
			log.debug("Opening RedisConnection");
		}

		RedisConnection conn = factory.getConnection();

		......

		return conn;
	}
看factory.getConnection()
public RedisConnection getConnection() {

		if (isClusterAware()) {
			return getClusterConnection();
		}

		LettuceConnection connection;
		// 核心代码
		if (pool != null) {
			connection = new LettuceConnection(getSharedConnection(), getTimeout(), null, pool, getDatabase());
		} else {
			connection = new LettuceConnection(getSharedConnection(), connectionProvider, getTimeout(), getDatabase());
		}

		connection.setConvertPipelineAndTxResults(convertPipelineAndTxResults);
		return connection;
	}
这个有个poll的判断,我们肯定会以为这个就是我们配置的连接池,但是发现这里是null,看一下赋值的地方
/**
	 * @param pool
	 * @deprecated since 2.0, use pooling via {@link LettucePoolingClientConfiguration}.
	 */
	@Deprecated
	public LettuceConnectionFactory(LettucePool pool) {

		this(new MutableLettuceClientConfiguration());
		this.pool = pool;
	}
发现可以通过构造方法传入这个pool,但是标记了过时,注释说2.0版本已经使用LettucePoolingClientConfiguration,也就是说老版本可以通过自己传入LettucePool来使用连接池,但是现在已经不推荐使用了,这里应该只是做兼容的
接下来我们进入else的逻辑,先调试下getSharedConnection(),发现为null,这个方法就是默认情况下返回共享本地连接的,这里设置为false了所以为null,然后看下connectionProvider这个对象

我们看到了里面有个pools,查看发现配置的maxIdle和maxTotal对应的就是spring.redis.lettuce.pool.max-idle和spring.redis.lettuce.pool.max-active。
这就是我们自己配置的连接池,RedisTemplate现在就是基于这个连接池来创建和使用连接的
最后我们来测试下使用连接池和不使用的耗时差别
@GetMapping(value = "/timeTest")
    public String timeTest() throws ExecutionException, InterruptedException {
        ExecutorService service = Executors.newFixedThreadPool(8);
        List<Future> futures = new ArrayList<>();
        long t1 = System.currentTimeMillis();
        for (int i = 0; i < 8; i++) {
            String finKey = String.valueOf(i);
            Future future = service.submit(() -> {
                stringRedisTemplate.opsForValue().set("aa" + finKey, "bb", 1, TimeUnit.HOURS);
            });
            futures.add(future);
        }
        for (Future future : futures) {
            future.get();
        }
        System.out.println("耗时:" + (System.currentTimeMillis() - t1) + "ms");
        return "OK";
    }
1、不使用连接池,多次调用结果
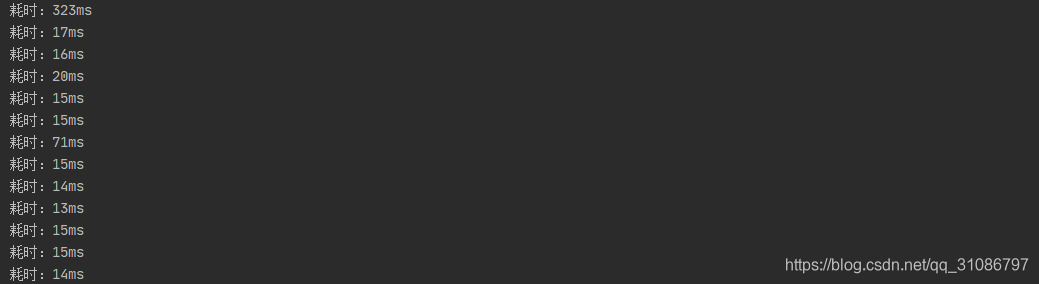
把线程池调整为100,创建100个任务测试
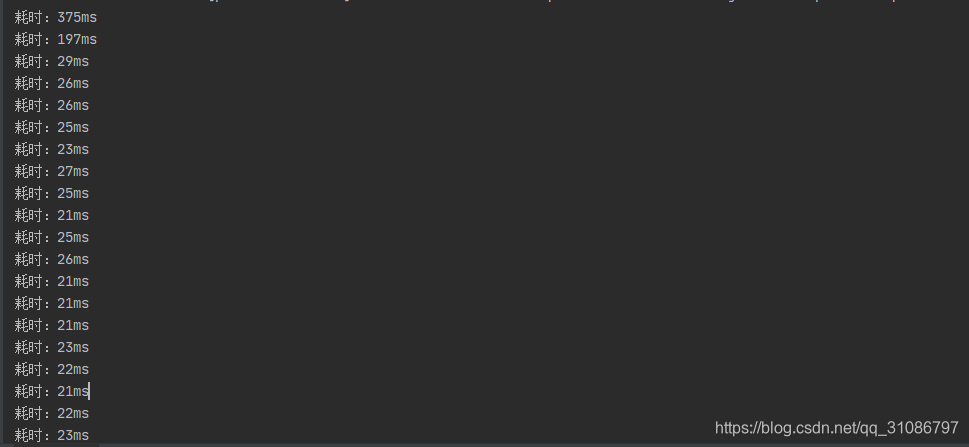
2、使用连接池
把线程池调整为100,创建100个任务测试

总结
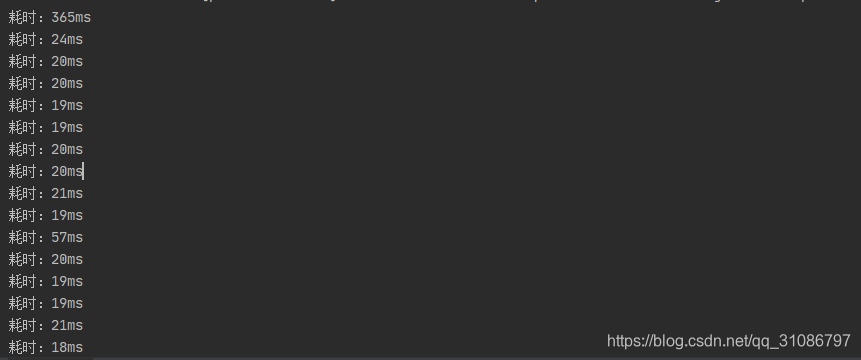
从测试结果来看,发现使用了线程池后在高并发场景下反而更加耗时了,可能这和服务器配置有关,笔者的服务器CPU只有一个核心,导致了CPU的时间片不断切换
从上可以看出,默认情况下RedisTemplate是不使用连接池的,并且性能还是不错的
最终要不要使用连接池,我觉得不能一概而论,可以进行压测,如果觉得性能不够再考虑是否使用连接池,以及连接池配置的大小
最后附上一个官网的文档链接:https://docs.spring.io/spring-data/redis/docs/2.3.9.RELEASE/reference/html/#redis:connectors:connection

为开发者提供学习成长、分享交流、生态实践、资源工具等服务,帮助开发者快速成长。
更多推荐


 15
15 0
0- 0


 已为社区贡献2条内容

所有评论(0)