SpringDataJPA融合esSearch
(,)1、将MySQL驱动包放到下面2、创建一个.config文件,这里我创建的是执行频率statement :过滤执行的sql语句,可以根据创建时间去筛选新增数据如我的input{jdbc{# 指定jdbc驱动包位置(不同版本处理不同,此处可直接将mysql驱动包放置logstash-core/lib/jars下,无需配置jdbc_driver_library)# 要使用的驱动包类# mysql
1、准备
es官网(下载logstash-6.3.2,kibana-6.3.2-windows-x86_64,elasticsearch-6.3.2)
SpringDataJPA的elasticsearch的API文档
1.1使用logstash导入MySQL数据
1、将MySQL驱动包放到logstash-6.3.2\logstash-core\lib\jars下面
2、创建一个.config文件,这里我创建的是Mmysql.conf
schedule :执行频率
statement :过滤执行的sql语句,可以根据创建时间去筛选新增数据
如
select * FROM t_blog
WHERE update_time > :sql_last_value
AND update_time < NOW()
ORDER BY update_time desc
我的 Mmysql.conf如下所示
input{
jdbc{
# 指定jdbc驱动包位置(不同版本处理不同,此处可直接将mysql驱动包放置logstash-core/lib/jars下,无需配置jdbc_driver_library)
# jdbc_driver_library => "D:\\esLearn\\logstash-6.3.2\\logstash-6.3.2\\mysql-connector-java-5.1.38.jar"
# 要使用的驱动包类
jdbc_driver_class => "com.mysql.jdbc.Driver"
# mysql数据库的连接信息
jdbc_connection_string => "jdbc:mysql://127.0.0.1:3306/learn_es"
# mysql用户
jdbc_user => "root"
# mysql密码
jdbc_password => "root"
# 定时任务,多久执行一次查询,默认一分钟,如果想要没有延迟,可以使用 schedule => "* * * * * *"
schedule => "* * * * *"
# 清空上传的sql_last_value记录
clean_run => true
# 要执行的语句
statement => "select * FROM medical"
}
}output {
elasticsearch{
# es host : port
hosts => ["127.0.0.1:9200"]
# 索引
index => "medical"
# _id (取到mysql数据库记录的id)
document_id => "%{id}"
}
}
进入logstash运行指定的config文件
bin/logstash -f config/Mmysql.conf
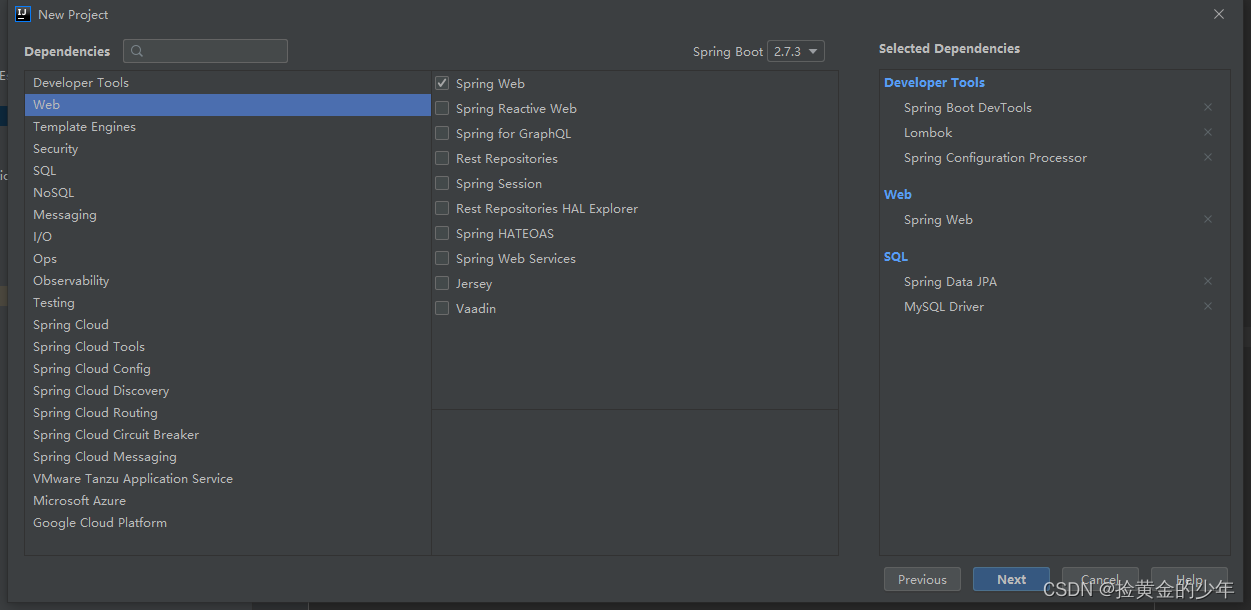
2、创建项目JPA项目
创建一个JPA项目
Spring版本对应的ES版本信息
下表显示了 Spring Data 发布系列使用的 Elasticsearch 版本和其中包含的 Spring Data Elasticsearch 版本,以及引用该特定 Spring Data 发布系列的 Spring Boot 版本。给出的 Elasticsearch 版本显示了 Spring Data Elasticsearch 是使用哪些客户端库构建和测试的。

因为用的是elasticsearch-6.3.2,所以springboot用的版本为2.1.6
<parent>
    <groupId>org.springframework.boot</groupId>
    <artifactId>spring-boot-starter-parent</artifactId>
    <version>2.1.6.RELEASE</version>
    <relativePath/> <!-- lookup parent from repository -->
</parent>
1、pom文件如下
<?xml version="1.0" encoding="UTF-8"?>
<project xmlns="http://maven.apache.org/POM/4.0.0" xmlns:xsi="http://www.w3.org/2001/XMLSchema-instance"
xsi:schemaLocation="http://maven.apache.org/POM/4.0.0 https://maven.apache.org/xsd/maven-4.0.0.xsd">
<modelVersion>4.0.0</modelVersion>
<parent>
<groupId>org.springframework.boot</groupId>
<artifactId>spring-boot-starter-parent</artifactId>
<version>2.1.6.RELEASE</version>
<relativePath/> <!-- lookup parent from repository -->
</parent>
<groupId>com.example</groupId>
<artifactId>learn_es</artifactId>
<version>0.0.1-SNAPSHOT</version>
<name>learn_es</name>
<description>Demo project for Spring Boot</description>
<properties>
<java.version>1.8</java.version>
</properties>
<dependencies>
<dependency>
<groupId>org.springframework.boot</groupId>
<artifactId>spring-boot-starter-data-jpa</artifactId>
</dependency>
<!--引入elasticsearch-->
<dependency>
<groupId>org.springframework.boot</groupId>
<artifactId>spring-boot-starter-data-elasticsearch</artifactId>
<!-- <version>2.2.0.RELEASE</version>-->
<!-- <version>2.2.0.RELEASE</version><!–限定版本,如果不指定则与springboot版本一致–>-->
</dependency>
<dependency>
<groupId>org.springframework.boot</groupId>
<artifactId>spring-boot-starter-web</artifactId>
</dependency>
<dependency>
<groupId>org.springframework.boot</groupId>
<artifactId>spring-boot-devtools</artifactId>
<scope>runtime</scope>
<optional>true</optional>
</dependency>
<dependency>
<groupId>mysql</groupId>
<artifactId>mysql-connector-java</artifactId>
<scope>runtime</scope>
</dependency>
<dependency>
<groupId>org.springframework.boot</groupId>
<artifactId>spring-boot-configuration-processor</artifactId>
<optional>true</optional>
</dependency>
<dependency>
<groupId>org.projectlombok</groupId>
<artifactId>lombok</artifactId>
<optional>true</optional>
</dependency>
<dependency>
<groupId>org.springframework.boot</groupId>
<artifactId>spring-boot-starter-test</artifactId>
<scope>test</scope>
</dependency>
</dependencies>
<build>
<plugins>
<plugin>
<groupId>org.springframework.boot</groupId>
<artifactId>spring-boot-maven-plugin</artifactId>
<configuration>
<excludes>
<exclude>
<groupId>org.projectlombok</groupId>
<artifactId>lombok</artifactId>
</exclude>
</excludes>
</configuration>
</plugin>
</plugins>
</build>
</project>
2、application.yml如下
server:
  port: 8081
spring:
  #数据库配置
  datasource:
    driver-class-name: com.mysql.jdbc.Driver
    url: jdbc:mysql://localhost:3306/learn_es?useSSL=false&useUnicode=true&characterEncoding=utf-8&zeroDateTimeBehavior=convertToNull&transformedBitIsBoolean=true&serverTimezone=Asia/Shanghai&nullCatalogMeansCurrent=true&allowPublicKeyRetrieval=true&noAccessToProcedureBodies=true
    username: root
    password: root
    # hikari 数据源专用配置(spring data jpa默认使用hikari数据库连接池)
    hikari:
      maximum-pool-size: 20
      minimum-idle: 5

  # jpa相关配置
  jpa:
    hibernate:
      ddl-auto: update
    show-sql: true
    # 数据库方言
    database-platform: org.hibernate.dialect.MySQLDialect

  # es 配置
  data:
    elasticsearch:
      cluster-name: my-application
      cluster-nodes: 127.0.0.1:9300


  # mvc 静态资源映射
  mvc:
    static-path-pattern: /**

  # 静态资源热部署
  devtools:
    livereload:
      enabled: true
    restart:
      additional-paths: static/**

  # 日期格式化
  jackson:
    date-format: yyyy-MM-dd HH:mm:ss
主要的 elasticsearch 配置如下
data:
  elasticsearch:
    cluster-name: my-application
    cluster-nodes: 127.0.0.1:9300
在 elasticsearch 的conf目录下面的elasticsearch.yml中加入
# Use a descriptive name for your cluster:
cluster.name: my-application# Set the bind address to a specific IP (IPv4 or IPv6):
network.host: 127.0.0.1
3、entity实体类建立
@Data
@Document(indexName = "medical",useServerConfiguration = true, createIndex = false)
public class EsMedical {

    @Id
    private Long id;
    @Field(type = FieldType.Text, analyzer = "ik_max_word")
    private String name;
    @Field(type = FieldType.Text, analyzer = "ik_max_word")
    private String cause;
    @Field(type = FieldType.Text, analyzer = "ik_max_word")
    private String complication;
    @Field(type = FieldType.Text, analyzer = "ik_max_word")
    private String cure;
    @Field(type = FieldType.Text, analyzer = "ik_max_word")
    private String diagnose;
    @Field(type = FieldType.Text, analyzer = "ik_max_word")
    private String intro;
    @Field(type = FieldType.Text, analyzer = "ik_max_word")
    private String prevent;
    @Field(type = FieldType.Text, analyzer = "ik_max_word")
    private String symptom;
}
@Document: 应用于类级别,表示该类是映射到数据库的候选。最重要的属性是:
indexName:存储该实体的索引名称。这可以包含一个 SpEL 模板表达式,如 “log-#{T(java.time.LocalDate).now().toString()}”
type:映射类型。如果未设置,则使用类的小写简单名称。(自 4.0 版起已弃用)
createIndex: 标记是否在存储库引导时创建索引。默认值为true。请参阅使用相应映射自动创建索引
versionType: 版本管理的配置。默认值为EXTERNAL。
@Id:应用于字段级别以标记用于标识目的的字段。
@Transient: 默认情况下,所有字段在存储或检索时都映射到文档,此注释不包括该字段。
@PersistenceConstructor: 标记给定的构造函数 - 甚至是受包保护的构造函数 - 在从数据库实例化对象时使用。构造函数参数按名称映射到检索到的文档中的键值。
@Field:应用于字段级别,定义字段的属性,大部分属性映射到各自的Elasticsearch Mapping定义
name: 字段名称,因为它将在 Elasticsearch 文档中表示,如果未设置,则使用 Java 字段名称。
type:字段类型,可以是Text、Keyword、Long、Integer、Short、Byte、Double、Float、Half_Float、Scaled_Float、Date、Date_Nanos、Boolean、Binary、Integer_Range、Float_Range、Long_Range、Double_Range、Date_Range、Ip_Range、Object之一, 嵌套, Ip, TokenCount, Percolator, Flattened, Search_As_You_Type。查看Elasticsearch 映射类型
format:一种或多种内置日期格式
pattern:一种或多种自定义日期格式
store: 标志是否应将原始字段值存储在 Elasticsearch 中,默认值为false。
analyzer:分词器的类型
4、repository的建立
继承ElasticsearchRepository()传入两个参数,第一个是entity实体类,第二个是ID的类型
@Repository
public interface EsMedicalRepository extends ElasticsearchRepository<EsMedical, Long> {
    List<EsMedical> findAllByName(String name);
}

继承的结构如下,所以也具有jpa框架增删改查的属性的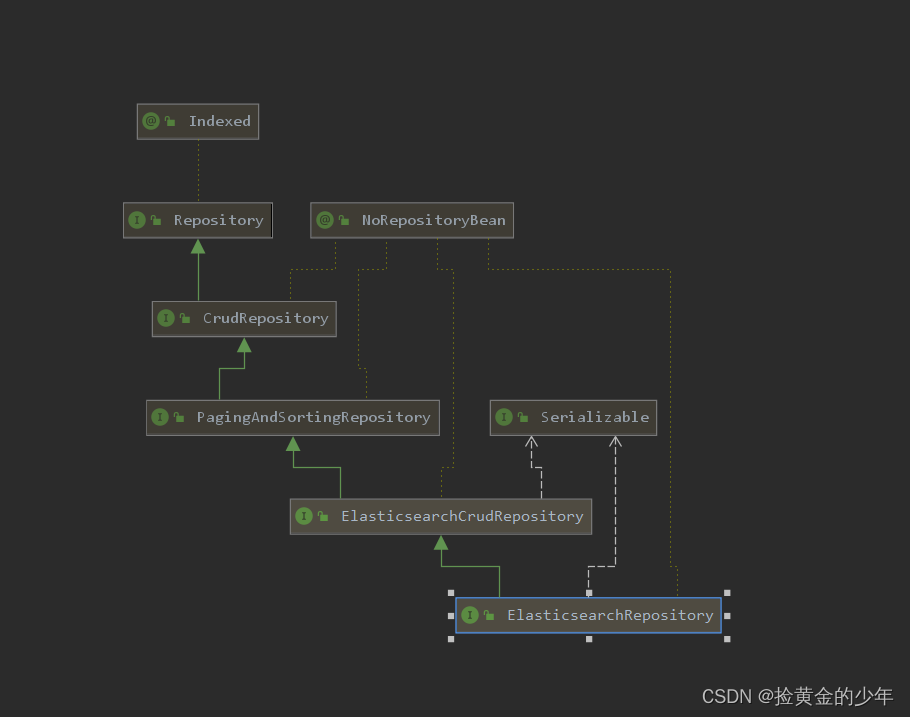
5、controller层调用方法
1、通过名称查询数据
@GetMapping("/estestOne2")
public Object esblogy(@RequestParam String name) {
    System.out.println(name);
    List<EsBlog> byTitle = esBlogRepository.findByTitle(name);
    return byTitle;
}
2、通过 两个字段模糊查询
  @RequestMapping("/estestTwo")
    public Object esblogyyyy(@RequestParam String name,@RequestParam String nameTwo) {
        System.out.println(name);
        System.out.println(nameTwo);
        NativeSearchQueryBuilder nativeSearchQueryBuilder = new NativeSearchQueryBuilder();
        BoolQueryBuilder builder = QueryBuilders.boolQuery();
        builder.should(QueryBuilders.matchPhraseQuery("diagnose",name));
        builder.should(QueryBuilders.matchPhraseQuery("cure",nameTwo));
        Page<EsMedical>  search = (Page<EsMedical>) esMedicalRepository.search(builder);

        long totalElements = search.getTotalElements();
        return search;
    }
打印的builder,也就是NativeSearchQueryBuilder 拼接的查询sql如下所示

sql类似这样
diagnose LIKE "%10~20岁%" or cure LIKE "%或者相关医疗%"
kibana中的语法为
GET medical/_search
{
"query":{
"bool":{
"should": [
{
"match_phrase": {
"diagnose":"10~20岁"
}
},
{
"match_phrase": {
"cure":"或者相关医疗"
}
}
]
}
}
}
3、kibana的使用
下载与elasticsearch相同版本的kibana
1、查询全部(查询所有索引的信息)
GET _all

2、查看数据表所有信息 ,medical为索引
GET medical/_search
{
"query": {"match_all": {}
}
}

3、条件查询
关键词 must、filter、should、must_not
描述
must
查询的结果必须匹配查询条件,并计算score
filter
查询的结果必须匹配查询条件,和must不同不会计算score
should
查询结果必须符合查询条件中的一个或多个
must_not
查询结果必须不符合查询条件
有时我们在查询es时,希望能够一次返回符合多个查询条件的结果,如多个时间范围查询、多个项的查询等。
GET medical/_search
{
"query":{
"bool":{
"must": [
{
"match_phrase": {
"diagnose":"10~20岁"
}
},
{
"match_phrase": {
"cure":"或者相关医疗"
}
}
]
}
}
}

liunx安装es
1、下载es,我下载的是elasticsearch-6.3.2.tar.gz
上传到home/es
cd /home/es
2、解压文件
tar -xzvf elasticsearch-6.3.2.tar.gz
mv elasticsearch-6.3.2.tar.gz elasticsearch
3、创建一个用户
先新建一个用户(出于安全考虑,elasticsearch默认不允许以root账号运行。)
useradd esuser
passwd esuser
4、先将es文件夹下的所有目录的所有权限迭代给esuser用户
chgrp -R esuser ./es
chown -R esuser ./es
chmod 777 es
5、修改 /etc/security/limits.conf文件 增加内存配置(添加配置后,要关闭客户端,重新登录才能生效)
vi /etc/security/limits.conf
* soft nofile 65536
* hard nofile 65536
如果下面这样,则配置正常
[root@localhost plugins]# ulimit -Hn
65536
[root@localhost plugins]# ulimit -Sn
65536
修改sysctl.conf配置文件,文件最后添加一行 vm.max_map_count=655360 添加完毕之后
vi /etc/sysctl.confvm.max_map_count=655360
6、elasticsearch.yml
我的配置如下
# ======================== Elasticsearch Configuration =========================
#
# NOTE: Elasticsearch comes with reasonable defaults for most settings.
# Before you set out to tweak and tune the configuration, make sure you
# understand what are you trying to accomplish and the consequences.
#
# The primary way of configuring a node is via this file. This template lists
# the most important settings you may want to configure for a production cluster.
#
# Please consult the documentation for further information on configuration options:
# https://www.elastic.co/guide/en/elasticsearch/reference/index.html
#
# ---------------------------------- Cluster -----------------------------------
#
# Use a descriptive name for your cluster:
#
#cluster.name: my-application
#
# ------------------------------------ Node ------------------------------------
#
# Use a descriptive name for the node:
#
#node.name: node-1
#
# Add custom attributes to the node:
#
#node.attr.rack: r1
#
# ----------------------------------- Paths ------------------------------------
#
# Path to directory where to store the data (separate multiple locations by comma):
#
#path.data: /path/to/data
#
# Path to log files:
#
#path.logs: /path/to/logs
#
# ----------------------------------- Memory -----------------------------------
#
# Lock the memory on startup:
#
#bootstrap.memory_lock: true
#
# Make sure that the heap size is set to about half the memory available
# on the system and that the owner of the process is allowed to use this
# limit.
#
# Elasticsearch performs poorly when the system is swapping the memory.
#
# ---------------------------------- Network -----------------------------------
#
# Set the bind address to a specific IP (IPv4 or IPv6):
#.
cluster.name: my-application
network.host: 0.0.0.0
bootstrap.memory_lock: false
bootstrap.system_call_filter: false
#
# Set a custom port for HTTP:
#
http.port: 9222
transport.tcp.port : 9333
#
# For more information, consult the network module documentation.
#
# --------------------------------- Discovery ----------------------------------
#
# Pass an initial list of hosts to perform discovery when new node is started:
# The default list of hosts is ["127.0.0.1", "[::1]"]
#
#discovery.zen.ping.unicast.hosts: ["host1", "host2"]
#
# Prevent the "split brain" by configuring the majority of nodes (total number of master-eligible nodes / 2 + 1):
#
#discovery.zen.minimum_master_nodes:
#
# For more information, consult the zen discovery module documentation.
#
# ---------------------------------- Gateway -----------------------------------
#
# Block initial recovery after a full cluster restart until N nodes are started:
#
#gateway.recover_after_nodes: 3
#
# For more information, consult the gateway module documentation.
#
# ---------------------------------- Various -----------------------------------
#
# Require explicit names when deleting indices:
#
#action.destructive_requires_name: true
可以根据下面配置 elasticsearch,下面conf目录下面elasticsearch.yml信息

启动 elasticsearch
su esuser
//启动可以查看到日志信息
./bin/elasticsearch
//那个后台运行
elasticsearch -d

为开发者提供学习成长、分享交流、生态实践、资源工具等服务,帮助开发者快速成长。
更多推荐


 0
0 0
0- 0


 已为社区贡献5条内容

所有评论(0)