Spring事务原理分析(一)--@EnableTransactionManagement 到底做了什么?
目录一、概述二、事务的ACID属性三、事务的隔离级别四、事务的传播行为五、Spring声明式事务环境搭建六、@EnableTransactionManagement分析七、AutoProxyRegistrar类分析八、ProxyTransactionManagementConfiguration类分析九、总结一、概述在分析Spring事务原理之前,我们有必要先回顾下数据库事务相关的知识。如事务的概
目录
六、@EnableTransactionManagement分析
八、ProxyTransactionManagementConfiguration类分析
一、概述
在分析Spring事务原理之前,我们有必要先回顾下数据库事务相关的知识。如事务的概念、事务的属性、事务隔离级别、事务传播行为等。
首先介绍一些什么是事务?
事务由单独单元的一个或者多个sql语句组成,在这个单元中,每个mysql语句是相互依赖的。而整个单独单元作为一个不可分割的整体,如果单元中某条sql语句一旦执行失败或者产生错误,整个单元将会回滚,也就是所有受到影响的数据将会返回到事务开始以前的状态;如果单元中的所有sql语句均执行成功,则事务被顺利执行。一般来说,我们说的事务单指“数据库事务”,接下来我们会以MySQL数据库、Spring声明式事务为主要研究对象。
二、事务的ACID属性
提到事务,不可避免需要涉及到事务的ACID属性:
- 原子性(atomicity):事务作为一个整体被执行,包含在其中的对数据库的操作要么全部被执行,要么都不执行;
- 一致性(consistency):事务应确保数据库的状态从一个一致状态转变为另一个一致状态。一致状态的含义是数据库中的数据应满足完整性约束;
- 隔离性(isolation):多个事务并发执行时,一个事务的执行不应影响其他事务的执行;
- 持久性(durability): 事务一旦提交,对数据库的修改应该永久保存在数据库中;
三、事务的隔离级别
MySQL的InnoDB引擎提供四种隔离级别:
- ①读未提交(READ UNCOMMITTED)
事务中的修改,即使没有提交,对其他事务也是可见的,也就是说事务可以读取到未提交的数据,这也被称为脏读。
- ②读已提交(READ COMMITTED)
一个事务从开始到提交之前,所做的任何修改对其他事务都是不可见的,这个级别有时候也叫不可重复读,因为两次执行同样的查询,可能会得到不一样的结果。
- ③可重复读(REPEATABLE READ)
该隔离级别保证了在同一个事务中多次读取同样的记录的结果是一致的,但是无法解决另外一个幻读的问题,所谓的幻读就是指当某个事务在读取某个范围内的记录是,另外一个事务又在该范围内插入了新的记录,当之前的事务再次读取该范围的记录时就会产生幻行。
- ④可串行化(SERIALIZABLE)
SERIALIZABLE是最高的隔离级别,通过强制事务的串行执行,避免了前面说的幻读问题,简单来说,SERIALIZABLE会在读取的每一行数据上加上锁。
四、事务的传播行为
Spring针对方法嵌套调用时事务的创建行为定义了七种事务传播机制,分别是:
| 传播行为 | 含义 |
| PROPAGATION_REQUIRED | 这是默认的传播属性,如果外部调用方有事务,将会加入到事务,没有的话新建一个。 |
| PROPAGATION_SUPPORTS | 表示当前方法不必需要具有一个事务上下文,但是如果有一个事务的话,它也可以在这个事务中运行(如果当前存在事务,则加入到该事务;如果当前没有事务,则以非事务的方式继续运行。) |
| PROPAGATION_MANDATORY | 表示当前方法必须在一个事务中运行,如果没有事务,将抛出异常 |
| PROPAGATION_NESTED | 表示如果当前方法正有一个事务在运行中,则该方法应该运行在一个嵌套事务中,被嵌套的事务可以独立于被封装的事务中进行提交或者回滚。如果封装事务存在,并且外层事务抛出异常回滚,那么内层事务必须回滚,反之,内层事务并不影响外层事务。如果封装事务不存在,则同PROPAGATION_REQUIRED的一样 |
| PROPAGATION_NEVER | 表示当前方法务不应该在一个事务中运行,如果存在一个事务,则抛出异常 |
| PROPAGATION_REQUIRES_NEW | 表示当前方法必须运行在它自己的事务中。一个新的事务将启动,而且如果有一个现有的事务在运行的话,则这个方法将在运行期被挂起,直到新的事务提交或者回滚才恢复执行。 |
| PROPAGATION_NOT_SUPPORTED | 以非事务方式运行,如果当前存在事务,则把当前事务挂起 |
五、Spring声明式事务环境搭建
笔者这里是在Spring源码里面新建了一个子模块搭建事务功能测试环境,所以使用的是Gradle进行构建。当然也可以使用maven搭建。
- (一)、build.gradle:添加Druid数据源、mysql驱动等依赖
description = "spring test demo"

dependencies {
    compile(project(":spring-beans"))
    compile(project(":spring-core"))
    compile(project(":spring-context"))
    compile(project(":spring-tx"))
    compile(project(":spring-jdbc"))
    implementation 'com.alibaba:druid:1.1.10'
    compile ("mysql:mysql-connector-java:5.1.24")
}

repositories {
    mavenLocal()
    maven { url "https://maven.aliyun.com/nexus/content/groups/public" }
    maven { url "https://repo.springsource.org/plugins-release" }
    mavenCentral()
}- (二)、定义Service接口以及实现类,实现类对应方法添加@Transactional开启声明式事务功能
public interface UserService {

    void insert();

}

@Service
public class UserServiceImpl implements UserService {

	@Autowired
	private UserDao userDao;

	@Override
	// 声明式事务
	@Transactional
	public void insert() {
		userDao.insert();
		System.out.println("插入完成");
//		int value = 1 / 0;
	}

}- (三)、定义持久层接口
@Repository
public class UserDao {

	@Autowired
	private JdbcTemplate jdbcTemplate;

	public void insert() {
		String sql = "INSERT INTO user(name, age) VALUES(?,?)";
		jdbcTemplate.update(sql, "lisi", 20);
	}

}- (四)、定义事务配置类
使用@EnableTransactionManagement开启Spring注解版事务功能,并往容器中注册DataSource、JdbcTemplate、PlatformTransactionManager这三个bean对象。
import com.alibaba.druid.pool.DruidDataSource;
import org.springframework.context.annotation.Bean;
import org.springframework.context.annotation.ComponentScan;
import org.springframework.context.annotation.Configuration;
import org.springframework.jdbc.core.JdbcTemplate;
import org.springframework.jdbc.datasource.DataSourceTransactionManager;
import org.springframework.transaction.PlatformTransactionManager;
import org.springframework.transaction.annotation.EnableTransactionManagement;

import javax.sql.DataSource;

// 开启Spring注解版事务功能
@EnableTransactionManagement
@Configuration
@ComponentScan("com.wsh.transaction")
public class TxConfig {

	/**
	 * 数据源配置
	 */
	@Bean
	public DataSource dataSource() {
		DruidDataSource dataSource = new DruidDataSource();
		dataSource.setUsername("root");
		dataSource.setPassword("0905");
		dataSource.setUrl("jdbc:mysql://localhost:3306/test?useSSL=false&serverTimezone=Asia/Shanghai");
		dataSource.setDriverClassName("com.mysql.jdbc.Driver");
		return dataSource;
	}

	@Bean
	public JdbcTemplate jdbcTemplate(DataSource dataSource) {
		return new JdbcTemplate(dataSource);
	}

	/**
	 * 事务管理器
	 */
	@Bean
	public PlatformTransactionManager platformTransactionManager() {
		return new DataSourceTransactionManager(dataSource());
	}
}
- (五)、客户端类
public class Client {

	public static void main(String[] args) {
		AnnotationConfigApplicationContext annotationConfigApplicationContext = new AnnotationConfigApplicationContext(TxConfig.class);
		UserService userService = (UserService) annotationConfigApplicationContext.getBean("userServiceImpl");
		System.out.println(userService);
		userService.insert();
	}

}
六、@EnableTransactionManagement分析
在前面的例子中,我们使用@EnableTransactionManagement开启了Spring注解版本的事务功能,所以我们从@EnableTransactionManagement注解开始分析Spring事务的整体流程。
先来看看@EnableTransactionManagement注解的源码:
@Target(ElementType.TYPE)
@Retention(RetentionPolicy.RUNTIME)
@Documented
// 开启Spring事务支持
// 通过@EnableTransactionManagement引入TransactionManagementConfigurationSelector组件,进而导入两个bean:
// a、AutoProxyRegistrar
// b、ProxyTransactionManagementConfiguration
@Import(TransactionManagementConfigurationSelector.class)
public @interface EnableTransactionManagement {

	/**
	 * 使用JDK动态代理还是Cglib动态代理,默认是false,但前提是AdviceMode必须是PROXY才适用
	 */
	boolean proxyTargetClass() default false;

	/**
	 * 通知的模式,默认是PROXY,还有一种是ASPECTJ
	 */
	AdviceMode mode() default AdviceMode.PROXY;

	/**
     * 指定通知器的执行顺序
	 */
	int order() default Ordered.LOWEST_PRECEDENCE;

}
通过@EnableTransactionManagement的源码,我们看到,使用@Import注解@Import(TransactionManagementConfigurationSelector.class)注入了TransactionManagementConfigurationSelector类。
TransactionManagementConfigurationSelector间接实现了ImportSelector接口,先来看看ImportSelector有什么作用?
public interface ImportSelector {

	String[] selectImports(AnnotationMetadata importingClassMetadata);

}
ImportSelector接口只定义了一个方法selectImports(),用于指定需要注册为bean的Class名称。当在@Configuration标注的Class上使用@Import引入了一个ImportSelector实现类后,会把实现类中返回的Class名称都定义为bean。
我们再回来看TransactionManagementConfigurationSelector类的selectImports()方法返回了什么Class名称。
protected String[] selectImports(AdviceMode adviceMode) {
    switch (adviceMode) {
        case PROXY:
            return new String[] {
                AutoProxyRegistrar.class.getName(),
                // 导入了BeanFactoryTransactionAttributeSourceAdvisor组件,bean名称为"org.springframework.transaction.config.internalTransactionAdvisor"
                ProxyTransactionManagementConfiguration.class.getName()};
        case ASPECTJ:
            return new String[] {determineTransactionAspectClass()};
        default:
            return null;
    }
}
selectImports()方法根据@EnableTransactionManagement注解指定的AdviceMode,分别返回不同的Class名称。
这里我们以默认的AdviceMode.PROXY模式为例,返回了两个bean的名称:
- (1). AutoProxyRegistrar
- (2). ProxyTransactionManagementConfiguration
七、AutoProxyRegistrar类分析
public class AutoProxyRegistrar implements ImportBeanDefinitionRegistrar {

	private final Log logger = LogFactory.getLog(getClass());

	@Override
	// org.springframework.context.annotation.AutoProxyRegistrar.registerBeanDefinitions
	public void registerBeanDefinitions(AnnotationMetadata importingClassMetadata, BeanDefinitionRegistry registry) {
		boolean candidateFound = false;
		Set<String> annTypes = importingClassMetadata.getAnnotationTypes();
		for (String annType : annTypes) {
			// 获取注解的属性
			AnnotationAttributes candidate = AnnotationConfigUtils.attributesFor(importingClassMetadata, annType);
			if (candidate == null) {
				continue;
			}
			// 模式
			Object mode = candidate.get("mode");
			Object proxyTargetClass = candidate.get("proxyTargetClass");
			if (mode != null && proxyTargetClass != null && AdviceMode.class == mode.getClass() &&
					Boolean.class == proxyTargetClass.getClass()) {
				candidateFound = true;
				if (mode == AdviceMode.PROXY) {
					// 注册自动代理创建器:InfrastructureAdvisorAutoProxyCreator
					AopConfigUtils.registerAutoProxyCreatorIfNecessary(registry);

					if ((Boolean) proxyTargetClass) {
						AopConfigUtils.forceAutoProxyCreatorToUseClassProxying(registry);
						return;
					}
				}
			}
		}
		if (!candidateFound && logger.isInfoEnabled()) {
			String name = getClass().getSimpleName();
			logger.info(String.format("%s was imported but no annotations were found " +
					"having both 'mode' and 'proxyTargetClass' attributes of type " +
					"AdviceMode and boolean respectively. This means that auto proxy " +
					"creator registration and configuration may not have occurred as " +
					"intended, and components may not be proxied as expected. Check to " +
					"ensure that %s has been @Import'ed on the same class where these " +
					"annotations are declared; otherwise remove the import of %s " +
					"altogether.", name, name, name));
		}
	}

}

// org.springframework.aop.config.AopConfigUtils#registerAutoProxyCreatorIfNecessary
public static BeanDefinition registerAutoProxyCreatorIfNecessary(BeanDefinitionRegistry registry) {
    return registerAutoProxyCreatorIfNecessary(registry, null);
}

public static BeanDefinition registerAutoProxyCreatorIfNecessary(
    BeanDefinitionRegistry registry, @Nullable Object source) {
    // 注册或者升级InfrastructureAdvisorAutoProxyCreator组件
    return registerOrEscalateApcAsRequired(InfrastructureAdvisorAutoProxyCreator.class, registry, source);
}
从源码可以看到,AutoProxyRegistrar实现了ImportBeanDefinitionRegistrar接口,ImportBeanDefinitionRegistrar接口内部定义了registerBeanDefinitions()方法实现向容器中注册bean的功能。
AutoProxyRegistrar#registerBeanDefinitions()方法中注册了自动代理创建器:InfrastructureAdvisorAutoProxyCreator。接下来看看InfrastructureAdvisorAutoProxyCreator是什么东西?
先看看InfrastructureAdvisorAutoProxyCreator的层级关系:
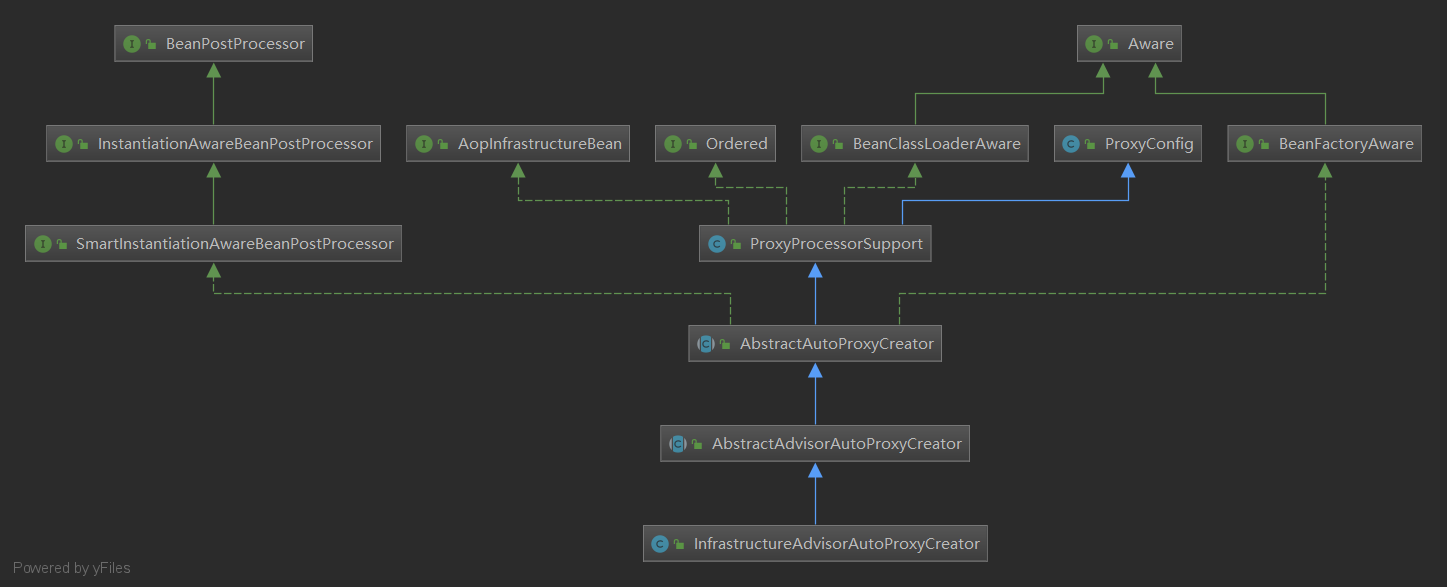
我们看到,InfrastructureAdvisorAutoProxyCreator类跟我们前面介绍到的AOP类一样,根父类也是AbstractAutoProxyCreator。主要分析下面两点:
- (1)、实现了InstantiationAwareBeanPostProcessor接口
该接口有2个方法postProcessBeforeInstantiation()和postProcessAfterInstantiation(),其中实例化之前会执行postProcessBeforeInstantiation()方法:
InfrastructureAdvisorAutoProxyCreator中并没有实现postProcessBeforeInstantiation(),而是在其父类AbstractAutoProxyCreator中实现。
// AbstractAutoProxyCreator#postProcessBeforeInstantiation
// postProcessBeforeInstantiation()方法在bean实例化之前调用
public Object postProcessBeforeInstantiation(Class<?> beanClass, String beanName) {
    // 组装缓存key
    Object cacheKey = getCacheKey(beanClass, beanName);

    if (!StringUtils.hasLength(beanName) || !this.targetSourcedBeans.contains(beanName)) {
        // 如果advisedBeans缓存中已经存在,即当前正在创建的Bean已经被解析过,则直接返回null
        if (this.advisedBeans.containsKey(cacheKey)) {
            return null;
        }

        // 注意:AnnotationAwareAspectJAutoProxyCreator重写了isInfrastructureClass()方法.

        // 1.isInfrastructureClass():判断当前正在创建的Bean是否是基础的Bean(Advice、PointCut、Advisor、AopInfrastructureBean)
        // 2.shouldSkip():判断是否需要跳过(在这个方法内部,Spring Aop解析直接解析出我们的切面信息(并且把我们的切面信息进行缓存))
        // 满足两个条件其中之一,都将跳过,直接返回null
        if (isInfrastructureClass(beanClass) || shouldSkip(beanClass, beanName)) {
            this.advisedBeans.put(cacheKey, Boolean.FALSE);
            return null;
        }
    }

    // Create proxy here if we have a custom TargetSource.
    // Suppresses unnecessary default instantiation of the target bean:
    // The TargetSource will handle target instances in a custom fashion.

    // 获取用户自定义TargetSource(目标源)
    TargetSource targetSource = getCustomTargetSource(beanClass, beanName);
    if (targetSource != null) {
        if (StringUtils.hasLength(beanName)) {
            this.targetSourcedBeans.add(beanName);
        }
        // 获取目标对象的拦截器链
        Object[] specificInterceptors = getAdvicesAndAdvisorsForBean(beanClass, beanName, targetSource);
        // 创建AOP代理
        Object proxy = createProxy(beanClass, beanName, specificInterceptors, targetSource);
        this.proxyTypes.put(cacheKey, proxy.getClass());
        return proxy;
    }

    return null;
}
postProcessBeforeInstantiation()方法在bean实例化之前调用,主要是通过isInfrastructureClass(beanClass)方法判断当前正在创建的Bean是否是基础的Bean(Advice、PointCut、Advisor、AopInfrastructureBean);以及通过
shouldSkip(beanClass, beanName)方法判断是否需要跳过,在shouldSkip()方法内部,Spring Aop解析直接解析出我们的切面信息,并且把我们的切面信息进行缓存,后面我们创建代理对象时直接从缓存中获取使用。
关于isInfrastructureClass(beanClass)和shouldSkip(beanClass, beanName)方法的详细分析,读者朋友可以参考笔者在前面的Spring AOP原理分析中的文章呦~~
- (2)、实现了BeanPostProcessor接口
该接口有2个方法postProcessBeforeInitialization()和postProcessAfterInitialization(),其中组件初始化之后会执行postProcessAfterInitialization()(该方法创建Aop和事务的代理对象)方法:
// 所有Spring管理的bean在初始化后都会去调用所有BeanPostProcessor的postProcessAfterInitialization()方法
@Override
public Object postProcessAfterInitialization(@Nullable Object bean, String beanName) {
    // 如果bean非空的话,判断是否需要进行代理,需要代理的话则会进行包装
    if (bean != null) {
        // 获取缓存key:
        // a.如果beanName非空的话,则还会判断是否是FactoryBean,是FactoryBean的话使用"&+beanName"作为缓存key,否则直接使用beanName;
        // b.如果beanName为空,直接使用beanClass作为缓存key;
        Object cacheKey = getCacheKey(bean.getClass(), beanName);
        if (this.earlyProxyReferences.remove(cacheKey) != bean) {
            // 如果有必要的话,则执行具体的包装
            return wrapIfNecessary(bean, beanName, cacheKey);
        }
    }
    // 如果bean为空,则直接返回
    return bean;
}
所有Spring管理的bean在初始化后都会去调用所有BeanPostProcessor的postProcessAfterInitialization()方法,postProcessAfterInitialization()方法内部最主要的是完成了代理对象的创建工作,返回给容器中。
同样的,关于wrapIfNecessary(bean, beanName, cacheKey)方法的详细分析,读者朋友可以参考笔者在前面的Spring AOP原理分析中的文章呦~~
八、ProxyTransactionManagementConfiguration类分析
前面我们介绍了AutoProxyRegistrar组件,主要是向容器中注册了自动代理创建器---InfrastructureAdvisorAutoProxyCreator,它间接实现了InstantiationAwareBeanPostProcessor接口,在postProcessBeforeInstantiation()方法中完成了切面信息的解析工作,并进行缓存,后面创建代理对象时直接从缓存中获取使用。同时它还实现了BeanPostProcessor接口,在postProcessAfterInitialization()方法内部完成了代理对象的创建工作。
接下来,我们看TransactionManagementConfigurationSelector导入的另外一个组件---ProxyTransactionManagementConfiguration发挥了什么作用。
@Configuration
@Role(BeanDefinition.ROLE_INFRASTRUCTURE)
public class ProxyTransactionManagementConfiguration extends AbstractTransactionManagementConfiguration {

	/**
	 * 注册BeanFactoryTransactionAttributeSourceAdvisor增强器
	 */
	@Bean(name = TransactionManagementConfigUtils.TRANSACTION_ADVISOR_BEAN_NAME)
	@Role(BeanDefinition.ROLE_INFRASTRUCTURE)
	public BeanFactoryTransactionAttributeSourceAdvisor transactionAdvisor() {
		// 注册BeanFactoryTransactionAttributeSourceAdvisor增强器,beanName = "org.springframework.transaction.config.internalTransactionAdvisor"
		BeanFactoryTransactionAttributeSourceAdvisor advisor = new BeanFactoryTransactionAttributeSourceAdvisor();
		advisor.setTransactionAttributeSource(transactionAttributeSource());
		advisor.setAdvice(transactionInterceptor());
		if (this.enableTx != null) {
			advisor.setOrder(this.enableTx.<Integer>getNumber("order"));
		}
		return advisor;
	}

	/**
	 * 注册TransactionAttributeSource,类型是AnnotationTransactionAttributeSource
	 */
	@Bean
	@Role(BeanDefinition.ROLE_INFRASTRUCTURE)
	public TransactionAttributeSource transactionAttributeSource() {
		return new AnnotationTransactionAttributeSource();
	}

	/**
	 * 注册TransactionInterceptor,实现了MethodInterceptor接口,主要用于拦截事务方法的执行
	 */
	@Bean
	@Role(BeanDefinition.ROLE_INFRASTRUCTURE)
	public TransactionInterceptor transactionInterceptor() {
		TransactionInterceptor interceptor = new TransactionInterceptor();
		interceptor.setTransactionAttributeSource(transactionAttributeSource());
		if (this.txManager != null) {
			interceptor.setTransactionManager(this.txManager);
		}
		return interceptor;
	}

}
从源码中我们看到,ProxyTransactionManagementConfiguration是一个配置类,通过@Bean + @Configuration注解往容器中注册了三个Bean:
- (1). BeanFactoryTransactionAttributeSourceAdvisor增强器
- (2). TransactionAttributeSource,类型是AnnotationTransactionAttributeSource
- (3). TransactionInterceptor,实现了MethodInterceptor接口,主要用于拦截事务方法的执行
九、总结
最后,通过一张图总结一下@EnableTransactionManagement注解的作用:
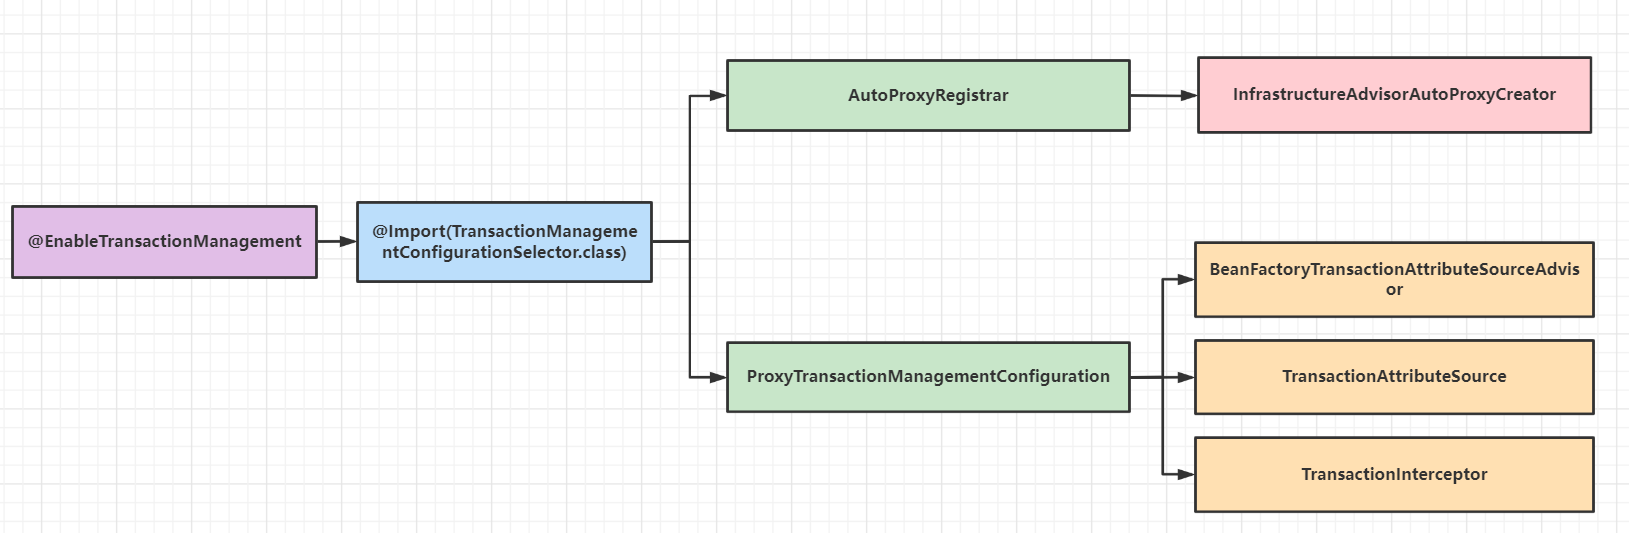
- AutoProxyRegistrar组件
主要是向容器中注册了自动代理创建器---InfrastructureAdvisorAutoProxyCreator,它间接实现了InstantiationAwareBeanPostProcessor接口,在postProcessBeforeInstantiation()方法中完成了切面信息的解析工作,并进行缓存,后面创建代理对象时直接从缓存中获取使用。同时它还实现了BeanPostProcessor接口,在postProcessAfterInitialization()方法内部完成了代理对象的创建工作。
- ProxyTransactionManagementConfiguration组件
通过@Bean + @Configuration注解往容器中注册了三个Bean:
- (1). BeanFactoryTransactionAttributeSourceAdvisor增强器;
- (2). TransactionAttributeSource,类型是AnnotationTransactionAttributeSource;
- (3). TransactionInterceptor,实现了MethodInterceptor接口,主要用于拦截事务方法的执行;

为开发者提供学习成长、分享交流、生态实践、资源工具等服务,帮助开发者快速成长。
更多推荐


 11
11 0
0- 0


 已为社区贡献12条内容

所有评论(0)