Linux安装MySql8.0详细教程
Linux中安装MySQL8.0教程本文主要介绍在CentOS7中,进行MySql数据库的下载、安装、删除 教程.
Linux 安装MySql8.0
文章目录
1、检查是否已安装MySql
检查Linux系统中是否已经安装了mysql,如果有,则使用rpm -e命令先卸载删除。
rpm -qa | grep mysql
如果没有任何输出,则表示未安装,如果有则输入以下命令进行删除:
rpm -e 需要卸载的rpm包
如果删除时提示有依赖,则输入强制删除命令:
rpm -e 需要卸载的rpm包 --nodeps
2、检查Linux版本
查看当前Linux的版本信息:
cat /etc/redhat-release
![[外链图片转存失败,源站可能有防盗链机制,建议将图片保存下来直接上传(img-Tc6CSOFg-1660707336964)(E:\BDQN\BCSP\课件笔记\Linux\07-Linux安装MySql8.0.assets\1658564451677.png)]](https://img-blog.csdnimg.cn/95ca5da4b7eb40c2817f6897f25f7870.png)
我的版本为: CentOS Linux release 7.9.2009 (Core)
3、下载并安装MySql
3.1查看MySql Yum存储库
MySQL Yum存储库: https://dev.mysql.com/downloads/repo/yum/

3.2下载mysql的rpm文件
3.2.1使用mkdir命令创建mysql文件夹
在 /opt/software目录下创建一个名称为mysql的文件夹。如果你/opt目录下还没有software文件目录,则先创建software目录:
mkdir software
cd software
mkdir mysql
博主这里之前创建过software目录,所以直接打开该目录输入mkdir mysql 就可以创建mysql的文件夹了
![[外链图片转存失败,源站可能有防盗链机制,建议将图片保存下来直接上传(img-COrY7AN9-1660707336967)(E:\BDQN\BCSP\课件笔记\Linux\07-Linux安装MySql8.0.assets\1658565505903.png)]](https://img-blog.csdnimg.cn/c36602f577ba481ab495345b5ebe9a7a.png)
3.2.2使用wget命令将mysql的rpm文件下载到刚创建的mysql文件夹中:
wget https://dev.mysql.com/get/mysql80-community-release-el7-5.noarch.rpm
![[外链图片转存失败,源站可能有防盗链机制,建议将图片保存下来直接上传(img-EWfcSBo1-1660707336968)(E:\BDQN\BCSP\课件笔记\Linux\07-Linux安装MySql8.0.assets\1658565816784.png)]](https://img-blog.csdnimg.cn/73cd45c61f484123ba399fe67ecfe072.png)
查看mysql文件夹中的
mysql80-community-release-el7-5.noarch.rpm文件
![[外链图片转存失败,源站可能有防盗链机制,建议将图片保存下来直接上传(img-RftGEtAU-1660707336969)(E:\BDQN\BCSP\课件笔记\Linux\07-Linux安装MySql8.0.assets\1658565879690.png)]](https://img-blog.csdnimg.cn/221189d2552e452e8db5989af9de5615.png)
3.3开始安装mysql源
3.3.1使用
sudo rpm -Uvh命令安装mysql源:
sudo rpm -Uvh mysql80-community-release-el7-5.noarch.rpm
![[外链图片转存失败,源站可能有防盗链机制,建议将图片保存下来直接上传(img-j3htl7mr-1660707336970)(E:\BDQN\BCSP\课件笔记\Linux\07-Linux安装MySql8.0.assets\1658566114337.png)]](https://img-blog.csdnimg.cn/1733f104c8194f61820521cdb2ee6751.png)
3.3.2执行成功后会在
/etc/yum.repos.d/目录下生成两个repo文件
① mysql-community.repo
② mysql-community-source.repo
3.4检查MySql是否安装成功
3.4.1打开
/etc/yum.repos.d/目录下检查MySql是否安装成功:
cd /etc/yum.repos.d/
![[外链图片转存失败,源站可能有防盗链机制,建议将图片保存下来直接上传(img-AsbYOEZq-1660707336971)(E:\BDQN\BCSP\课件笔记\Linux\07-Linux安装MySql8.0.assets\1658566565443.png)]](https://img-blog.csdnimg.cn/2abb80a0841f4e23824d1557ac6752d7.png)
3.5查看系统中mysql相关资源
yum repolist enabled | grep "mysql.*-community.*"
![[外链图片转存失败,源站可能有防盗链机制,建议将图片保存下来直接上传(img-B0Qhe5L4-1660707336971)(E:\BDQN\BCSP\课件笔记\Linux\07-Linux安装MySql8.0.assets\1658566822238.png)]](https://img-blog.csdnimg.cn/46ff5992ccd84aa9af50416e88813fbf.png)
3.6安装MySql服务端
3.6.1输入 sudo yum install命令即可进行MySql服务端安装:
sudo yum install mysql-community-server
注意: 该命令会安装MySQL服务器 (mysql-community-server) 及其所需的依赖、相关组件,包括mysql-community-client、mysql-community-common、mysql-community-libs等。安装过程中需要进行几次用户确认,我们输入字母y即可,时间会比较长,需要耐心等待…
3.6.2以下是博主安装过程中的相关信息,贴上以供参考:
[root@localhost yum.repos.d]# sudo yum install mysql-community-server
Loaded plugins: fastestmirror, langpacks
Loading mirror speeds from cached hostfile
 * base: mirrors.aliyun.com
 * centos-sclo-rh: mirrors.tuna.tsinghua.edu.cn
 * centos-sclo-sclo: mirrors.aliyun.com
 * extras: mirrors.aliyun.com
 * updates: mirrors.aliyun.com
base                                                                                         | 3.6 kB  00:00:00
centos-sclo-rh                                                                               | 3.0 kB  00:00:00
centos-sclo-sclo                                                                             | 3.0 kB  00:00:00
extras                                                                                       | 2.9 kB  00:00:00
updates                                                                                     | 2.9 kB  00:00:00
Resolving Dependencies
--> Running transaction check
---> Package mysql-community-server.x86_64 0:8.0.29-1.el7 will be installed
--> Processing Dependency: mysql-community-common(x86-64) = 8.0.29-1.el7 for package: mysql-community-server-8.0.29-1.el7.x86_64
--> Processing Dependency: mysql-community-icu-data-files = 8.0.29-1.el7 for package: mysql-community-server-8.0.29-1.el7.x86_64
--> Processing Dependency: mysql-community-client(x86-64) >= 8.0.11 for package: mysql-community-server-8.0.29-1.el7.x86_64
--> Running transaction check
---> Package mysql-community-client.x86_64 0:8.0.29-1.el7 will be installed
--> Processing Dependency: mysql-community-client-plugins = 8.0.29-1.el7 for package: mysql-community-client-8.0.29-1.el7.x86_64
--> Processing Dependency: mysql-community-libs(x86-64) >= 8.0.11 for package: mysql-community-client-8.0.29-1.el7.x86_64
---> Package mysql-community-common.x86_64 0:8.0.29-1.el7 will be installed
---> Package mysql-community-icu-data-files.x86_64 0:8.0.29-1.el7 will be installed
--> Running transaction check
---> Package mariadb-libs.x86_64 1:5.5.68-1.el7 will be obsoleted
--> Processing Dependency: libmysqlclient.so.18()(64bit) for package: 2:postfix-2.10.1-9.el7.x86_64
--> Processing Dependency: libmysqlclient.so.18(libmysqlclient_18)(64bit) for package: 2:postfix-2.10.1-9.el7.x86_64
---> Package mysql-community-client-plugins.x86_64 0:8.0.29-1.el7 will be installed
---> Package mysql-community-libs.x86_64 0:8.0.29-1.el7 will be obsoleting
--> Running transaction check
---> Package mysql-community-libs-compat.x86_64 0:8.0.29-1.el7 will be obsoleting
--> Finished Dependency Resolution

Dependencies Resolved

====================================================================================================================
 Package                                  Arch             Version                Repository                   Size
====================================================================================================================
Installing:
 mysql-community-libs                     x86_64           8.0.29-1.el7           mysql80-community           1.5 M
     replacing  mariadb-libs.x86_64 1:5.5.68-1.el7
 mysql-community-libs-compat              x86_64           8.0.29-1.el7           mysql80-community           667 k
     replacing  mariadb-libs.x86_64 1:5.5.68-1.el7
 mysql-community-server                   x86_64           8.0.29-1.el7           mysql80-community            53 M
Installing for dependencies:
 mysql-community-client                   x86_64           8.0.29-1.el7           mysql80-community            14 M
 mysql-community-client-plugins           x86_64           8.0.29-1.el7           mysql80-community           2.5 M
 mysql-community-common                   x86_64           8.0.29-1.el7           mysql80-community           633 k
 mysql-community-icu-data-files           x86_64           8.0.29-1.el7           mysql80-community           2.1 M

Transaction Summary
====================================================================================================================
Install  3 Packages (+4 Dependent packages)

Total download size: 75 M
Is this ok [y/d/N]: y
Downloading packages:
warning: /var/cache/yum/x86_64/7/mysql80-community/packages/mysql-community-client-plugins-8.0.29-1.el7.x86_64.rpm: Header V4 RSA/SHA256 Signature, key ID 3a79bd29: NOKEY
Public key for mysql-community-client-plugins-8.0.29-1.el7.x86_64.rpm is not installed
(1/7): mysql-community-client-plugins-8.0.29-1.el7.x86_64.rpm                                | 2.5 MB  00:00:04
(2/7): mysql-community-client-8.0.29-1.el7.x86_64.rpm                                        |  14 MB  00:00:05
(3/7): mysql-community-common-8.0.29-1.el7.x86_64.rpm                                        | 633 kB  00:00:00
(4/7): mysql-community-icu-data-files-8.0.29-1.el7.x86_64.rpm                                | 2.1 MB  00:00:00
(5/7): mysql-community-libs-compat-8.0.29-1.el7.x86_64.rpm                                   | 667 kB  00:00:00
(6/7): mysql-community-libs-8.0.29-1.el7.x86_64.rpm                                          | 1.5 MB  00:00:01
(7/7): mysql-community-server-8.0.29-1.el7.x86_64.rpm                                        |  53 MB  00:00:20
--------------------------------------------------------------------------------------------------------------------
Total                                                                               2.8 MB/s |  75 MB  00:00:26
Retrieving key from file:///etc/pki/rpm-gpg/RPM-GPG-KEY-mysql-2022
Importing GPG key 0x3A79BD29:
 Userid     : "MySQL Release Engineering <mysql-build@oss.oracle.com>"
 Fingerprint: 859b e8d7 c586 f538 430b 19c2 467b 942d 3a79 bd29
 Package    : mysql80-community-release-el7-5.noarch (installed)
 From       : /etc/pki/rpm-gpg/RPM-GPG-KEY-mysql-2022
Is this ok [y/N]: y
Retrieving key from file:///etc/pki/rpm-gpg/RPM-GPG-KEY-mysql
Importing GPG key 0x5072E1F5:
 Userid     : "MySQL Release Engineering <mysql-build@oss.oracle.com>"
 Fingerprint: a4a9 4068 76fc bd3c 4567 70c8 8c71 8d3b 5072 e1f5
 Package    : mysql80-community-release-el7-5.noarch (installed)
 From       : /etc/pki/rpm-gpg/RPM-GPG-KEY-mysql
Is this ok [y/N]: y
Running transaction check
Running transaction test
Transaction test succeeded
Running transaction
Warning: RPMDB altered outside of yum.
  Installing : mysql-community-common-8.0.29-1.el7.x86_64                                                       1/8
  Installing : mysql-community-client-plugins-8.0.29-1.el7.x86_64                                               2/8
  Installing : mysql-community-libs-8.0.29-1.el7.x86_64                                                         3/8
  Installing : mysql-community-client-8.0.29-1.el7.x86_64                                                       4/8
  Installing : mysql-community-icu-data-files-8.0.29-1.el7.x86_64                                               5/8
  Installing : mysql-community-server-8.0.29-1.el7.x86_64                                                       6/8
  Installing : mysql-community-libs-compat-8.0.29-1.el7.x86_64                                                  7/8
  Erasing    : 1:mariadb-libs-5.5.68-1.el7.x86_64                                                               8/8
  Verifying  : mysql-community-icu-data-files-8.0.29-1.el7.x86_64                                               1/8
  Verifying  : mysql-community-libs-compat-8.0.29-1.el7.x86_64                                                  2/8
  Verifying  : mysql-community-client-8.0.29-1.el7.x86_64                                                       3/8
  Verifying  : mysql-community-client-plugins-8.0.29-1.el7.x86_64                                               4/8
  Verifying  : mysql-community-server-8.0.29-1.el7.x86_64                                                       5/8
  Verifying  : mysql-community-common-8.0.29-1.el7.x86_64                                                       6/8
  Verifying  : mysql-community-libs-8.0.29-1.el7.x86_64                                                         7/8
  Verifying  : 1:mariadb-libs-5.5.68-1.el7.x86_64                                                               8/8

Installed:
  mysql-community-libs.x86_64 0:8.0.29-1.el7             mysql-community-libs-compat.x86_64 0:8.0.29-1.el7
  mysql-community-server.x86_64 0:8.0.29-1.el7

Dependency Installed:
  mysql-community-client.x86_64 0:8.0.29-1.el7         mysql-community-client-plugins.x86_64 0:8.0.29-1.el7
  mysql-community-common.x86_64 0:8.0.29-1.el7         mysql-community-icu-data-files.x86_64 0:8.0.29-1.el7

Replaced:
  mariadb-libs.x86_64 1:5.5.68-1.el7

Complete!
3.7启动服务mysql服务
3.7.1使用
systemctl start mysqld.service启动服务
systemctl start mysqld.service
3.7.2使用
systemctl status mysqld.service查看服务状态
systemctl status mysqld.service
![[外链图片转存失败,源站可能有防盗链机制,建议将图片保存下来直接上传(img-KAQilDn8-1660707336972)(E:\BDQN\BCSP\课件笔记\Linux\07-Linux安装MySql8.0.assets\1658567703423.png)]](https://img-blog.csdnimg.cn/81b679df0ac94f31967a2a6950ea8378.png)
3.8停止MySql服务
systemctl stop mysqld.service
3.9重启MySql服务
systemctl restart mysqld.service
4、MySql修改密码及登录
4.1查看初始化密码:
MySQL第一次启动后会创建超级管理员账号root@localhost,初始密码存储在日志文件中,输入如下命令即可查看。
grep 'temporary password' /var/log/mysqld.log
如下运行结果中,我的密码是(Cg%N.)huy2hc)
[root@localhost yum.repos.d]# grep 'temporary password' /var/log/mysqld.log
2022-07-23T09:11:22.370522Z 6 [Note] [MY-010454] [Server] A temporary password is generated for root@localhost: Cg%N.)huy2hc
4.2root账号登录
![[外链图片转存失败,源站可能有防盗链机制,建议将图片保存下来直接上传(img-Hehxee0u-1660707336972)(E:\BDQN\BCSP\课件笔记\Linux\07-Linux安装MySql8.0.assets\1658568425269.png)]](https://img-blog.csdnimg.cn/b204f7980e604a3f93c508c52f4b926f.png)
4.3修改root账号的密码
mysql登录成功后输入ALTER USER 'root'@'localhost' IDENTIFIED BY 'root';进行密码修改。发现提示Your password does not satisfy the current policy requirements 时,说明密码太弱,在MySQL中默认的密码策略是要包含数字、字母及特殊字符,如果只是测试用,不想用那么复杂的密码,可以修改默认策略,即validate_password_policy(以及validate_password_length等相关参数),使其支持简单密码的设定,设置密码策略修改配置文件/etc/my.cnf,添加validate_password=OFF,保存并重启MySQL。
这里我没有修改密码直接重新换了一下密码,设置为 Aiden@163.com
![[外链图片转存失败,源站可能有防盗链机制,建议将图片保存下来直接上传(img-vqIT40jW-1660707336973)(E:\BDQN\BCSP\课件笔记\Linux\07-Linux安装MySql8.0.assets\1659957842036.png)]](https://img-blog.csdnimg.cn/7c7e732bdfe44f19b887bf6dcfbb6bcc.png)
5、设置编码格式
5.1查看编码
步骤1:登录mysql
步骤2:输入 show variables like ‘character%’; 查看,如下所示:
mysql> show  variables  like 'character%';
+--------------------------+--------------------------------+
| Variable_name            | Value                          |
+--------------------------+--------------------------------+
| character_set_client     | utf8mb4                        |
| character_set_connection | utf8mb4                        |
| character_set_database   | utf8mb4                        |
| character_set_filesystem | binary                         |
| character_set_results    | utf8mb4                        |
| character_set_server     | utf8mb4                        |
| character_set_system     | utf8mb3                        |
| character_sets_dir       | /usr/share/mysql-8.0/charsets/ |
+--------------------------+--------------------------------+
5.2设置编码
步骤1:输入vim /etc/my.cnf 命令
步骤2:按 insert键进入编辑模式
步骤3:编辑 /etc/my.cnf 配置文件,在[mysqld]节点增加以下代码:
[mysqld]
character_set_server=utf8
init-connect='SET NAMES utf8'
![[外链图片转存失败,源站可能有防盗链机制,建议将图片保存下来直接上传(img-GecJnYMX-1660707336973)(E:\BDQN\BCSP\课件笔记\Linux\07-Linux安装MySql8.0.assets\1659960230285.png)]](https://img-blog.csdnimg.cn/de3ce5995d834cc8acddaf6aac11a5a4.png)
步骤4:编辑完后 按Esc键退出,最后输入:wq 进行保存!
6、设置MySql开机启动
systemctl enable mysqld
systemctl daemon-reload
![[外链图片转存失败,源站可能有防盗链机制,建议将图片保存下来直接上传(img-y2TLkdLl-1660707336974)(E:\BDQN\BCSP\课件笔记\Linux\07-Linux安装MySql8.0.assets\1659961031571.png)]](https://img-blog.csdnimg.cn/fceeb178b47140dc87cf7a6291130df3.png)
7、开放3306端口
开放端口命令语法:
firewall-cmd --zone=public --add-port=端口号/tcp --permanent
命令含义:
--zone :作用域
--add-port=端口号/tcp :添加端口,格式为:端口/通讯协议
--permanent :永久生效,如果没有设置此参数,则只能维持当前服务生命周期内,重新启动后将会失效
开放端口3306示例:
[root@localhost mysql]# firewall-cmd --state
running
[root@localhost mysql]# firewall-cmd --zone=public --add-port=3306/tcp --permanent
success
![[外链图片转存失败,源站可能有防盗链机制,建议将图片保存下来直接上传(img-B5G1cwPc-1660707336974)(E:\BDQN\BCSP\课件笔记\Linux\07-Linux安装MySql8.0.assets\1659961970894.png)]](https://img-blog.csdnimg.cn/573a6f1e78c54f4381559c28965c066b.png)
查询3306端口是否开启,注意需要使用
firewall-cmd --reload命令重新载入配置
[root@localhost mysql]# firewall-cmd --reload
success
[root@localhost mysql]# firewall-cmd --query-port=3306/tcp
yes
![[外链图片转存失败,源站可能有防盗链机制,建议将图片保存下来直接上传(img-gu0ezH5b-1660707336975)(E:\BDQN\BCSP\课件笔记\Linux\07-Linux安装MySql8.0.assets\1659961825541.png)]](https://img-blog.csdnimg.cn/277cd6a99cb44fcea5c5ed5411da619b.png)
8、Navicat Premium测试连接操作MySql
步骤1:查看系统的ip地址
![[外链图片转存失败,源站可能有防盗链机制,建议将图片保存下来直接上传(img-evdixF3s-1660707336975)(E:\BDQN\BCSP\课件笔记\Linux\07-Linux安装MySql8.0.assets\1660015482121.png)]](https://img-blog.csdnimg.cn/d6dfe523848641ea926cda052a200358.png)
步骤2:打开windows系统上安装的Navicat Premium15
![[外链图片转存失败,源站可能有防盗链机制,建议将图片保存下来直接上传(img-sJSdVSJ8-1660707336975)(E:\BDQN\BCSP\课件笔记\Linux\07-Linux安装MySql8.0.assets\1660015660674.png)]](https://img-blog.csdnimg.cn/04b2244eaddb42da8ea1210c78f63d41.png)
步骤3:在新建连接的界面输入正确的IP地址与用户名、密码、端口号信息
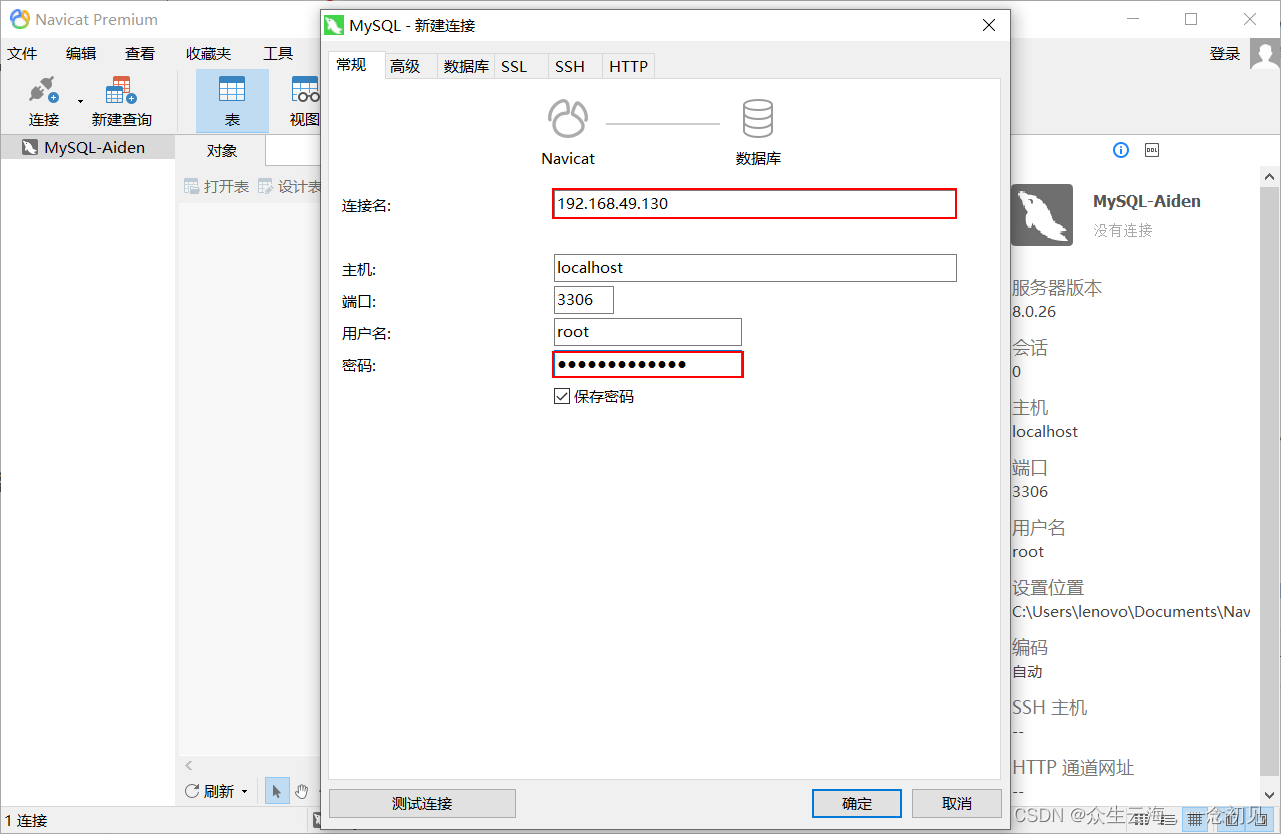
步骤4:点击测试连接,验证是否正常
注意: 在执行此步骤时,要确保linux中是否已开放3306端口,当过程中如果出现如下错误,则需要修改mysql服务器中mysql数据库中user表中host列的值为%。
![[外链图片转存失败,源站可能有防盗链机制,建议将图片保存下来直接上传(img-KvYD4Kz4-1660707336976)(E:\BDQN\BCSP\课件笔记\Linux\07-Linux安装MySql8.0.assets\1660016073691.png)]](https://img-blog.csdnimg.cn/c90d94b073a74607938c3c56b097963a.png)
1045错误码的解决方案步骤:
1、连接mysql服务器
2、进入mysql数据库:use mysql;
3、查看user表中的数据:select Host, User,Password from user;
4、修改user表中的Host:update user set Host=‘%’ where User=‘root’;
5、刷新授权列表:flush privileges;
mysql> use mysql
Database changed
mysql> select host,user from user;
+-----------+------------------+
| host      | user             |
+-----------+------------------+
| localhost | mysql.infoschema |
| localhost | mysql.session    |
| localhost | mysql.sys        |
| localhost | root             |
+-----------+------------------+
4 rows in set (0.00 sec)

mysql> update user set host='%' where user='root';
Query OK, 1 row affected (0.01 sec)
Rows matched: 1  Changed: 1  Warnings: 0

mysql> flush privileges;
Query OK, 0 rows affected (0.01 sec)

mysql> select host,user from user;
+-----------+------------------+
| host      | user             |
+-----------+------------------+
| %         | root             |
| localhost | mysql.infoschema |
| localhost | mysql.session    |
| localhost | mysql.sys        |
+-----------+------------------+
4 rows in set (0.00 sec)
步骤5:再次尝试测试连接
![[外链图片转存失败,源站可能有防盗链机制,建议将图片保存下来直接上传(img-i5us9VdG-1660707336977)(E:\BDQN\BCSP\课件笔记\Linux\07-Linux安装MySql8.0.assets\1660016620124.png)]](https://img-blog.csdnimg.cn/e7b702693bfa4e65aa9b1cc15bf89e35.png)
点击 “确定” 按钮后连接就创建成功了 O(∩_∩)O~
步骤6:测试测试数据库创建
create database testDB;
![[外链图片转存失败,源站可能有防盗链机制,建议将图片保存下来直接上传(img-jLzM9HXX-1660707336977)(E:\BDQN\BCSP\课件笔记\Linux\07-Linux安装MySql8.0.assets\1660016797868.png)]](https://img-blog.csdnimg.cn/daca1c7f91424715afb5a20cad3116f5.png)
步骤7:测试创建数据表
use testDB;
create table users(
 	userId int not null primary key auto_increment comment '用户ID',
 	userName varchar(20) not null comment '用户名',
 	userSex char(2) not null comment '用户性别'
) comment='用户信息表';
![[外链图片转存失败,源站可能有防盗链机制,建议将图片保存下来直接上传(img-7JeukCHD-1660707336977)(E:\BDQN\BCSP\课件笔记\Linux\07-Linux安装MySql8.0.assets\1660017040816.png)]](https://img-blog.csdnimg.cn/8f151d736f14417e9b1f8f6e0c0efe22.png)
步骤8:测试为表中插入数据
use testDB;
insert into users (userName,userSex)
values ('张三','男'),('李四','男'),('王五','男');
![[外链图片转存失败,源站可能有防盗链机制,建议将图片保存下来直接上传(img-7ynd3PG7-1660707336978)(E:\BDQN\BCSP\课件笔记\Linux\07-Linux安装MySql8.0.assets\1660017189846.png)]](https://img-blog.csdnimg.cn/e03e14bb74884516860d82532385a915.png)
步骤8:测试查询表数据
use testDB;
select * from users;
![[外链图片转存失败,源站可能有防盗链机制,建议将图片保存下来直接上传(img-lgb6EUBh-1660707336978)(E:\BDQN\BCSP\课件笔记\Linux\07-Linux安装MySql8.0.assets\1660017354503.png)]](https://img-blog.csdnimg.cn/51bfadfa7f9f480cb2a904fba6ce301b.png)
步骤9:使用Xshell连接Linux操作MySql数据库
![[外链图片转存失败,源站可能有防盗链机制,建议将图片保存下来直接上传(img-ai9B0XIc-1660707336978)(E:\BDQN\BCSP\课件笔记\Linux\07-Linux安装MySql8.0.assets\1660017617457.png)]](https://img-blog.csdnimg.cn/75f0edad40054dd4a5b8a49beebe5d4b.png)
9、卸载删除MySql
9.1、检查mariadb
rpm -qa|grep mariadb
注意:如果有检查到mariadb则删除mariadb, 如没有,则跳过
rpm -e --nodeps mariadb-server
rpm -e --nodeps mariadb
rpm -e --nodeps mariadb-libs
9.2、检查mysql
[root@localhost ~]  rpm -qa|grep mysql
mysql-community-icu-data-files-8.0.29-1.el7.x86_64
mysql80-community-release-el7-5.noarch
mysql-community-client-plugins-8.0.29-1.el7.x86_64
mysql-community-server-8.0.29-1.el7.x86_64
mysql-community-libs-8.0.29-1.el7.x86_64
mysql-community-libs-compat-8.0.29-1.el7.x86_64
mysql-community-client-8.0.29-1.el7.x86_64
mysql-community-common-8.0.29-1.el7.x86_64
9.3、删除MySql
rpm -e --nodeps xxx
学习交流: 617530501 /821596752

为开发者提供学习成长、分享交流、生态实践、资源工具等服务,帮助开发者快速成长。
更多推荐


 6
6 1
1- 0


 已为社区贡献3条内容

所有评论(0)