springboot 集成 Swagger2 配置以及常用注解的说明和使用 ( 超详细)
一、注解的使用 和 说明结构化说明如下:@Api:用在请求的类上,表示对类的说明tags="说明该类的作用,可以在UI界面上看到的注解"(也就是给类取别名)value="该参数没什么意义,在UI界面上也看到,所以不需要配置"@ApiOperation:用在请求的方法上,说明方法的用途、作用value="说明方法的用途、作用"notes="方法的备注说明"@ApiImplicitParams:用在请
一、注解的使用 和 说明
结构化说明如下:
@Api:用在请求的类上,表示对类的说明
tags="说明该类的作用,可以在UI界面上看到的注解" (也就是给类取别名)
value="该参数没什么意义,在UI界面上也看到,所以不需要配置"
@ApiOperation:用在请求的方法上,说明方法的用途、作用
value="说明方法的用途、作用"
notes="方法的备注说明"
@ApiImplicitParams:用在请求的方法上,表示一组参数说明
@ApiImplicitParam:用在@ApiImplicitParams注解中,指定一个请求参数的各个方面
name:参数名
value:参数的汉字说明、解释
required:参数是否必须传
paramType:参数放在哪个地方
· header --> 请求参数的获取:@RequestHeader
· query --> 请求参数的获取:@RequestParam
· path(用于restful接口)--> 请求参数的获取:@PathVariable
· body(不常用)
· form(不常用)
dataType:参数类型,默认String,其它值dataType="Integer"
defaultValue:参数的默认值
@ApiResponses:用在请求的方法上,表示一组响应
@ApiResponse:用在@ApiResponses中,一般用于表达一个错误的响应信息
code:数字,例如400
message:信息,例如"请求参数没填好"
response:抛出异常的类
@ApiModel:用于响应类上,表示一个返回响应数据的信息
(这种一般用在post创建的时候,使用@RequestBody这样的场景,
请求参数无法使用@ApiImplicitParam注解进行描述的时候)
@ApiModelProperty:用在属性上,描述响应类的属性
@ApiParam() 用于方法,参数,字段说明;表示对参数的添加元数据(说明或是否必填等)
name–参数名
value–参数说明
required–是否必填
二、POM 依赖注入
这里要注意的是springboot整合swagger要注意版本的兼容
以下是版本的兼容:
| Spring Boot版本 | Swagger 版本 |
|---|---|
| 2.5.6 | 2.9.2 |
| Spring Boot版本 | Swagger 版本 |
|---|---|
| 2.6.5 | 3.0.0 |
<parent>
    <groupId>org.springframework.boot</groupId>
    <artifactId>spring-boot-starter-parent</artifactId>
    <version>2.5.6</version>
    <relativePath/>
</parent>

<dependencies>

    <dependency>
        <groupId>org.springframework.boot</groupId>
        <artifactId>spring-boot-starter-web</artifactId>
    </dependency>

    <!-- https://mvnrepository.com/artifact/io.springfox/springfox-swagger2 -->
    <dependency>
        <groupId>io.springfox</groupId>
        <artifactId>springfox-swagger2</artifactId>
        <version>2.9.2</version>
    </dependency>

    <!-- https://mvnrepository.com/artifact/io.springfox/springfox-swagger-ui -->
    <dependency>
        <groupId>io.springfox</groupId>
        <artifactId>springfox-swagger-ui</artifactId>
        <version>2.9.2</version>
    </dependency>

</dependencies>
三、启动类 添加@EnableSwagger2注解
/**
 * @EnableSwagger2-是springfox提供的一个注解,代表swagger2相关技术开启。
 * 会扫描当前类所在包,及子包中所有的类型中的注解。做swagger文档的定制
 */
@SpringBootApplication
@EnableSwagger2
public class application {
    public static void main(String[] args) {
        SpringApplication.run(application.class, args);
    }
}
四、创建一个controller类
package com.study.controller;

import org.springframework.web.bind.annotation.GetMapping;
import org.springframework.web.bind.annotation.PostMapping;
import org.springframework.web.bind.annotation.RequestMapping;
import org.springframework.web.bind.annotation.RestController;


@RestController
public class Mycontroller {

    @RequestMapping("/reg")
    public String reg(String m) {
        return "reg";
    }

    @GetMapping("/get")
    public String get(String a,String b){
        return "get";
    }

    @PostMapping("/post")
    public String post(){
        return "post";
    }

    @GetMapping("/test")

    public String test(String m,String n){
        return  "test";
    }

}
运行项目后,打开浏览器访问swagger的ui进行测试
http://localhost:8080/swagger-ui.html

五、创建Swagger的配置类,并进行配置
package com.study.config;
import org.springframework.context.annotation.Bean;
import org.springframework.context.annotation.Configuration;
import springfox.documentation.builders.ApiInfoBuilder;
import springfox.documentation.service.ApiInfo;
import springfox.documentation.service.Contact;
import springfox.documentation.spi.DocumentationType;
import springfox.documentation.spring.web.plugins.Docket;
@Configuration
public class SwaggerConfig {
/**
* 创建Docket类型的对象。并使用spring容器管理。
* DOcket是swagger中的全局配置对象。
* @return
*/
@Bean
public Docket docket(){
Docket docket = new Docket(DocumentationType.SWAGGER_2);
//ApiInfo 就是API帮助文档的描述信息。 information
ApiInfo apiInfo =
new ApiInfoBuilder()
.contact( //配置swagger文档主题内容。
new Contact(
"Swagger开发文档", //是文档的发布者名称
"http://www.baidu.com", //是文档发布者的网站地址。企业网站
"123@qq.com") //文档发布者的电子邮箱
)
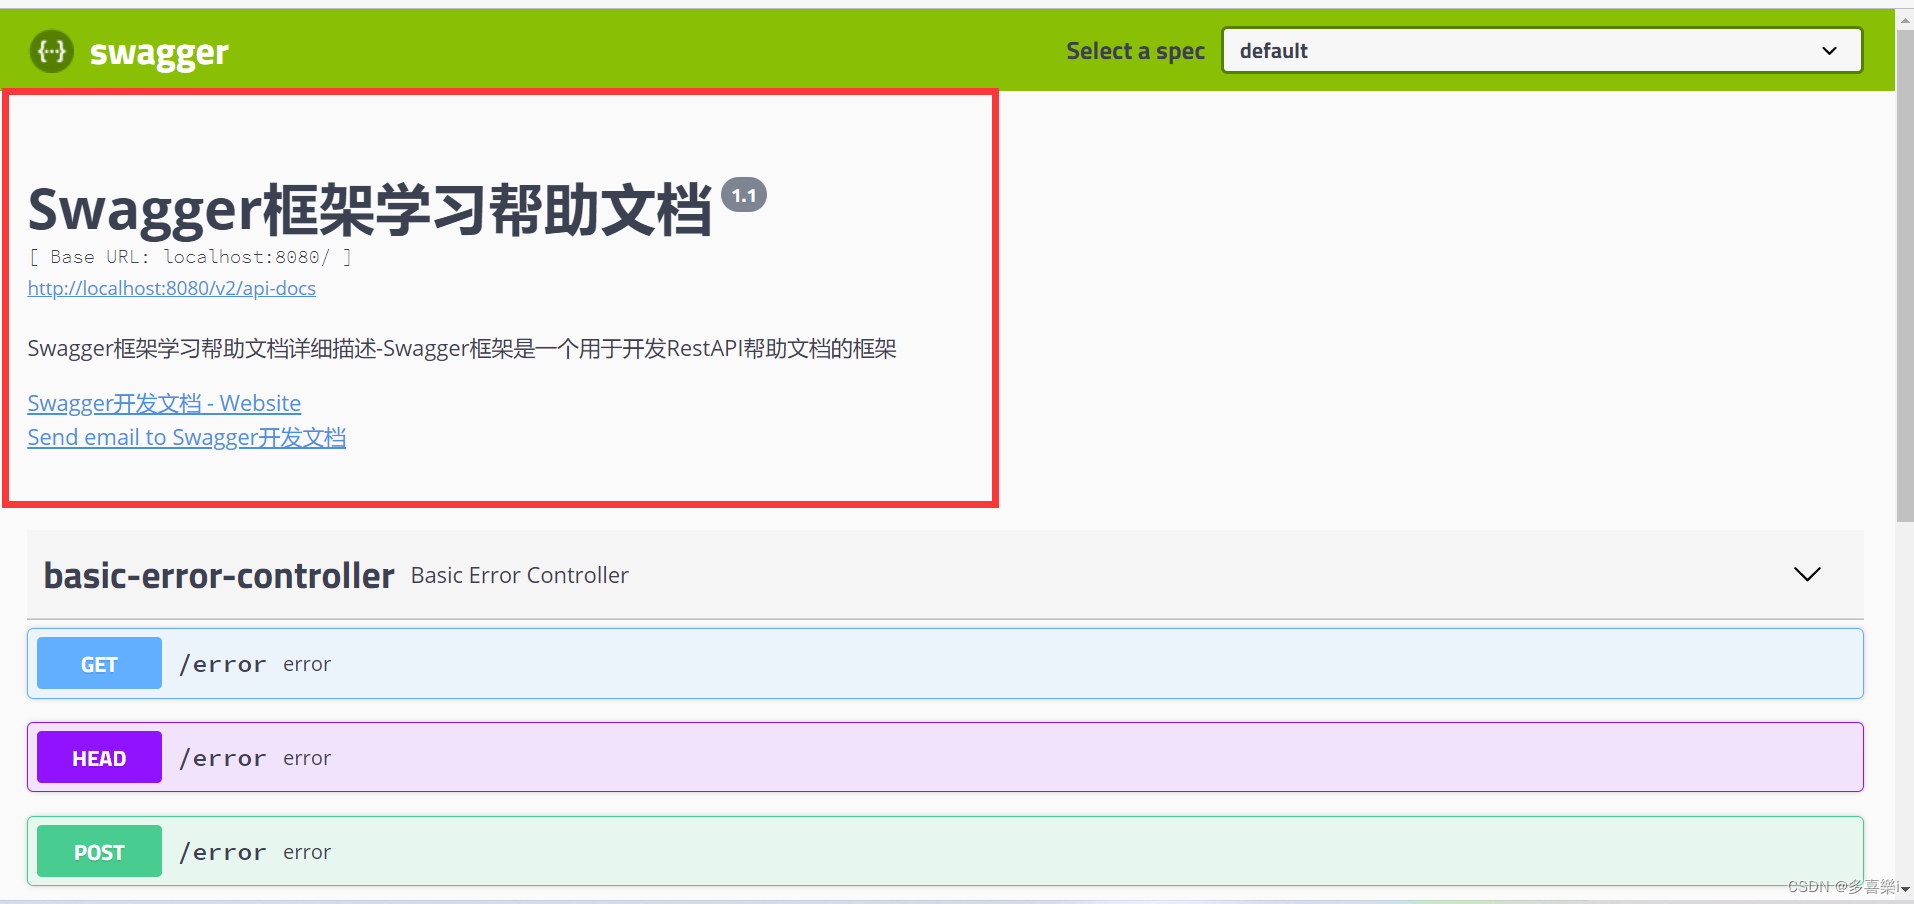
.title("Swagger框架学习帮助文档")
.description("Swagger框架学习帮助文档详细描述-Swagger框架是一个用于开发RestAPI帮助文档的框架")
.version("1.1")
.build();
//给docket上下文配置api描述信息
docket.apiInfo(apiInfo);
return docket;
}
}
再重新运行项目,刷新浏览器,发现和刚才明显的区别,这就是配置swagger配置文件后,对文档主题内容的修改。

六、在swagger配置类里 配置扫描包
docket
        .select() //获取Docket中的选择器。返回ApiSelectorBuilder。构建选择器的。 如:扫描什么包的注解。
        .apis(RequestHandlerSelectors.basePackage("com.imooc.controller"));  //设定扫描哪个包(包含子包)中的注解  包扫描规则
return docket;
七、创建自定义注解,设置不需要生成接口文档的方法
7.1 生成一个自定义注解类 ,注意要加上@interface 代表当前类是一个注解
package com.study.anno;

import java.lang.annotation.ElementType;
import java.lang.annotation.Retention;
import java.lang.annotation.RetentionPolicy;
import java.lang.annotation.Target;

//这里是自定义注解 自定义注解设置不需要生成接口文档的方法

/**
 * @interface 代表当前类是一个注解
 *
 * @Target-描述当前的注解可以定义在什么资源上。
 *   属性value
 *      -定义具体的资源。  包括:
 *          -ElementType.METHOD 可以定义在方法上
 *          -ElementType.TYPE 可以定义在类型上
 *          -ElementType.FIELD 可以定义在属性上
 *          -ElementType.PARAMETER 可以定义在方法参数上
 *
 * @Retention -当前注解在什么时候有效
 * 属性 value
 *    -定义具体的生效标记
 *      - RetentionPolicy.RUNTIME - 运行时有效
 *      - RetentionPolicy.SOURCE - 源码中有效
 *      - RetentionPolicy.CLASS - 字节码有效
 */
@Target(value = {ElementType.METHOD,ElementType.TYPE})
@Retention(RetentionPolicy.RUNTIME)
public @interface MyAnnotation4Sagger {
    //自定义注解中的属性。相当于@MyAnnotation4Sagger(value="")
    String value() default "";
}
7.2 在 Swagger的配置类 添加规则
添加取反规则,当扫描到自定注解后取反,返回false,这样就会使不需要生成的接口在文档中不显示
docket
        .select() //获取Docket中的选择器。返回ApiSelectorBuilder。构建选择器的。 如:扫描什么包的注解。
        .apis(
                Predicates.not( // 取反。false -> true  true -> false    自定义注解取反规则
                        RequestHandlerSelectors.withMethodAnnotation(  // 当方法上有注解的时,返回true
                                MyAnnotation4Sagger.class )  //也就是说他回去扫描包里面的所有注解 当方法上有该注解的时候返回true
                )
        )
        .build();
        //.apis(RequestHandlerSelectors.basePackage("com.imooc.controller"))  //设定扫描哪个包(包含子包)中的注解  包扫描规则
return docket;
7.3 在controller类中 给不许要生成的接口文档的方法添加上自定义注解
@MyAnnotation4Sagger

启动项目后 只显示 get 和 post 接口
八、路径范围配置
在swagger配置类中添加 .paths()规则
.paths(  //设置生成文档的路径范围
        Predicates.or( //设置多个规则符合任意一个即可通过。
            PathSelectors.regex("/swagger/.*"), //使用正则表达式,约束生成API文档的路径地址
            PathSelectors.regex("/swagger2/.*"),
            PathSelectors.regex("/.*")
        )
)

设置完在controller类中添加所设置的路径

运行后

九、常用注解@Api
在controller类上添加:
@Api(tags = {"MyController","Swagger学习控制器"},description = "测试AIP控制器")

运行项目后

十、常用注解@ApiOperation()
在方法上添加
@ApiOperation(value = "post方法,执行数据新增操作",notes = "Swagger学习使用-处理POST请求处理的方法")

运行项目后

十一、常用注解@ApiParam
在参数上添加
@ApiParam(name = "用户名 (a)",value = "新增用户时提供的用户名",required = true) String a,
                   @ApiParam(name = "密码 (b)",value = "新增用户时提供的用户密码",required = true) String b

运行项目后(可以与get 做对比)


十二、常用注解@ApiIgnore
直接在方法上添加注解

运行项目后:

十三、常用注解 @ApiImplicitParams() 和 @ApiImplicitParam()
直接在方法上添加
@ApiImplicitParams(value = {
        @ApiImplicitParam(name = "m",value = "m参数描述",required = false,paramType = "body",dataType = "String"),
        @ApiImplicitParam(name = "n",value = "n参数描述",required = true,paramType = "body",dataType = "String")
})

运行项目后

十四、常用注解 @ApiModel() 和 @ApiModelProperty()
在实体类中添加@ApiModel() 在, 属性上添加@ApiModelProperty()
package com.study.entity;

import io.swagger.annotations.ApiModel;
import io.swagger.annotations.ApiModelProperty;

import java.io.Serializable;
import java.util.Objects;

/**
 * ApiModel - 描述一个实体类型。
 * 这个实体类型如果成为任何一个生成api帮助文档方法的返回值类型的时候,此注解被解析。
 */
@ApiModel(value = "自定义实体-MyEntity",description = "MyEntity存储用户数据")
public class MyEntity implements Serializable {
    @ApiModelProperty(value = "主键",name = "主键(id)",
            required = false,example = "1",hidden = false)
    private String id;

    @ApiModelProperty(value = "姓名",name = "姓名(name)",
            required = true,example = "张三",hidden = false)
    private String name;

    @ApiModelProperty(value = "密码",name = "密码(password)",
            required = true,example = "my-password-123",hidden = false)
    private String password;

    public MyEntity() {
    }

    @Override
    public boolean equals(Object o) {
        if (this == o) return true;
        if (o == null || getClass() != o.getClass()) return false;
        MyEntity myEntity = (MyEntity) o;
        return Objects.equals(id, myEntity.id) &&
                Objects.equals(name, myEntity.name) &&
                Objects.equals(password, myEntity.password);
    }

    @Override
    public int hashCode() {
        return Objects.hash(id, name, password);
    }

    public String getId() {
        return id;
    }

    public void setId(String id) {
        this.id = id;
    }

    public String getName() {
        return name;
    }

    public void setName(String name) {
        this.name = name;
    }

    public String getPassword() {
        return password;
    }

    public void setPassword(String password) {
        this.password = password;
    }
}
因为该注解被解析的条件要是 1.该实体类要是任意方法的返回值类型,2.该方法要在@Api()文档下
所以在controller中添加方法
@RequestMapping("/testEntity")
public MyEntity testMyEntity(){
    return new MyEntity();
}
运行后


为开发者提供学习成长、分享交流、生态实践、资源工具等服务,帮助开发者快速成长。
更多推荐


 5
5 0
0- 0


 已为社区贡献1条内容

所有评论(0)