SpringBoot集成MySQL
SpringBoot集成MySQL:注:集成mysql之前请先搭建好springboot(springboot搭建)1配置pom.xml文件引入mysql依赖<!--集成mysql数据库--><dependency><groupId>mysql</groupId><artifactId>mysql-connector-java</a
·
SpringBoot集成MySQL:
注:集成mysql之前请先搭建好springboot(springboot搭建)
1
配置pom.xml文件引入mysql依赖
<!--集成mysql数据库-->
<dependency>
    <groupId>mysql</groupId>
    <artifactId>mysql-connector-java</artifactId>
    <version>8.0.26</version>
</dependency>
<dependency>
    <groupId>org.springframework.boot</groupId>
    <artifactId>spring-boot-starter-jdbc</artifactId>
    <version>2.6.1</version>
</dependency>
2
配置yml文件application.yml
spring:
  application:
    name: springboot_union
  datasource:
    #url切换数据库之后如果对应数据库名称和路径有变动,需要修改url
    url: jdbc:mysql://localhost:3306/springboot_union?useUnicode=true&characterEncoding=utf-8&useSSL=false
    username: root
    password: root
    driver-class-name: com.mysql.cj.jdbc.Driver
3
设计表
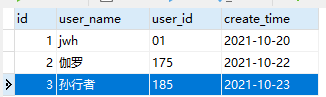
打开数据库,新建表,表名为:mysql_test
填充数据
建表语句:
CREATE TABLE `mysql_test` ( `id` INT UNSIGNED auto_increment, `username` VARCHAR ( 100 ), `user_id` VARCHAR ( 100 ), `create_time` VARCHAR ( 100 ), PRIMARY KEY ( `id` ) ) ENGINE = INNODB;

INSERT INTO `mysql_test` (`user_name`,`user_id`,`create_time`) VALUES ('jwh','01','2021-10-20');
INSERT INTO `mysql_test` (`user_name`,`user_id`,`create_time`) VALUES ('伽罗','175','2021-10-22');
INSERT INTO `mysql_test` (`user_name`,`user_id`,`create_time`) VALUES ('孙行者','185','2021-10-23');
4
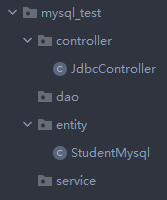
包结构
5
实体类StudentMysql.java
package com.jwh.springboot.integration_test.mysql_test.entity;


import java.util.Objects;


/**
* @author JING
*/
public class StudentMysql {
    private int id;
    private String userName;
    private String userId;
    private String createTime;


    /**
     * 无参构造
     */
    public StudentMysql() {
    }


    /**
     * 有参构造
     * @param id id
     * @param userName  用户名
     * @param userId    用户id
     * @param createTime    创建时间
     */
    public StudentMysql(int id, String userName, String userId, String createTime) {
        this.id = id;
        this.userName = userName;
        this.userId = userId;
        this.createTime = createTime;
    }


    /**
     * setter getter 方法
     * @return 参数
     */
    public int getId() {
        return id;
    }


    public void setId(int id) {
        this.id = id;
    }


    public String getUserName() {
        return userName;
    }


    public void setUserName(String userName) {
        this.userName = userName;
    }


    public String getUserId() {
        return userId;
    }


    public void setUserId(String userId) {
        this.userId = userId;
    }


    public String getCreateTime() {
        return createTime;
    }


    public void setCreateTime(String createTime) {
        this.createTime = createTime;
    }


    @Override
    public boolean equals(Object o) {
        if (this == o) {return true;}
        if (o == null || getClass() != o.getClass()) {return false;}
        StudentMysql that = (StudentMysql) o;
        return id == that.id && Objects.equals(userName, that.userName) && Objects.equals(userId, that.userId) && Objects.equals(createTime, that.createTime);
    }


    @Override
    public int hashCode() {
        return Objects.hash(id, userName, userId, createTime);
    }


    @Override
    public String toString() {
        return "StudentMysql{" +
                "id=" + id +
                ", userName='" + userName + '\'' +
                ", userId='" + userId + '\'' +
                ", createTime='" + createTime + '\'' +
                '}';
    }
}
6
接口测试类
package com.jwh.springboot.integration_test.mysql_test.controller;


import org.springframework.beans.factory.annotation.Autowired;
import org.springframework.jdbc.core.JdbcTemplate;
import org.springframework.web.bind.annotation.RequestMapping;
import org.springframework.web.bind.annotation.RequestMethod;
import org.springframework.web.bind.annotation.RestController;


/**
* @author JING
*/
@RestController
public class JdbcController {
    @Autowired
    JdbcTemplate jdbcTemplate;

    @RequestMapping(value="/hello", method= RequestMethod.GET)//如果使用postman进行测试,使用post方式进行访问,则需将此处的GET改为POST
    public String index() {

        String sql = "SELECT user_name FROM mysql_test WHERE id = ?";

        // 通过jdbcTemplate查询数据库
        String userName = (String) jdbcTemplate.queryForObject(
                sql, new Object[]{1}, String.class);

        return "Good job!" + userName;
    }
}
7
启动项目

8
浏览器中访问地址 http://localhost:8080/hello
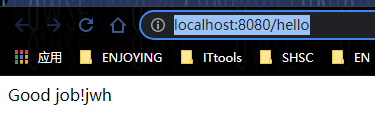
测试成功
表示springboot集成mysql成功,可以正常访问数据库中的表

为开发者提供学习成长、分享交流、生态实践、资源工具等服务,帮助开发者快速成长。
更多推荐


 3
3 0
0- 0


 已为社区贡献4条内容

所有评论(0)