springboot2+JPA 配置多数据源(不同类型数据库)
springboot2+JPA配置多数据源(不同数据库)
·
注意:看此篇文章之前,springboot+jpa的配置环境应搭建好,不会搭可以自行百度。本文章主要讲述配置JPA多数据源。
1.数据源配置文件
application.properties
# 数据源thirded(oracle数据库)
spring.jpa.thirded.database-platform=org.hibernate.dialect.Oracle10gDialect
spring.jpa.thirded.show-sql=false
spring.jpa.thirded.hibernate.ddl-auto=none

# 数据源fourth (mysql数据库)
spring.jpa.fourth.database-platform=org.hibernate.dialect.MySQL5InnoDBDialect
spring.jpa.fourth.show-sql=true
spring.jpa.fourth.hibernate.ddl-auto=none
上面的 thirded 和 fourth 是我给这两个数据源起的别名
application.yml
spring:
    datasource:
	    thirded:
			url: jdbc:oracle:thin:@//127.0.0.1:1521/orcl
			username: lpsgt
			password: lpsgt
			driverClassName: oracle.jdbc.OracleDriver
			database: oracle
			configuration:
			maximum-pool-size: 30
		fourth:
			url: jdbc:mysql://127.0.0.1:3306/testdb?useUnicode=true&characterEncoding=utf8&useSSL=true&serverTimezone=Asia/Shanghai
			username: root
			password: root
			driverClassName: com.mysql.cj.jdbc.Driver
			database: mysql
			configuration:
			maximum-pool-size: 30
2.创建数据源配置类
数据源管理类:DataSourceConfig.java
package com.lns.analysis.config;

import org.springframework.beans.factory.annotation.Qualifier;
import org.springframework.boot.autoconfigure.jdbc.DataSourceProperties;
import org.springframework.boot.context.properties.ConfigurationProperties;
import org.springframework.context.annotation.Bean;
import org.springframework.context.annotation.Configuration;
import org.springframework.context.annotation.Primary;

import javax.sql.DataSource;

@Configuration
public class DataSourceConfig {
  @Bean("thirdedProperties")
  @ConfigurationProperties(prefix = "spring.datasource.thirded")
  public DataSourceProperties thirdedProperties() {
    return new DataSourceProperties();
  }

  @Bean("fourthProperties")
  @ConfigurationProperties(prefix = "spring.datasource.fourth")
  public DataSourceProperties fourthProperties() {
    return new DataSourceProperties();
  }

  @Bean(name = "thirdedDataSource")
  public DataSource thirdedDataSource(
          @Qualifier(value = "thirdedProperties") DataSourceProperties dataSourceProperties) {
    DataSource dataSource = dataSourceProperties.initializeDataSourceBuilder().build();
    return dataSource;
  }

  @Bean(name = "fourthDataSource")
  public DataSource fourthDataSource(
          @Qualifier(value = "fourthProperties") DataSourceProperties dataSourceProperties) {
    DataSource dataSource = dataSourceProperties.initializeDataSourceBuilder().build();
    return dataSource;
  }
}
DataSourceConfig.java该类主要读取了配置文件里的参数,然后根据参数初始化自动生成数据源,提供数据库连接。
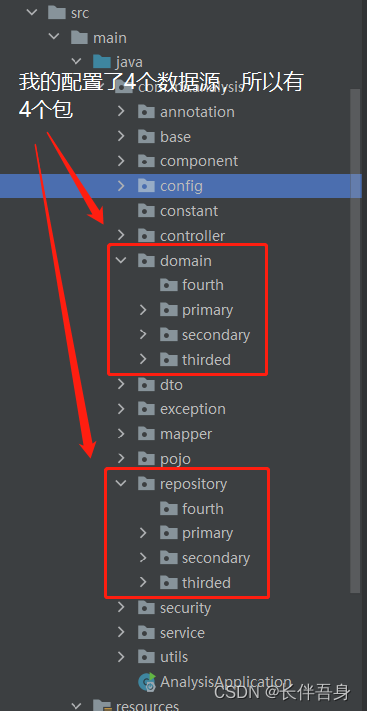
配置多个数据源时,注意每个数据源对应的实体类,jpa类单独放一个包里面
thirded数据源——JPA配置类:
package com.lns.analysis.config;

import lombok.extern.slf4j.Slf4j;
import org.springframework.beans.factory.annotation.Qualifier;
import org.springframework.boot.autoconfigure.orm.jpa.HibernateProperties;
import org.springframework.boot.autoconfigure.orm.jpa.HibernateSettings;
import org.springframework.boot.autoconfigure.orm.jpa.JpaProperties;
import org.springframework.boot.context.properties.ConfigurationProperties;
import org.springframework.boot.orm.jpa.EntityManagerFactoryBuilder;
import org.springframework.context.annotation.Bean;
import org.springframework.context.annotation.Configuration;
import org.springframework.data.jpa.repository.config.EnableJpaRepositories;
import org.springframework.orm.jpa.JpaTransactionManager;
import org.springframework.orm.jpa.LocalContainerEntityManagerFactoryBean;
import org.springframework.transaction.PlatformTransactionManager;
import org.springframework.transaction.annotation.EnableTransactionManagement;

import javax.persistence.EntityManager;
import javax.persistence.EntityManagerFactory;
import javax.sql.DataSource;

@Slf4j
@Configuration
@EnableTransactionManagement
@EnableJpaRepositories(
        basePackages = "com.lns.analysis.repository.thirded",
        entityManagerFactoryRef = "thirdedEntityManagerFactory",
        transactionManagerRef = "thirdedTransactionManager")
public class ThirdedConfig {

    @Bean(name = "thirdedJpaProperties")
    @ConfigurationProperties(prefix = "spring.jpa.thirded")
    public JpaProperties jpaProperties() {
        return new JpaProperties();
    }

    @Bean(name = "thirdedEntityManagerFactory")
    public LocalContainerEntityManagerFactoryBean entityManagerFactory(
            @Qualifier("thirdedDataSource") DataSource thirdedDataSource,
            @Qualifier("thirdedJpaProperties") JpaProperties jpaProperties,
            EntityManagerFactoryBuilder builder) {
        LocalContainerEntityManagerFactoryBean localContainerEntityManagerFactoryBean =
                builder
                        // 设置数据源
                        .dataSource(thirdedDataSource)
                        // 设置jpa配置
                        .properties(jpaProperties.getProperties())
                        // 设置hibernate配置
                        .properties(
                                new HibernateProperties()
                                        .determineHibernateProperties(
                                                jpaProperties.getProperties(), new HibernateSettings()))
                        // 设置实体包名
                        .packages("com.lns.analysis.domain.thirded")
                        // 设置持久化单元名,用于@PersistenceContext注解获取EntityManager时指定数据源
                        .persistenceUnit("thirdedPersistenceUnit")
                        .build();
        return localContainerEntityManagerFactoryBean;
    }

    @Bean(name = "thirdedEntityManager")
    public EntityManager entityManager(
            @Qualifier("thirdedEntityManagerFactory") EntityManagerFactory factory) {
        return factory.createEntityManager();
    }

    @Bean(name = "thirdedTransactionManager")
    public PlatformTransactionManager transactionManager(
            @Qualifier("thirdedEntityManagerFactory") EntityManagerFactory factory) {
        return new JpaTransactionManager(factory);
    }
}
这个JPA配置类获取到了 第2节 中的DataSource数据源,配置文件,然后扫描JPA的包路径下所有配置类。
注意:上述代码包含了JPA类的所在包名,配置文件。跟我不一样的地方,注意要替换成你的。
com.lns.analysis.repository.thirded:JPA存储库包名spring.jpa.thirded:上面第1节数据源配置文件里的配置com.lns.analysis.domain.thirded:实体类包名
fourth数据源——JPA配置类:
package com.lns.analysis.config;

import lombok.extern.slf4j.Slf4j;
import org.springframework.beans.factory.annotation.Qualifier;
import org.springframework.boot.autoconfigure.orm.jpa.HibernateProperties;
import org.springframework.boot.autoconfigure.orm.jpa.HibernateSettings;
import org.springframework.boot.autoconfigure.orm.jpa.JpaProperties;
import org.springframework.boot.context.properties.ConfigurationProperties;
import org.springframework.boot.orm.jpa.EntityManagerFactoryBuilder;
import org.springframework.context.annotation.Bean;
import org.springframework.context.annotation.Configuration;
import org.springframework.data.jpa.repository.config.EnableJpaRepositories;
import org.springframework.orm.jpa.JpaTransactionManager;
import org.springframework.orm.jpa.LocalContainerEntityManagerFactoryBean;
import org.springframework.transaction.PlatformTransactionManager;
import org.springframework.transaction.annotation.EnableTransactionManagement;

import javax.persistence.EntityManager;
import javax.persistence.EntityManagerFactory;
import javax.sql.DataSource;

@Slf4j
@Configuration
@EnableTransactionManagement
@EnableJpaRepositories(
        basePackages = "com.lns.analysis.repository.fourth",
        entityManagerFactoryRef = "fourthEntityManagerFactory",
        transactionManagerRef = "fourthTransactionManager")
public class FourthConfig {

    @Bean(name = "fourthJpaProperties")
    @ConfigurationProperties(prefix = "spring.jpa.fourth")
    public JpaProperties jpaProperties() {
        return new JpaProperties();
    }

    @Bean(name = "fourthEntityManagerFactory")
    public LocalContainerEntityManagerFactoryBean entityManagerFactory(
            @Qualifier("fourthDataSource") DataSource fourthDataSource,
            @Qualifier("fourthJpaProperties") JpaProperties jpaProperties,
            EntityManagerFactoryBuilder builder) {
        LocalContainerEntityManagerFactoryBean localContainerEntityManagerFactoryBean =
                builder
                        // 设置数据源
                        .dataSource(fourthDataSource)
                        // 设置jpa配置
                        .properties(jpaProperties.getProperties())
                        // 设置hibernate配置
                        .properties(
                                new HibernateProperties()
                                        .determineHibernateProperties(
                                                jpaProperties.getProperties(), new HibernateSettings()))
                        // 设置实体包名
                        .packages("com.lns.analysis.domain.fourth")
                        // 设置持久化单元名,用于@PersistenceContext注解获取EntityManager时指定数据源
                        .persistenceUnit("fourthPersistenceUnit")
                        .build();
        return localContainerEntityManagerFactoryBean;
    }

    @Bean(name = "fourthEntityManager")
    public EntityManager entityManager(
            @Qualifier("fourthEntityManagerFactory") EntityManagerFactory factory) {
        return factory.createEntityManager();
    }

    @Bean(name = "fourthTransactionManager")
    public PlatformTransactionManager transactionManager(
            @Qualifier("fourthEntityManagerFactory") EntityManagerFactory factory) {
        return new JpaTransactionManager(factory);
    }
}
跟上面thirded的配置一样,注意包名、路径需要更换成你的
以上2个数据源的配置部分就已经完成了,运行项目,如果没有报错就是配置成功了。
多数据源的使用:不用额外的操作,因为我们已经用配置类配置好了,还是像之前单个数据源一样接口调用增删改查接口。
调用示例:


为开发者提供学习成长、分享交流、生态实践、资源工具等服务,帮助开发者快速成长。
更多推荐


 6
6 0
0- 0


 已为社区贡献2条内容

所有评论(0)