Elasticsearch:使用最新的 Elasticsearch Java client 8.0 来创建索引并搜索
这篇文章,我来详细地描述如何使用最新的 Elasticsearch Java client 8.0 来创建索引并进行搜索。最新的 Elasticsearch Java client API 和之前的不同。在之前的一些教程中,我们使用 High Level API来进行操作。在官方文档中,已经显示为 deprecated。前提条件Java 8 及以后的版本一个 JSON 对象映射库,允许你的应用程序
这篇文章,我来详细地描述如何使用最新的 Elasticsearch Java client 8.0 来创建索引并进行搜索。最新的 Elasticsearch Java client API 和之前的不同。在之前的一些教程中,我们使用 High Level API 来进行操作。在官方文档中,已经显示为 deprecated。
前提条件
- Java 8 及以后的版本
- 一个 JSON 对象映射库,允许你的应用程序类与 Elasticsearch API 无缝集成。 Java 客户端支持 Jackson 或像 Eclipse Yasson 的 JSON-B 库。
版本托管在 Maven Central 上。 如果你正在寻找 SNAPSHOT 版本,可以从 https://snapshots.elastic.co/maven/ 获得 Elastic Maven 快照存储库。
为什么需要一个新的 Java client?
也许有许多的开发者好奇为啥需要新的 client,以前的那个 High level rest client 不是好好的吗?以前的那个 High level REST client API 有如下的问题:

- 和 Elasticsearch server 共享很多的代码
- 拉取大量依赖 (30 + MB)。很多代码并不实用
- 容易误解:之前的 API 暴露了许多 Elasticsearch server 的内部情况
- 用手来书写 API
- API 在不同的版本中有时并不一致
- 需要大量的维护工作(400 多个 endpoints)
- 没有 JSON/object 映射的集成
- 你需要使用 byte buffers 来自己映射
新的 Java client API 具有一下的优点:

- 使用代码来生成 API
- 基于官方的 Elasticsearch API 正式文档
- Java client API 是新一代 Elasticsearch client 的第一个。后续有针对其它的语言发布
- 99% 的代码是自动生成的
- 一个提供更加现代 API 接口的机会
- 流畅的 functional builders
- 接近 Elasticsearch JSON 格式的分层 DSL
- 到/从和应用程序类的自动映射
- 保持 Java 8 的兼容性
安装
如果你还没有安装好自己的 Elasticsearch 及 Kibana 的话,请参阅我之前的文章:
- 如何在 Linux,MacOS 及 Windows 上进行安装 Elasticsearch
- Kibana:如何在 Linux,MacOS 及 Windows上安装 Elastic 栈中的 Kibana
- Elasticsearch:设置 Elastic 账户安全
如果你想在 Elastic Stack 8.0 上试用的话。你可以参阅文章 “Elastic Stack 8.0 安装 - 保护你的 Elastic Stack 现在比以往任何时候都简单”。在本文章中,我们不启用 HTTPS 的访问。你需要查看文章中 “如何配置 Elasticsearch 只带有基本安全” 这个部分。我们为 Elasticsearch 配置基本安全。如果你想访问带有 HTTPS 连接的 Elasticsearch 集群,请参阅文章 “Elasticsearch:使用 Elasticsearch Java client 8.0 来连接带有 HTTPS 的集群”。
展示
在今天的展示中,我将使用 Maven 项目来进行展示尽管 gradle 也可以。为了方便大家的学习,我把我创建的项目上传到 github 上 GitHub - liu-xiao-guo/ElasticsearchJava-search8
首先,我们的 pom.xml 文件如下:
pom.xml
<?xml version="1.0" encoding="UTF-8"?>
<project xmlns="http://maven.apache.org/POM/4.0.0"
         xmlns:xsi="http://www.w3.org/2001/XMLSchema-instance"
         xsi:schemaLocation="http://maven.apache.org/POM/4.0.0 http://maven.apache.org/xsd/maven-4.0.0.xsd">
    <modelVersion>4.0.0</modelVersion>

    <groupId>org.example</groupId>
    <artifactId>ElasticsearchJava-search8</artifactId>
    <version>1.0-SNAPSHOT</version>

    <properties>
        <maven.compiler.source>8</maven.compiler.source>
        <maven.compiler.target>8</maven.compiler.target>
        <elastic.version>8.0.1</elastic.version>
    </properties>

    <dependencies>
        <dependency>
            <groupId>co.elastic.clients</groupId>
            <artifactId>elasticsearch-java</artifactId>
            <version>${elastic.version}</version>
        </dependency>

        <dependency>
            <groupId>com.fasterxml.jackson.core</groupId>
            <artifactId>jackson-databind</artifactId>
            <version>2.12.3</version>
        </dependency>

        <!-- Needed only if you use the spring-boot Maven plugin -->
        <dependency>
            <groupId>jakarta.json</groupId>
            <artifactId>jakarta.json-api</artifactId>
            <version>2.0.1</version>
        </dependency>
    </dependencies>
</project>
如上所示,我们使用了 8.0.1 的版本。你也可以使用在地址 Maven Central Repository Search 上的最新版本 8.1.1。
接下来,我们创建一个叫做 Product.java 的文件:
Product.java
public class Product {
    private String id;
    private String name;
    private int price;

    public Product() {
    }

    public Product(String id, String name, int price) {
        this.id = id;
        this.name = name;
        this.price = price;
    }

    public String getId() {
        return id;
    }

    public String getName() {
        return name;
    }

    public int getPrice() {
        return price;
    }

    public void setId(String id) {
        this.id = id;
    }

    public void setName(String name) {
        this.name = name;
    }

    public void setPrice(int price) {
        this.price = price;
    }

    @Override
    public String toString() {
        return "Product{" +
                "id='" + id + '\'' +
                ", name='" + name + '\'' +
                ", price=" + price +
                '}';
    }
}
我们再接下来创建 ElasticsearchJava.java 文件:
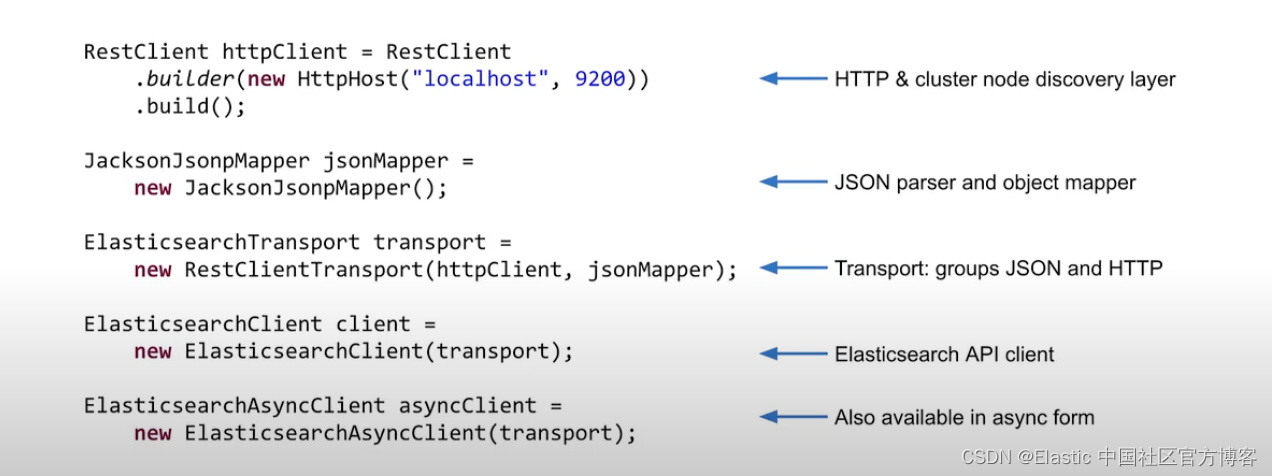
在上面,代码也非常直接。我们使用如下的代码来连接到 Elasticsearch:
  private static synchronized void makeConnection() {
        // Create the low-level client
        final CredentialsProvider credentialsProvider =
                new BasicCredentialsProvider();
        credentialsProvider.setCredentials(AuthScope.ANY,
                new UsernamePasswordCredentials("elastic", "password"));

        RestClientBuilder builder = RestClient.builder(
                        new HttpHost("localhost", 9200))
                .setHttpClientConfigCallback(new RestClientBuilder.HttpClientConfigCallback() {
                    @Override
                    public HttpAsyncClientBuilder customizeHttpClient(
                            HttpAsyncClientBuilder httpClientBuilder) {
                        return httpClientBuilder
                                .setDefaultCredentialsProvider(credentialsProvider);
                    }
                });

        RestClient restClient = builder.build();

        // Create the transport with a Jackson mapper
        ElasticsearchTransport transport = new RestClientTransport(
                restClient, new JacksonJsonpMapper());

        // And create the API client
        client = new ElasticsearchClient(transport);
        asyncClient = new ElasticsearchAsyncClient(transport);
    }
在上面,我们使用 elastic 这个超级用户来进行访问。它的密码是 password。这个在实际的使用中,需要根据自己的情况来进行设置。
在下面,我们使用如下的两种格式来写入数据到 products 索引中:
        // Index data to an index products
        Product product = new Product("abc", "Bag", 42);

        IndexRequest<Object> indexRequest = new IndexRequest.Builder<>()
                .index("products")
                .id("abc")
                .document(product)
                .build();

        client.index(indexRequest);

        Product product1 = new Product("efg", "Bag", 42);

        client.index(builder -> builder
                .index("products")
                .id(product1.getId())
                .document(product1)
        );
上述的写入类似于在 Kibana 中输入如下的指令:
PUT products/_doc/abc
{
  "id": "abc",
  "name": "Bag",
  "price": 42
}
我们可以在 Kibana 中进行查看:
GET products/_search上面的命令显示:
{
  "took" : 0,
  "timed_out" : false,
  "_shards" : {
    "total" : 1,
    "successful" : 1,
    "skipped" : 0,
    "failed" : 0
  },
  "hits" : {
    "total" : {
      "value" : 2,
      "relation" : "eq"
    },
    "max_score" : 1.0,
    "hits" : [
      {
        "_index" : "products",
        "_id" : "abc",
        "_score" : 1.0,
        "_source" : {
          "id" : "abc",
          "name" : "Bag",
          "price" : 42
        }
      },
      {
        "_index" : "products",
        "_id" : "efg",
        "_score" : 1.0,
        "_source" : {
          "id" : "efg",
          "name" : "Bag",
          "price" : 42
        }
      }
    ]
  }
}
显然我们写入的数据是成功的。
接下来,我使用了如下的两种格式来进行搜索:
       // Search for a data
        TermQuery query = QueryBuilders.term()
                .field("name")
                .value("bag")
                .build();

        SearchRequest request = new SearchRequest.Builder()
                .index("products")
                .query(query._toQuery())
                .build();

        SearchResponse<Product> search =
                client.search(
                        request,
                        Product.class
                );

        for (Hit<Product> hit: search.hits().hits()) {
            Product pd = hit.source();
            System.out.println(pd);
        }

        SearchResponse<Product> search1 = client.search(s -> s
                        .index("products")
                        .query(q -> q
                                .term(t -> t
                                        .field("name")
                                        .value(v -> v.stringValue("bag"))
                                )),
                Product.class);

        for (Hit<Product> hit: search1.hits().hits()) {
            Product pd = hit.source();
            System.out.println(pd);
        }
这个搜索相当于:
GET products/_search
{
  "query": {
    "term": {
      "name": {
        "value": "bag"
      }
    }
  }
}
上面的搜索结果为:
{
  "took" : 0,
  "timed_out" : false,
  "_shards" : {
    "total" : 1,
    "successful" : 1,
    "skipped" : 0,
    "failed" : 0
  },
  "hits" : {
    "total" : {
      "value" : 2,
      "relation" : "eq"
    },
    "max_score" : 0.18232156,
    "hits" : [
      {
        "_index" : "products",
        "_id" : "abc",
        "_score" : 0.18232156,
        "_source" : {
          "id" : "abc",
          "name" : "Bag",
          "price" : 42
        }
      },
      {
        "_index" : "products",
        "_id" : "efg",
        "_score" : 0.18232156,
        "_source" : {
          "id" : "efg",
          "name" : "Bag",
          "price" : 42
        }
      }
    ]
  }
}
Java 代码输出的结果为:
Product{id='abc', name='Bag', price=42}
Product{id='efg', name='Bag', price=42}
Product{id='abc', name='Bag', price=42}
Product{id='efg', name='Bag', price=42}
我们使用如下的代码来简化一个复杂的 DSL:
        // Splitting complex DSL
        TermQuery termQuery = TermQuery.of(t ->t.field("name").value("bag"));

        SearchResponse<Product> search2 = client.search(s -> s
                .index("products")
                .query(termQuery._toQuery()),
                Product.class
        );

        for (Hit<Product> hit: search2.hits().hits()) {
            Product pd = hit.source();
            System.out.println(pd);
        }
同样上面的输出结果为:
Product{id='abc', name='Bag', price=42}
Product{id='efg', name='Bag', price=42}
我们使用如下的代码:
        // Search by product name
        Query byName = MatchQuery.of(m -> m
                .field("name")
                .query("bag")
        )._toQuery();

        // Search by max price
        Query byMaxPrice = RangeQuery.of(r -> r
                .field("price")
                .gte(JsonData.of(10))
        )._toQuery();

        // Combine name and price queries to search the product index
        SearchResponse<Product> response = client.search(s -> s
                        .index("products")
                        .query(q -> q
                                .bool(b -> b
                                        .must(byName)
                                        .should(byMaxPrice)
                                )
                        ),
                Product.class
        );

        List<Hit<Product>> hits = response.hits().hits();
        for (Hit<Product> hit: hits) {
            Product product2 = hit.source();
            System.out.println("Found product " + product2.getId() + ", score " + hit.score());
        }
来实现如下的一个搜索:
GET products/_search
{
  "query": {
    "bool": {
      "must": [
        {
          "match": {
            "name": "bag"
          }
        }
      ],
      "should": [
        {
          "range": {
            "price": {
              "gte": 10
            }
          }
        }
      ]
    }
  }
}
它显示的结果是:
{
  "took" : 1,
  "timed_out" : false,
  "_shards" : {
    "total" : 1,
    "successful" : 1,
    "skipped" : 0,
    "failed" : 0
  },
  "hits" : {
    "total" : {
      "value" : 1,
      "relation" : "eq"
    },
    "max_score" : 1.287682,
    "hits" : [
      {
        "_index" : "products",
        "_id" : "abc",
        "_score" : 1.287682,
        "_source" : {
          "id" : "abc",
          "name" : "Bag",
          "price" : 42
        }
      }
    ]
  }
}
而 Java 的输出结果为:
Found product abc, score 1.287682最后,使用了一个 aggregation:
        // Creating aggregations
        SearchResponse<Void> search3 = client.search( b-> b
                .index("products")
                .size(0)
                .aggregations("price-histo", a -> a
                        .histogram(h -> h
                                .field("price")
                                .interval(20.0)
                        )
                ),
                Void.class
        );

        long firstBucketCount = search3.aggregations()
                .get("price-histo")
                .histogram()
                .buckets().array()
                .get(0)
                .docCount();

        System.out.println("doc count: " + firstBucketCount);
    }
上面的 Void.class 表示在相应中没有文档。我们可以通过如上所示的代码导航聚合的结果:

上面的 aggregation 相当于如下的请求:
GET products/_search
{
  "size": 0,
  "aggs": {
    "price-histo": {
      "histogram": {
        "field": "price",
        "interval": 20
      }
    }
  }
}
我们的 Java 代码的输出结果为:
doc count: 2上面的聚合,我们可以甚至直接使用 JSON 结构的字符串来进行操作:
        String aggstr = "\n" +
           " { \n" +
           "   \"size\": 0, \n" +
           "   \"aggs\": { \n" +
           "     \"price-histo\": {  \n" +
           "       \"histogram\": { \n" +
           "         \"field\": \"price\", \n" +
           "         \"interval\": 20 \n" +
           "       } \n" +
           "     } \n" +
           "   } \n" +
           " } ";

        System.out.println("agg is: " + aggstr  );

        InputStream agg = new ByteArrayInputStream(aggstr.getBytes());
        SearchResponse<Void> searchAgg = client
                .search(b -> b
                        .index("products")
                        .withJson(agg),
                        Void.class
                );

        firstBucketCount = searchAgg.aggregations()
                .get("price-histo")
                .histogram()
                .buckets().array()
                .get(0)
                .docCount();

        System.out.println("doc count: " + firstBucketCount);
上面代码显示的结果和之上的结果是一样的:
doc count: 2更多阅读,请参阅 “Elasticsearch:使用 Elasticsearch Java client 8.0 来连接带有 HTTPS 的集群”。

为开发者提供学习成长、分享交流、生态实践、资源工具等服务,帮助开发者快速成长。
更多推荐


 12
12 0
0- 0


 已为社区贡献117条内容

所有评论(0)