Docker容器互访三种方式
文章目录一、 Docker容器互访三种方式方式一、虚拟ip访问方式二、link方式三、创建bridge网络二、实现(bridge方式)(1)、运行node docker(2)、运行nginx docker(3)、测试:一、 Docker容器互访三种方式参考:https://www.cnblogs.com/shenh/p/9714547.html我们都知道docker容器之间是互相隔离的,不能互相访
文章目录
一、 Docker容器互访三种方式
参考:https://www.cnblogs.com/shenh/p/9714547.html
我们都知道docker容器之间是互相隔离的,不能互相访问,但如果有些依赖关系的服务要怎么办呢。下面介绍三种方法解决容器互访问题。容器之间的相互通信也是为了项目能够更好的拓展,同时也可对当前正在看的nginx的方向代理容器有所帮助。建议直接学习方式三
方式一、虚拟ip访问
安装docker时,docker会默认创建一个内部的桥接网络docker0,每创建一个容器分配一个虚拟网卡,容器之间可以根据ip互相访问。
[root@33fcf82ab4dd /]# [root@CentOS ~]# ifconfig
......
docker0: flags=4163<UP,BROADCAST,RUNNING,MULTICAST>  mtu 1500
        inet 172.17.0.1  netmask 255.255.0.0  broadcast 0.0.0.0
        inet6 fe80::42:35ff:feac:66d8  prefixlen 64  scopeid 0x20<link>
        ether 02:42:35:ac:66:d8  txqueuelen 0  (Ethernet)
        RX packets 4018  bytes 266467 (260.2 KiB)
        RX errors 0  dropped 0  overruns 0  frame 0
        TX packets 4226  bytes 33935667 (32.3 MiB)
        TX errors 0  dropped 0 overruns 0  carrier 0  collisions 0
......
运行一个centos镜像, 查看ip地址得到:172.17.0.7
[root@CentOS ~]# docker run -it --name centos-1 docker.io/centos:latest
[root@6d214ff8d70a /]# ifconfig
eth0: flags=4163<UP,BROADCAST,RUNNING,MULTICAST>  mtu 1500
        inet 172.17.0.7  netmask 255.255.0.0  broadcast 0.0.0.0
        inet6 fe80::42:acff:fe11:7  prefixlen 64  scopeid 0x20<link>
        ether 02:42:ac:11:00:07  txqueuelen 0  (Ethernet)
        RX packets 16  bytes 1296 (1.2 KiB)
        RX errors 0  dropped 0  overruns 0  frame 0
        TX packets 8  bytes 648 (648.0 B)
        TX errors 0  dropped 0 overruns 0  carrier 0  collisions 0
以同样的命令再起一个容器,查看ip地址得到:172.17.0.8
[root@CentOS ~]# docker run -it --name centos-2 docker.io/centos:latest
[root@33fcf82ab4dd /]# ifconfig
eth0: flags=4163<UP,BROADCAST,RUNNING,MULTICAST>  mtu 1500
        inet 172.17.0.8  netmask 255.255.0.0  broadcast 0.0.0.0
        inet6 fe80::42:acff:fe11:8  prefixlen 64  scopeid 0x20<link>
        ether 02:42:ac:11:00:08  txqueuelen 0  (Ethernet)
        RX packets 8  bytes 648 (648.0 B)
        RX errors 0  dropped 0  overruns 0  frame 0
        TX packets 8  bytes 648 (648.0 B)
        TX errors 0  dropped 0 overruns 0  carrier 0  collisions 0
容器内部ping测试结果如下:
[root@33fcf82ab4dd /]# ping 172.17.0.7
PING 172.17.0.7 (172.17.0.7) 56(84) bytes of data.
64 bytes from 172.17.0.7: icmp_seq=1 ttl=64 time=0.205 ms
64 bytes from 172.17.0.7: icmp_seq=2 ttl=64 time=0.119 ms
64 bytes from 172.17.0.7: icmp_seq=3 ttl=64 time=0.118 ms
64 bytes from 172.17.0.7: icmp_seq=4 ttl=64 time=0.101 ms
这种方式必须知道每个容器的ip,在实际使用中并不实用。
方式二、link
运行容器的时候加上参数link
运行第一个容器
docker run -it --name centos-1 docker.io/centos:latest
运行第二个容器
[root@CentOS ~]# docker run -it --name centos-2 --link centos-1:centos-1 docker.io/centos:latest
–link:参数中第一个centos-1是容器名,第二个centos-1是定义的容器别名(使用别名访问容器),为了方便使用,一般别名默认容器名。
测试结果如下:
[root@e0841aa13c5b /]# ping centos-1
PING centos-1 (172.17.0.7) 56(84) bytes of data.
64 bytes from centos-1 (172.17.0.7): icmp_seq=1 ttl=64 time=0.210 ms
64 bytes from centos-1 (172.17.0.7): icmp_seq=2 ttl=64 time=0.116 ms
64 bytes from centos-1 (172.17.0.7): icmp_seq=3 ttl=64 time=0.112 ms
64 bytes from centos-1 (172.17.0.7): icmp_seq=4 ttl=64 time=0.114 ms
此方法对容器创建的顺序有要求,如果集群内部多个容器要互访,使用就不太方便。
方式三、创建bridge网络
1.安装好docker后,运行如下命令创建bridge网络:docker network create testnet
查询到新创建的bridge testnet。

查看网桥下的容器ip信息: docker network inspect dyl_testnet

2.运行容器连接到testnet网络。
使用方法:docker run -it --name <容器名> —network --network-alias <网络别名> <镜像名>
[root@CentOS ~]# docker run -it --name centos-1 --network testnet --network-alias centos-1 docker.io/centos:latest
[root@CentOS ~]# docker run -it --name centos-2 --network testnet --network-alias centos-2 docker.io/centos:latest
3.从一个容器ping另外一个容器,测试结果如下:
[root@fafe2622f2af /]# ping centos-1
PING centos-1 (172.20.0.2) 56(84) bytes of data.
64 bytes from centos-1.testnet (172.20.0.2): icmp_seq=1 ttl=64 time=0.158 ms
64 bytes from centos-1.testnet (172.20.0.2): icmp_seq=2 ttl=64 time=0.108 ms
64 bytes from centos-1.testnet (172.20.0.2): icmp_seq=3 ttl=64 time=0.112 ms
64 bytes from centos-1.testnet (172.20.0.2): icmp_seq=4 ttl=64 time=0.113 ms
4.若访问容器中服务,可以使用这用方式访问 <网络别名>:<服务端口号>
推荐使用这种方法,自定义网络,因为使用的是网络别名,可以不用顾虑ip是否变动,只要连接到docker内部bright网络即可互访。bridge也可以建立多个,隔离在不同的网段。brig
二、实现(bridge方式)
(1)、运行node docker
server.js
const express = require('express');

// Constants
const PORT = 8081;
const HOST = '0.0.0.0';

// App
const app = express();
app.get('/api', (req, res) => {
  res.send('Hello World');
});

app.listen(PORT, HOST);
console.log(`Running on http://${HOST}:${PORT}`);
docker run -it --network testnet --network-alias node_web_app diyunlong/node_web_app
(2)、运行nginx docker
为了保存数据和方便修改配置文件,需要对nginx进行目录挂载,前面有具体介绍
default.conf
server {
    listen       80;
    listen  [::]:80;
    server_name  localhost;

    location / {
        root   /usr/share/nginx/html; // 这个不用改
        index  index.html;
    }
    error_page   500 502 503 504  /50x.html;
    location = /50x.html {
        root   /usr/share/nginx/html;
    }
    location  ^~ /api {
        proxy_pass   http://node_web_app:8081/api;
    }
}
docker run -it --name=vue_nginx --privileged=true --network dyl_testnet --network-alias nginx -p 8091:8091 -v /home/dyl/nginxdocker/conf/nginx.conf:/etc/nginx/nginx.conf -v /home/dyl/nginxdocker/html:/usr/share/nginx/html -v /home/dyl/nginxdocker/logs:/var/log/nginx -v /home/dyl/nginxdocker/conf.d/default.conf:/etc/nginx/conf.d/default.conf nginx
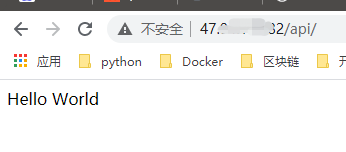
(3)、测试:
// 在宿主主机上
[root@iZ2ze5ot8cnsficuqqnoj5Z ~]# curl http://127.18.0.2:8081
Hello World
// 进入nginx,试着cur另一个node docker容器ip
[root@iZ2ze5ot8cnsficuqqnoj5Z ~]# docker exec -it 11b10c5142b2 /bin/bash
root@11b10c5142b2:/# curl http://127.18.0.2:8081
curl: (7) Failed to connect to 127.18.0.2 port 8081: Connection refused
// 换一种方式curl
root@11b10c5142b2:/# curl node_web_app:8081
Hello World
流程如下:
http://47****2:8080/api > nginx docker > ^~ /api > http://node_web_app:8081/api > nodejs

为开发者提供学习成长、分享交流、生态实践、资源工具等服务,帮助开发者快速成长。
更多推荐


 6
6 0
0- 0


 已为社区贡献4条内容

所有评论(0)