(四)SpringCloud-Consul注册中心
Consul注册中心介绍Consul注册中心windows集群环境搭建Consul注册中心Linux集群搭建Consul注册中心使用demo
目录
1、consul注册中心介绍(Go官网)
Consul 是 HashiCorp 公司推出的开源工具,用于实现分布式系统的服务发现与配置。与其它分布式服务注册与
发现的方案,Consul 的方案更“一站式”,内置了服务注册与发现框架、分布式一致性协议实现、健康检查、Key/Value 存储(配置中心)、多数据中心方案,不再需要依赖其它工具(比如 ZooKeeper 等),使用起来也较为
简单。
Consul 使用 Go 语言编写,因此具有天然可移植性(支持Linux、Windows 和 Mac OS);安装包仅包含一个可
执行文件,方便部署,与 Docker 等轻量级容器可无缝配合。
Consul 特性
- Raft 算法
- 服务发现
- 健康检查
- Key/Value 存储(配置中心)
- 多数据中心
- 支持 http 和 dns 协议接口
- 官方提供 Web 管理界面
1.1 consul角色说明
1.1.1 client: 客户端
无状态, 将 HTTP 和 DNS 接口请求转发给局域网内的服务端集群。
1.1.2 server: 服务端
保存配置信息, 高可用集群, 在局域网内与本地客户端通讯, 通过广域网与其它数据中心通讯。 每个数据中心的 server 数量推荐为 3 个或是 5 个。
1.2 consul架构简述
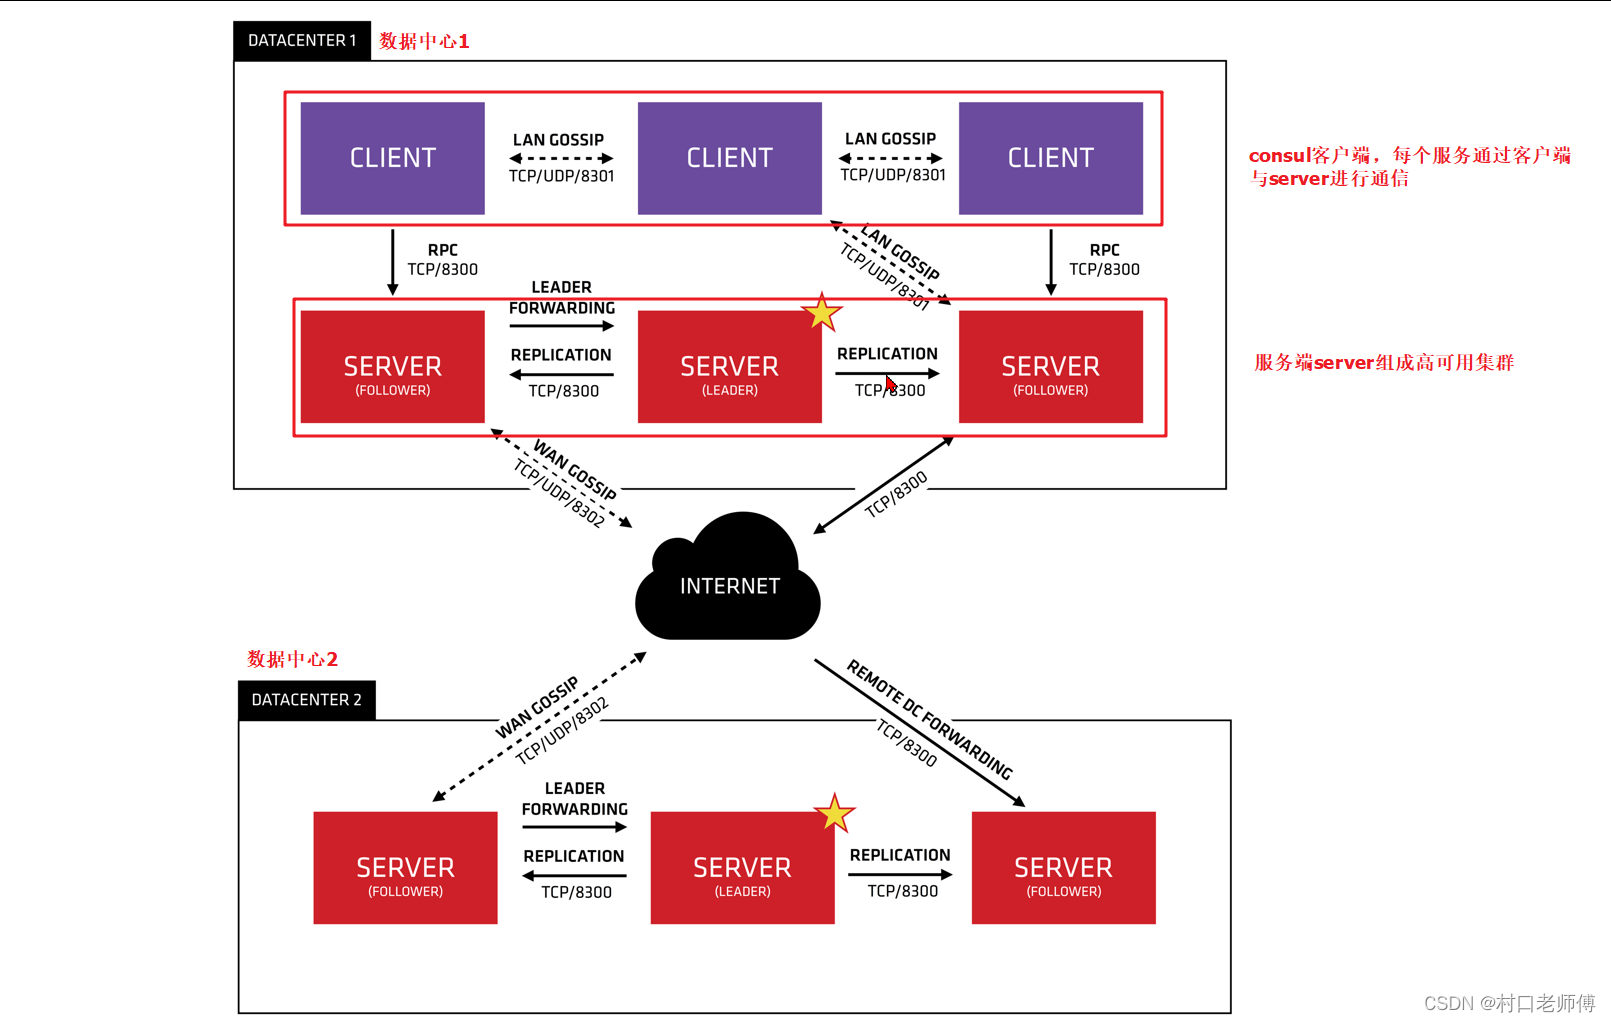
首先,我们可以看到有两个数据中心,分别标记为“datacenter1”和“datacenter1”(Consul 对多个数据中心有一流的支持)。
在每个数据中心内,我们混合了客户端(client)和服务器(server),每个数据中心的 server 数量推荐三到五台。这在故障情况下的可用性和性能之间取得了平衡,因为随着更多机器的加入,保持数据一致性所做的同步变得越来越慢。但是,客户端数量没有限制,它们可以轻松扩展到数千或数万。
不管是 Server 还是Client,统称为 Agent,Consul Client 是相对无状态的,只负责转发 RPC 到 Server 资源开销很少。Server 是一个有一组扩展功能的代理,这些功能包括参与 Raft 选举,维护集群状态,响应 RPC 查询,与其他数据中心交互 WAN Gossip 和转发查询给 leader 或者远程数据中心。
Consul使用gossip协议管理成员关系、广播消息到整个集群。数据中心中的所有代理都参与gossip协议(流言协议),这意味着gossip协议池包含数据中心的所有代理。这有几个目的:首先,不需要使用服务器地址配置客户端;发现是自动完成的。其次,检测代理故障的工作不是放在服务器上而是分布式的。这使得故障检测比简单的心跳方案更具可扩展性。它还为节点提供故障检测;如果代理不可访问,则节点可能遇到故障。第三,它用作消息传递层,以在发生领导者选举等重要事件时进行通知。
每个数据中心内的服务器都是单个 Raft 中节点集的一部分。这意味着他们一起工作,选择一个单一的领导者——一个具有额外职责的选定的服务器。leader 负责处理所有查询和事物。事物也必须作为同步协议的一部分复制到节点集中的所有节点。由于这个要求,当非 leader 服务器接收到 RPC 请求时,就会将请求其转发给集群 leader。。
服务器端节点同时也作为 WAN Gossip 池的一部分,WAN 池和 LAN 池不同的是,它针对网络高延迟做了优
化,而且只包含其他Consul 服务器的节点。这个池的目的是允许数据中心以最少的消耗方式发现对方。启动新的数据中心与加入现有的 WAN Gossip 一样简单。因为这些服务器都在这个池中运行,它还支持跨数据中心请求。当服务器收到对不同数据中心的请求时,它会将其转发到正确数据中心中的随机服务器。那个服务器可能会转发给本地的leader。
这导致数据中心之间的耦合非常低,但由于故障检测、连接缓存和多路复用,跨数据中心请求相对快速和可靠。
通常,不同的 Consul 数据中心之间不会复制数据。当对另一个数据中心中的资源发出请求时,本地 Consul 服务器会将 RPC 请求转发到该资源的远程 Consul 服务器并返回结果。如果远程数据中心不可用,那么这些资源也将不可用,但这不会影响本地数据中心。在某些特殊情况下,可以复制有限的数据子集,例如使用 Consul 的内置 ACL 复制功能,或使用consul-replicate等外部工具。
在某些地方,客户端代理可能会缓存来自服务器的数据,以使其在本地可用以提高性能和可靠性。示例包括连接证书和意图,它们允许客户端代理对入站连接请求做出本地决策,而无需往返服务器。一些 API 端点还支持可选的结果缓存。这有助于提高可靠性,因为即使与服务器的连接中断或服务器暂时不可用,本地代理也可以继续响应某些查询,如服务发现或缓存中的连接授权。
1.3 服务发现以及注册
当服务 Producer 启动时,会将自己的 Ip/host 等信息通过发送请求告知 Consul,Consul 接收到 Producer 的注册信息后,每隔 10s(默认)会向 Producer 发送一个健康检查的请求,检验 Producer 是否健康。
1.4 服务调用
当 Consumer 请求 Product 时,会先从 Consul 中拿到存储 Product 服务的 IP 和 Port 的临时表(temp table),从temp table 表中任选一个· Producer 的 IP 和 Port,然后根据这个 IP 和 Port,发送访问请求;temp table 表只包含通过了健康检查的 Producer 信息,并且每隔 10s(默认)更新。
1.3 配置说明
1.4 官网下载地址
2、在windows开发模式启动
2.1 安装
将下载的consul.exe放在指定目录,双击运行后,在当前目录启动cmd客户端,执行consul命令,返回如下提示。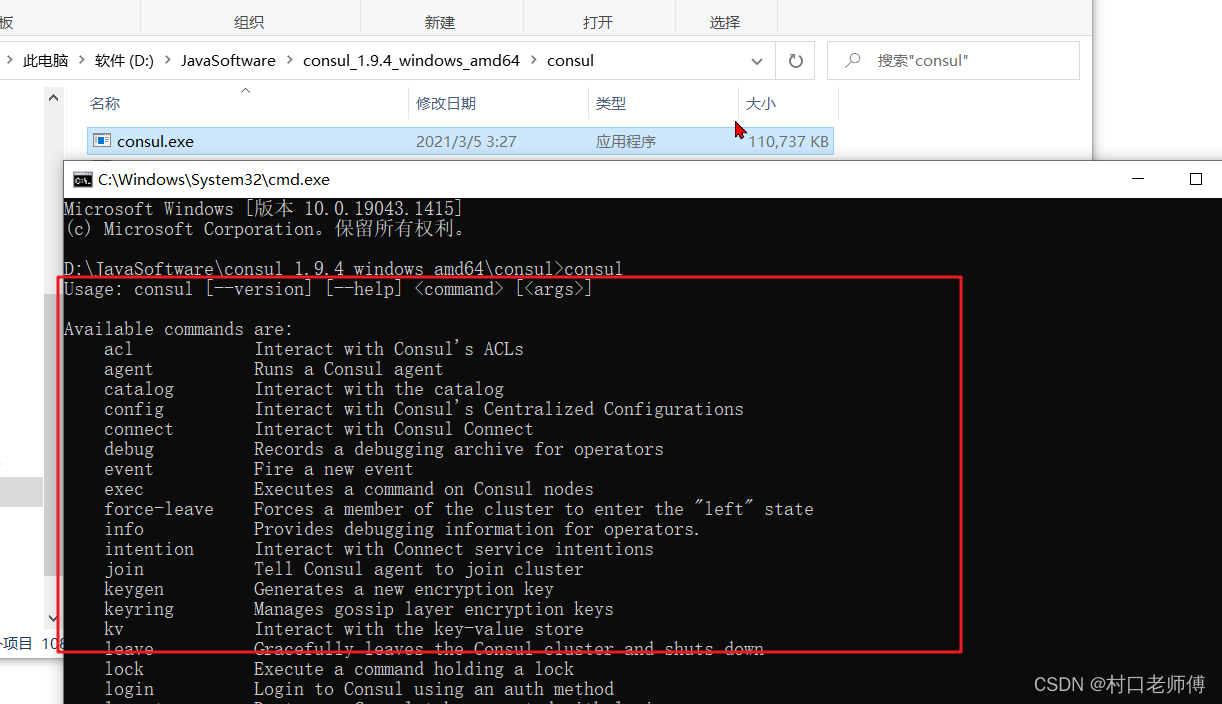
2.2 启动
使用consul agent -dev命令启动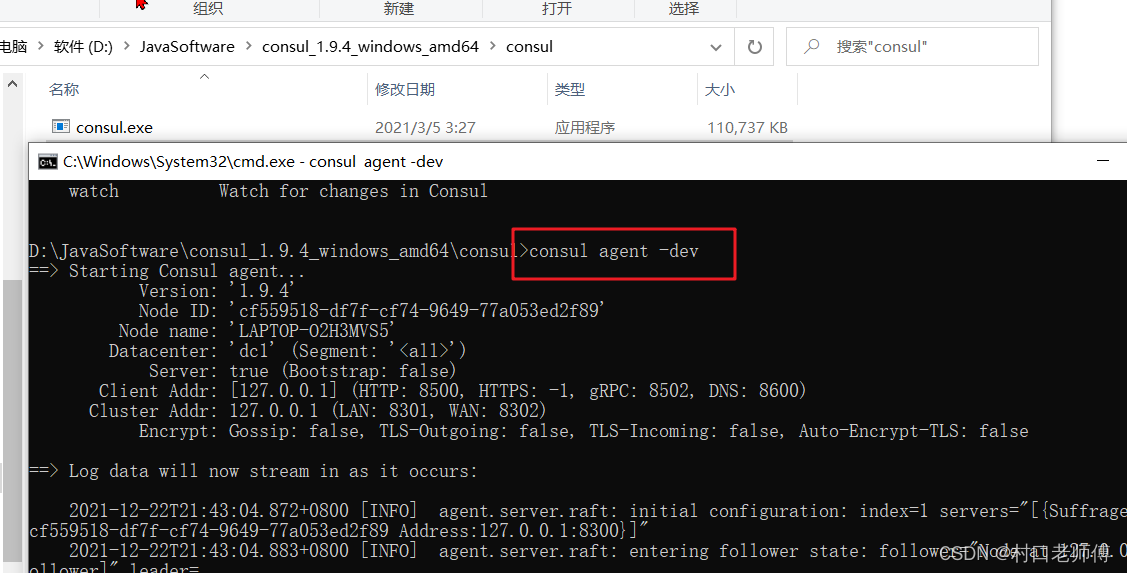
启动报错:
D:\JavaSoftware\consul_1.9.4_windows_amd64\端口7---> consul agent -config-dir ./
==> Multiple private IPv4 addresses found. Please configure one with 'bind' and/or 'advertise'.
原因:因为有虚拟机,有多块网卡。关闭虚拟机的网卡,或者使用bind指定ipv4地址``
2.3 访问consul客户端
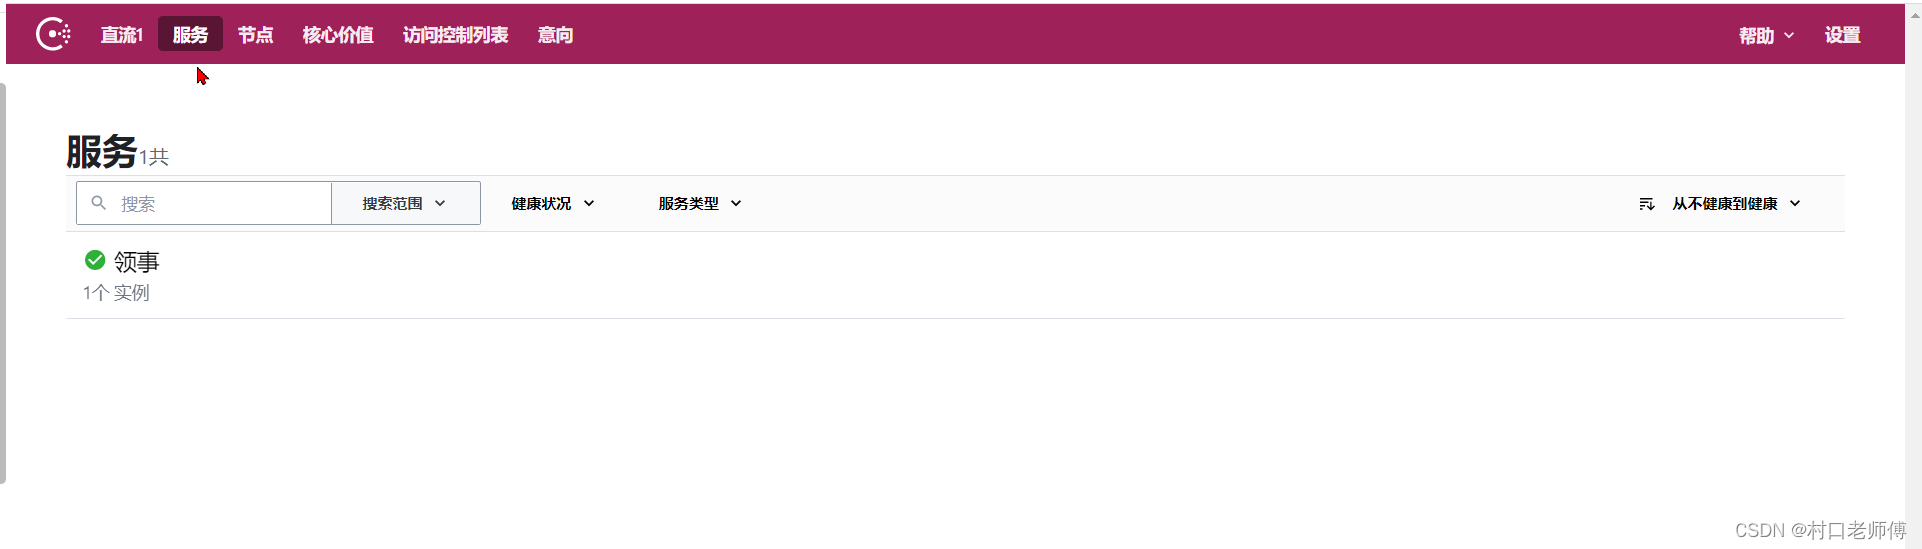
http://127.0.0.1:8500/ui/dc1/services
3、在windows启动client模式
3.1 端口分配
| 节点用途 | 节点主机IP | HTTP | HTTPS | DNS | GRPC | SERVER | LAN | WAN |
|---|---|---|---|---|---|---|---|---|
| consul-client1 | 本机IP | 8499 | 8509 | 8599 | 8399 | 8290 | 8291 | 8292 |
| consul-client2 | 本机IP | 8500 | 8510 | 8600 | 8400 | 8320 | 8301 | 8302 |
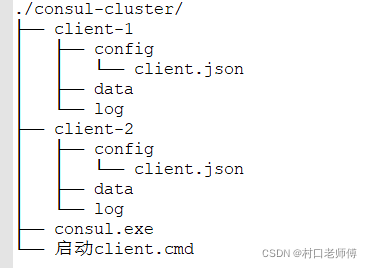
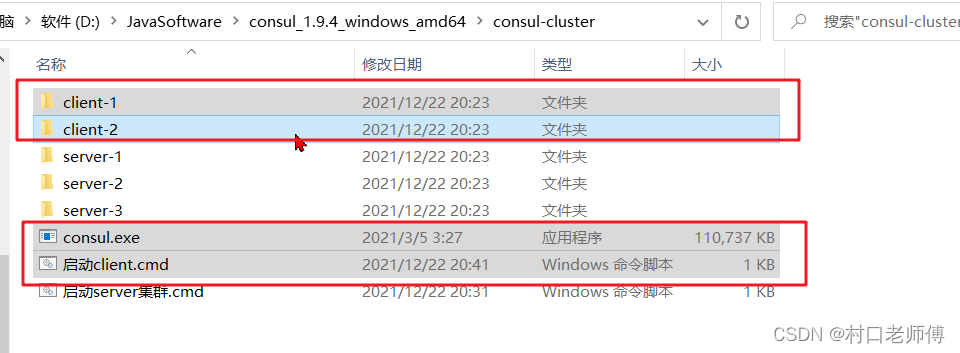
3.2 创建如下目录结构
3.3 根据端口创建配置文件
通过修改节点名称、目录、端口,给客户端client1和client2创建配置文件client.json。
注:使用时需要删除注释!!!
{
  "node_name": "client1", -- 该节点在集群中的名称。这在集群中必须是唯一的
  "data_dir": "D:\\JavaSoftware\\consul_1.9.4_windows_amd64\\consul-cluster\\client-1\\data",  --数据持久化目录
  "server": false,					-- true为服务端,false为客户端
  "bind_addr": "127.0.0.1", 		-- 绑定ip,本机ip地址
  "client_addr": "0.0.0.0",			-- 配置0.0.0.0,允许局域网所有ip访问
  "bootstrap": false,
  "datacenter": "yyyL", 			-- 数据中心
  "log_level": "INFO",
  "log_file": "D:\\JavaSoftware\\consul_1.9.4_windows_amd64\\consul-cluster\\client-1\\log\\consul.log", --日志存放目录
  "log_rotate_duration": "24h",
  "enable_syslog": false,
  "disable_host_node_id": true,
  "rejoin_after_leave": true,
  "ui": true,
  "ports": {
    "http": 8500,
    "https": 8510,
    "dns": 8600,
    "grpc": 8400,
    "serf_lan": 8301,
    "serf_wan": 8302,
    "server": 8300
  },
  "start_join": ["127.0.0.1:8311", "127.0.0.1:8321","127.0.0.1:8331"] -- 启动的时候就加入集群
}
3.4 启动客户端
注:启动客户端前,需要先启动服务端server。
创建启动文件启动client.cmd(通过consul agent命令依次启动client1和client2):
@echo off
start /D "D:\JavaSoftware\consul_1.9.4_windows_amd64\consul-cluster" consul.exe
start /D "D:\JavaSoftware\consul_1.9.4_windows_amd64\consul-cluster" consul agent -config-file=D:\JavaSoftware\consul_1.9.4_windows_amd64\consul-cluster\client-1\config\client.json
start /D "D:\JavaSoftware\consul_1.9.4_windows_amd64\consul-cluster" consul agent -config-file=D:\JavaSoftware\consul_1.9.4_windows_amd64\consul-cluster\client-2\config\client.json
4、在windows启动server集群模式
4.1 端口分配
| 节点用途 | 节点主机IP | HTTP | HTTPS | DNS | GRPC | SERVER | LAN | WAN |
|---|---|---|---|---|---|---|---|---|
| consul-server1 | 本机IP | 8501 | 8511 | 8601 | 8401 | 8310 | 8311 | 8312 |
| consul-server2 | 本机IP | 8502 | 8512 | 8602 | 8402 | 8320 | 8321 | 8322 |
| consul-server3 | 本机IP | 8503 | 8513 | 8603 | 8403 | 8330 | 8331 | 8332 |
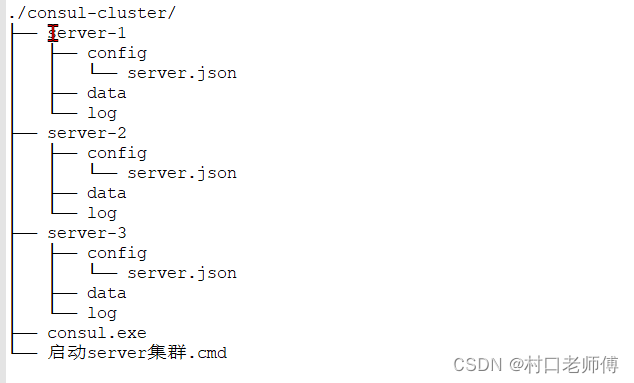
4.2 创建如下目录结构
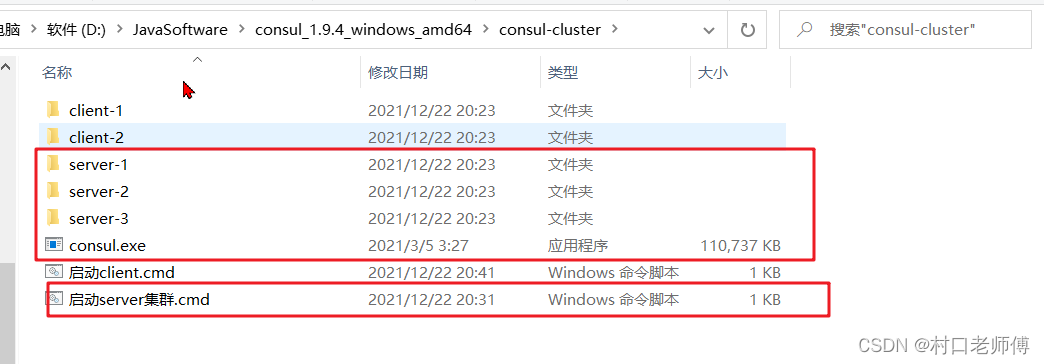
4.3 根据端口创建配置文件
通过修改节点名称、目录、端口,给服务端server1、server2、server3创建配置文件server.json。
注:使用时需要删除注释!!!
{
  "node_name": "server1",   -- 该节点在集群中的名称。这在集群中必须是唯一的
  "bootstrap_expect": 3,    -- 集群中server数量
  "datacenter": "yyyL",     -- 数据中心
  "bind_addr": "127.0.0.1", -- 绑定ip,本机ip地址
  "client_addr":"0.0.0.0",  -- 配置0.0.0.0,允许局域网所有ip访问
  "data_dir": "D:\\JavaSoftware\\consul_1.9.4_windows_amd64\\consul-cluster\\server-1\\data",  --数据持久化目录
  "ui":false,      -- 关闭可视化界面
  "server": true,  -- true为服务端,false为客户端。默认为true
  "log_level": "INFO",
  "log_file": "D:\\JavaSoftware\\consul_1.9.4_windows_amd64\\consul-cluster\\server-1\\log\\consul.log", --日志存放目录
  "log_rotate_duration": "24h",
  "enable_syslog": false,
  "enable_debug": true,
  "disable_host_node_id": true,
  "ports": {
    "http": 8501,
    "https": 8511,
    "dns": 8601,
    "grpc": 8401,
    "serf_lan": 8311,
    "serf_wan": 8312,
    "server": 8310
  },
  "retry_join": ["127.0.0.1:8311","127.0.0.1:8321","127.0.0.1:8331"]  --集群server列表。和join类似,区别是会一直重试加入直到成功。
}
4.4 启动服务端集群
创建启动文件启动server集群.cmd(通过consul agent命令依次启动服务端server1、server2、server3):
@echo off
start /D "D:\JavaSoftware\consul_1.9.4_windows_amd64\consul-cluster" consul.exe
start /D "D:\JavaSoftware\consul_1.9.4_windows_amd64\consul-cluster" consul agent -config-file=D:\JavaSoftware\consul_1.9.4_windows_amd64\consul-cluster\server-1\config\server.json
start /D "D:\JavaSoftware\consul_1.9.4_windows_amd64\consul-cluster" consul agent -config-file=D:\JavaSoftware\consul_1.9.4_windows_amd64\consul-cluster\server-2\config\server.json
start /D "D:\JavaSoftware\consul_1.9.4_windows_amd64\consul-cluster" consul agent -config-file=D:\JavaSoftware\consul_1.9.4_windows_amd64\consul-cluster\server-3\config\server.json
6、在Linux部署consul集群
6.1 准备工作
6.1.1 下载consul的Linux版压缩包
consul_1.11.1_linux_amd64.zip
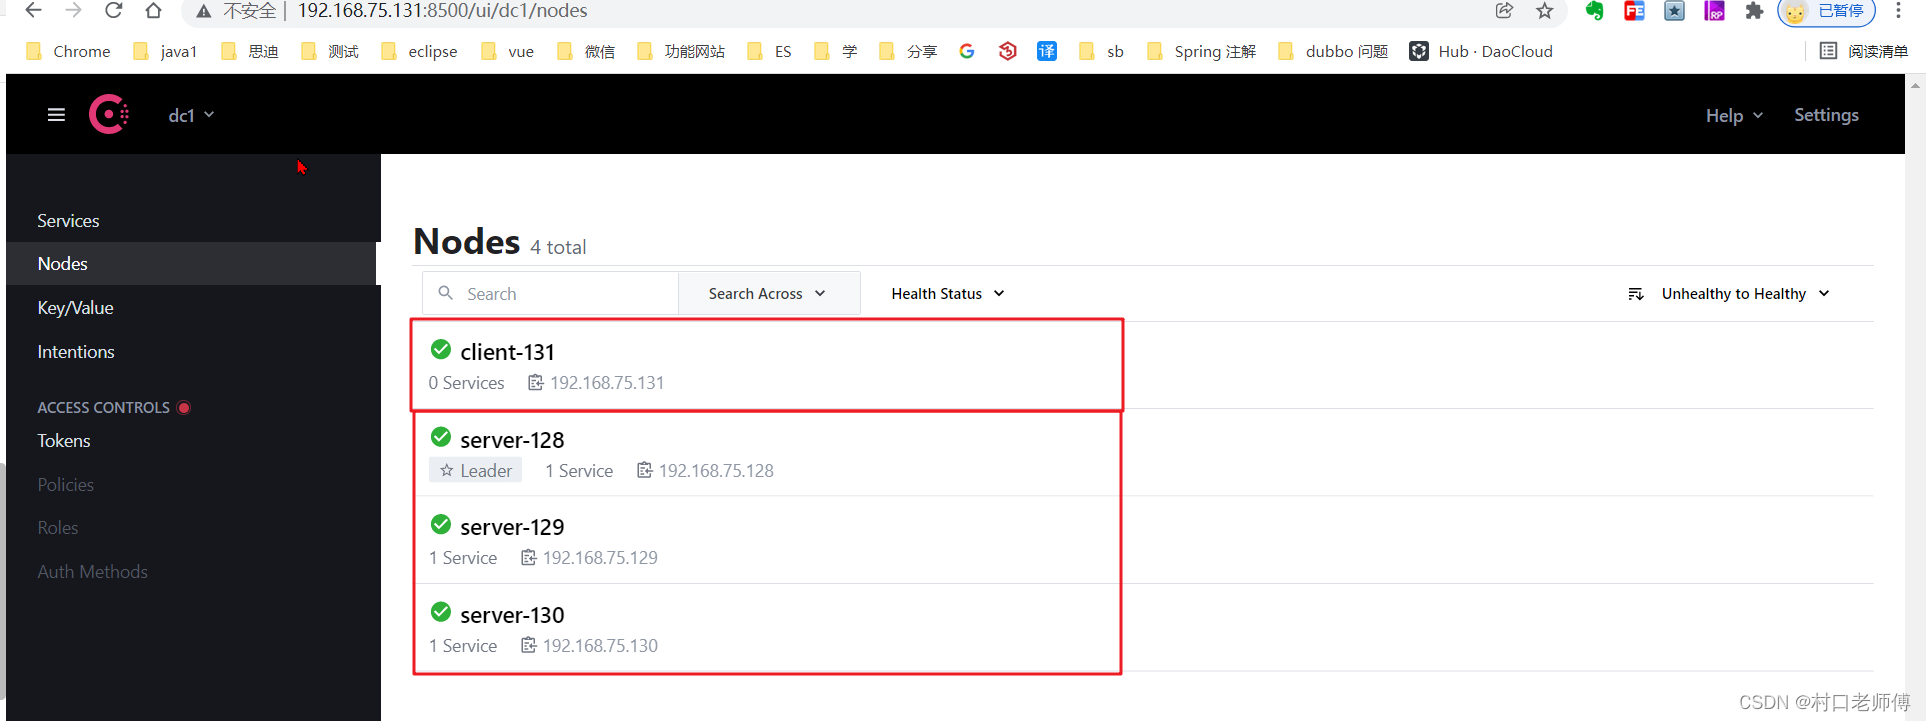
6.1.2 准备4台Linux,3台作为server,1台作为client,并保证这4台服务器之间可以相互ping通。
| 类型 | ip | 是否leader |
|---|---|---|
| server-128 | 192.168.75.128 | 是 |
| server-129 | 192.168.75.129 | 否 |
| server-130 | 192.168.75.130 | 否 |
| client-131 | 192.168.75.131 | 否 |
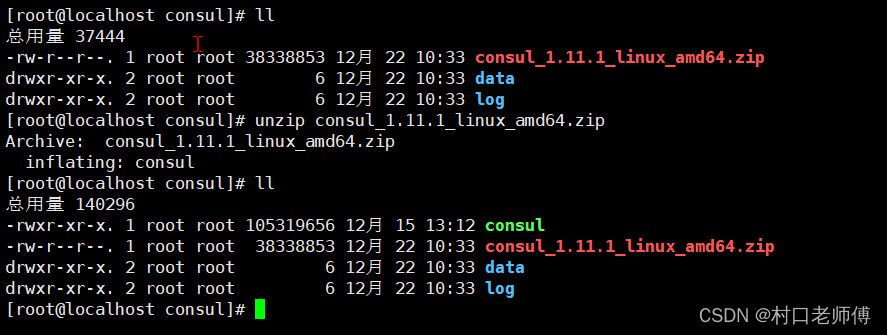
6.1.3 将consul压缩包复制到4台机器的/tmp/consul目录
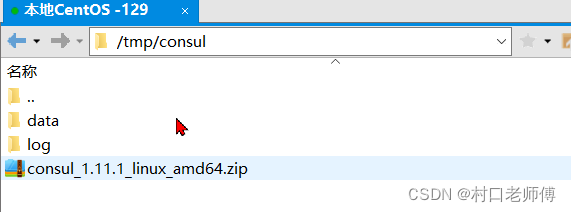
使用unzip consul_1.11.1_linux_amd64.zip解压,若未安装unzip。使用yum安装:yum install -y unzip zip,解压后会有一个consul的可执行文件。
6.2 在Linux启动client模式
6.2.1 启动命令
/tmp/consul/consul agent -server=false -bind=192.168.75.131 -client=0.0.0.0 -ui=true -data-dir=/tmp/consul/data -log-file=/tmp/consul/log -node=client-131 -retry-join=192.168.75.128
6.2.2 命令解释
-server=false:客户端模式-bind=192.168.75.131:绑定本机ip-client=0.0.0.0:配置0.0.0.0,允许局域网所有ip访问-ui=true:启用内置 Web UI-data-dir=/tmp/consul/data:持久化数据存放目录-log-file=/tmp/consul/log:日志文件。设置log-file为/var/log/将导致日志文件路径为/var/log/consul-{timestamp}.log-node=client-128:该节点在集群中的名称。这在集群中必须是唯一的-retry-join=192.168.75.128:类似于-join但允许重试加入直到成功
6.2.3 启动
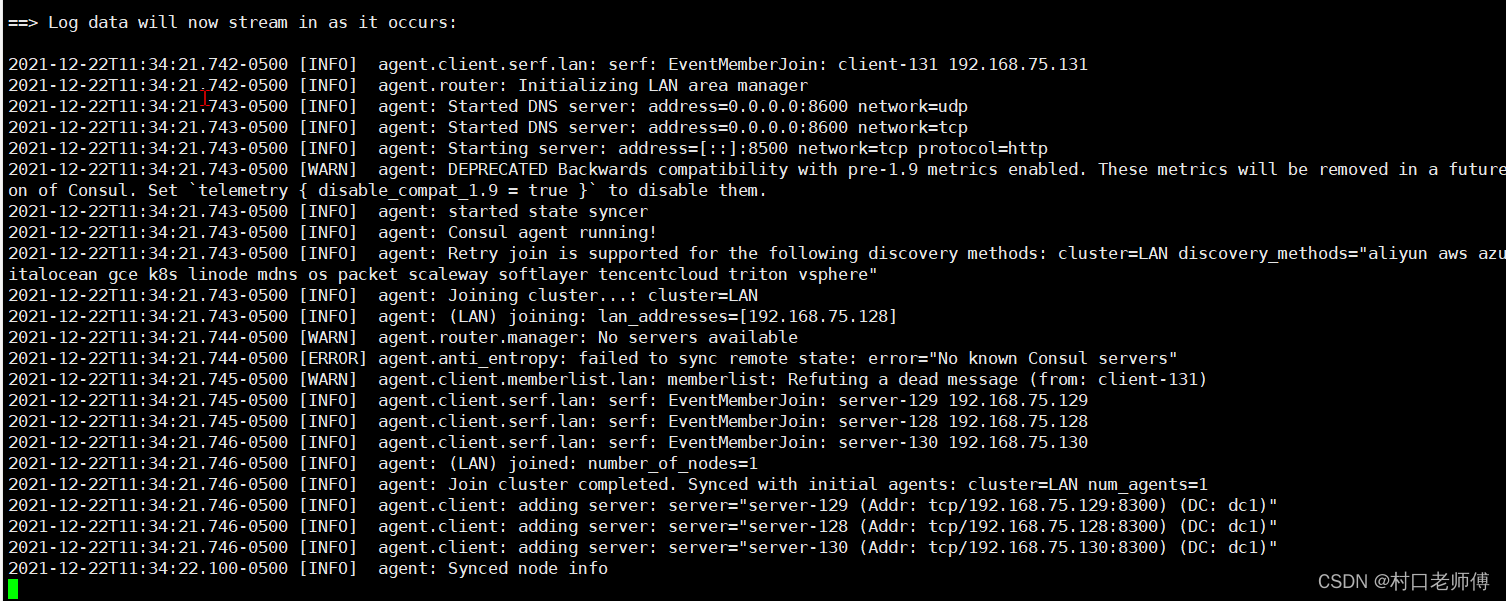
访问http://192.168.75.131:8500/

6.3 在Linux启动server集群模式
6.3.1 启动命令
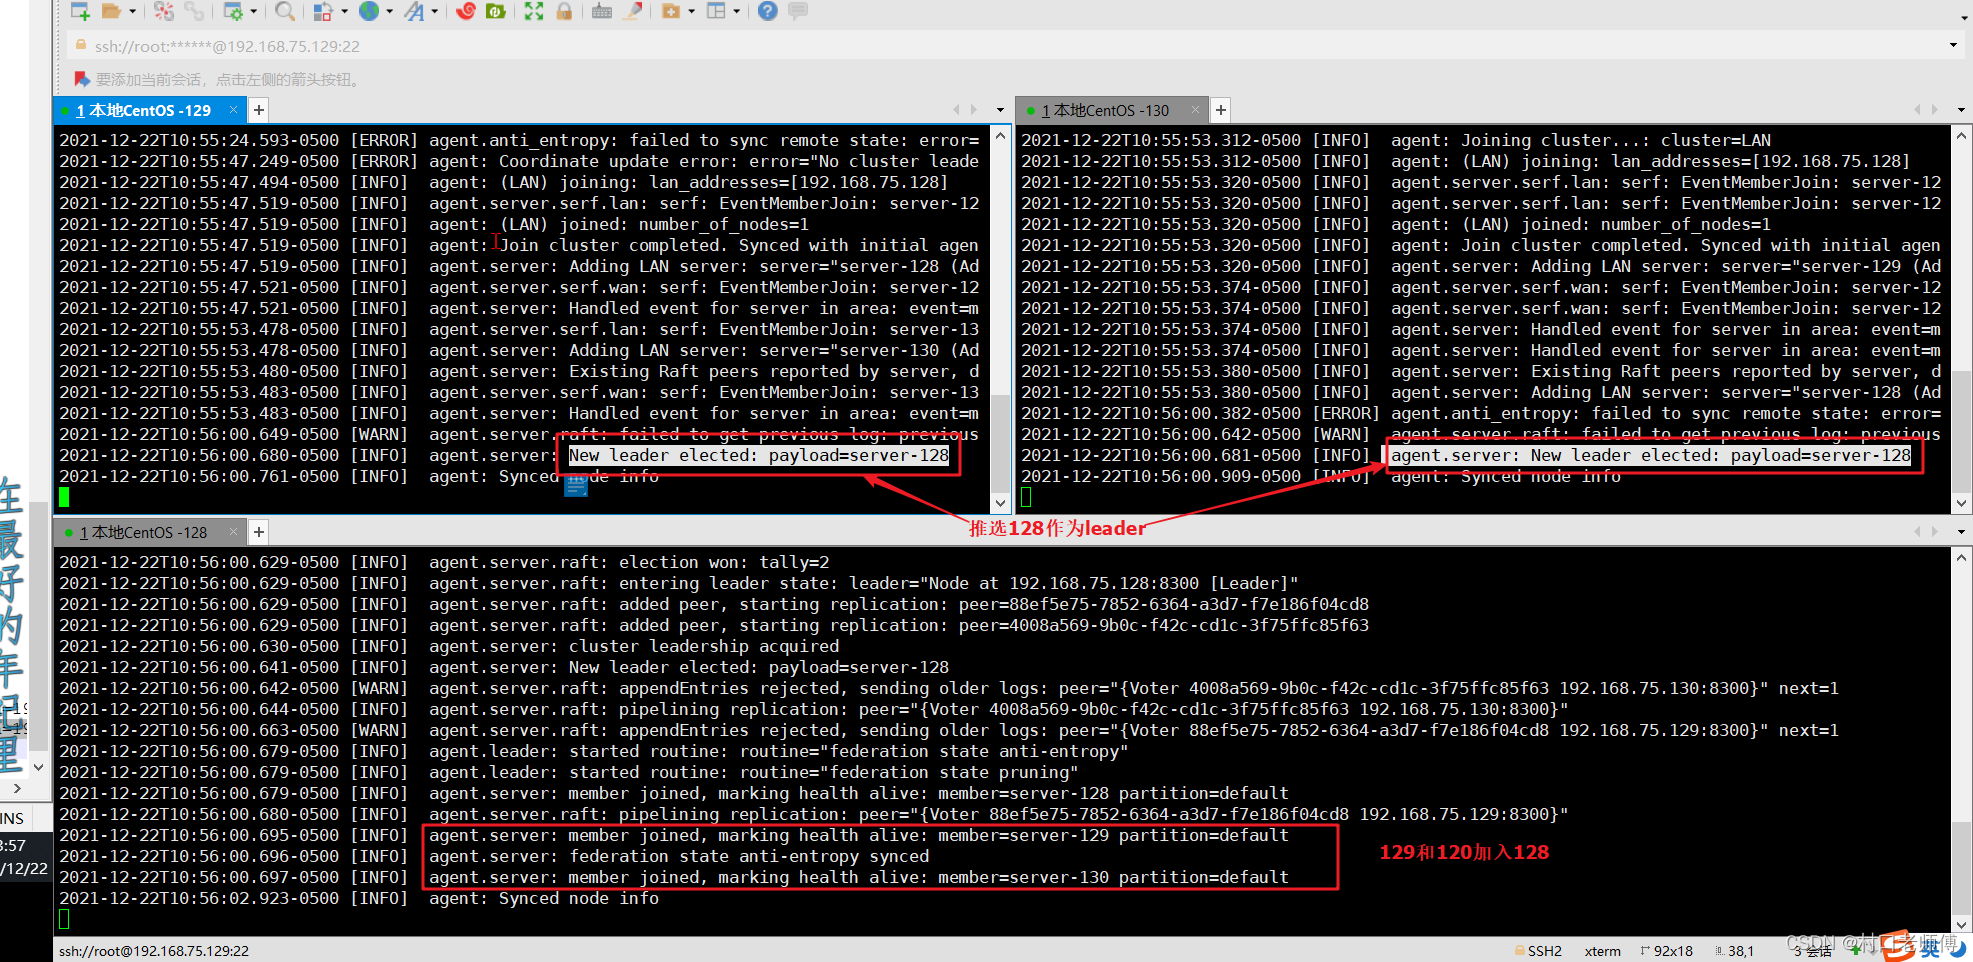
在128、129、130三台机器上面执行对应命令:
/tmp/consul/consul agent -server -bind=192.168.75.128 -client=0.0.0.0 -ui=false -bootstrap-expect=3 -data-dir=/tmp/consul/data -log-file=/tmp/consul/log -node=server-128

/tmp/consul/consul agent -server -bind=192.168.75.129 -client=0.0.0.0 -ui=false -bootstrap-expect=3 -data-dir=/tmp/consul/data -log-file=/tmp/consul/log -node=server-129 -retry-join=192.168.75.128

/tmp/consul/consul agent -server -bind=192.168.75.130 -client=0.0.0.0 -ui=false -bootstrap-expect=3 -data-dir=/tmp/consul/data -log-file=/tmp/consul/log -node=server-130 -retry-join=192.168.75.128
6.3.2 命令解释
-server=false:客户端模式-bind=192.168.0.104:绑定本机ip-client=0.0.0.0:配置0.0.0.0,允许局域网所有ip访问-ui=true:启用内置 Web UI-data-dir=/tmp/consul/data:持久化数据存放目录-log-file=/tmp/consul/log:日志文件。设置log-file为/var/log/将导致日志文件路径为/var/log/consul-{timestamp}.log-node=client-128:该节点在集群中的名称。这在集群中必须是唯一的-retry-join=192.168.75.128:类似于-join但允许重试加入直到成功
6.3.3 启动
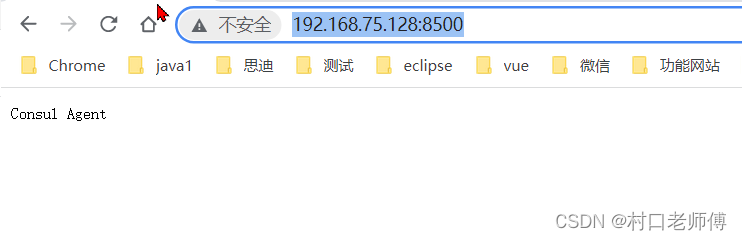
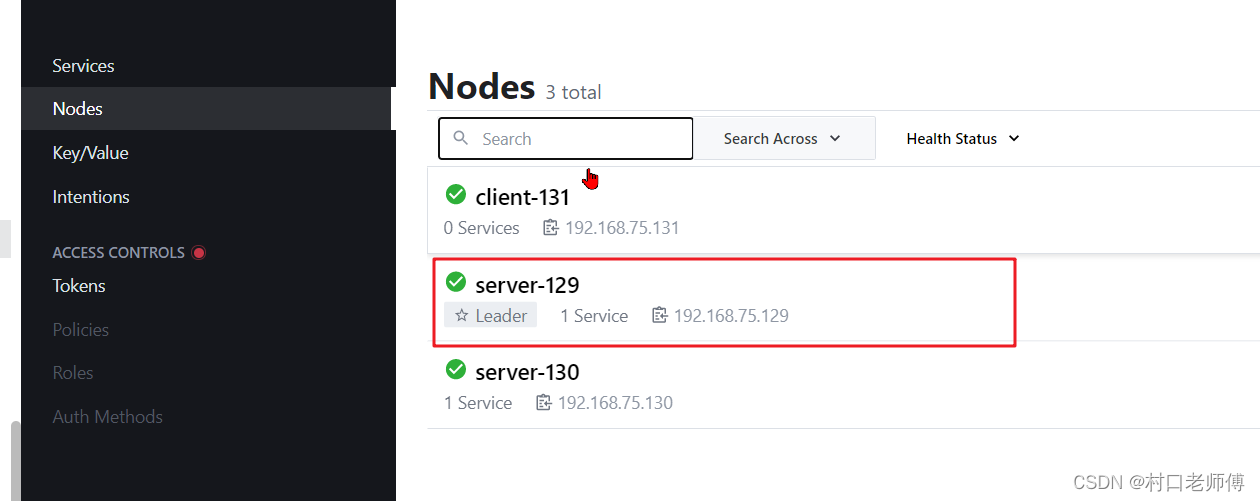
访问 http://192.168.75.128:8500/返回Consul Agent
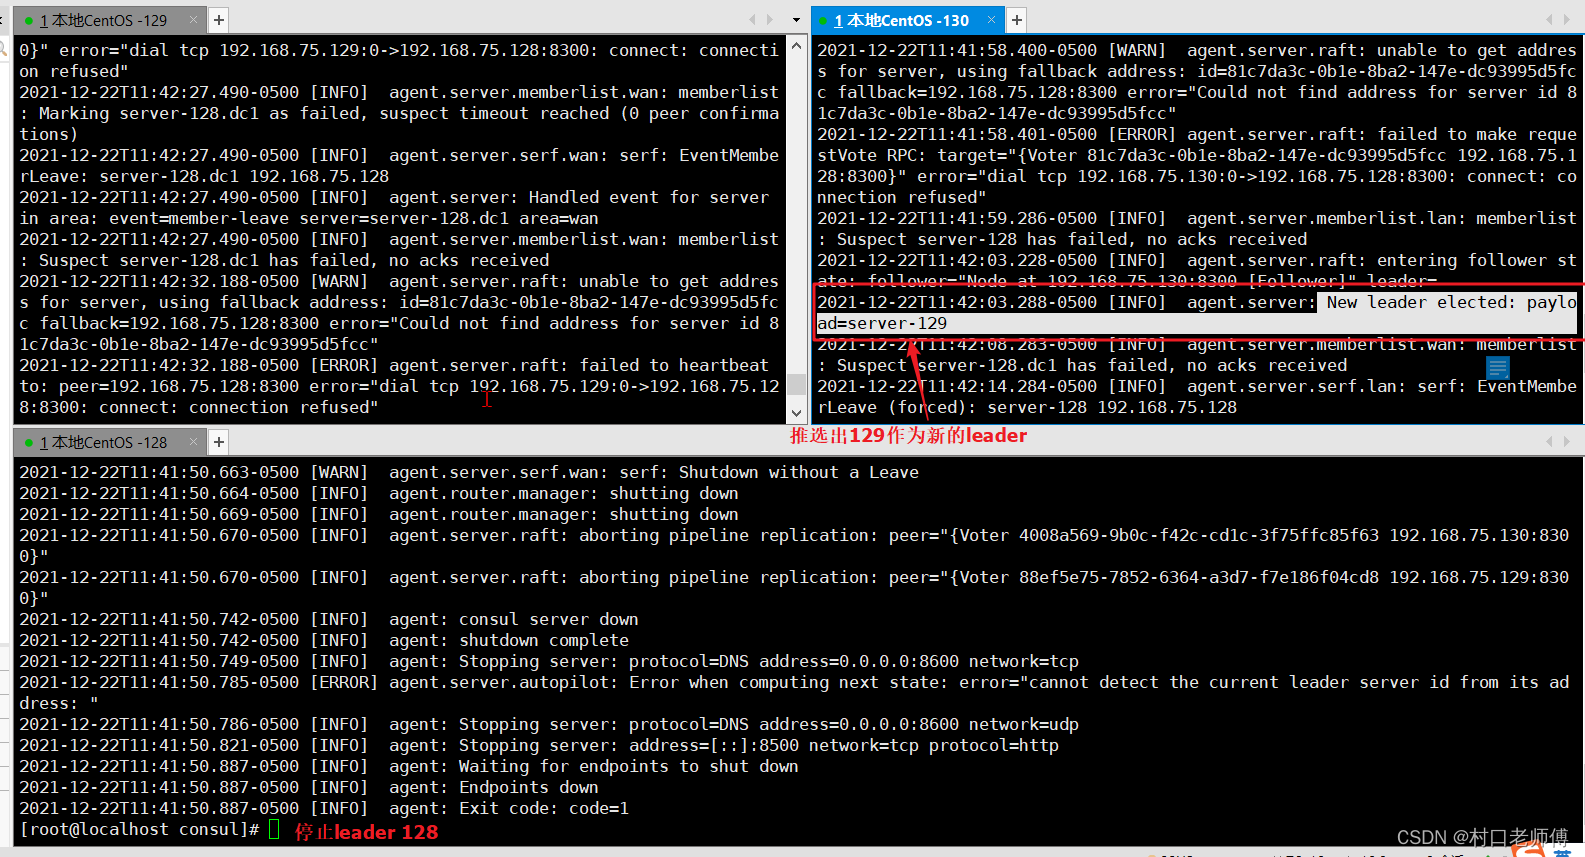
6.3.4 leder选举
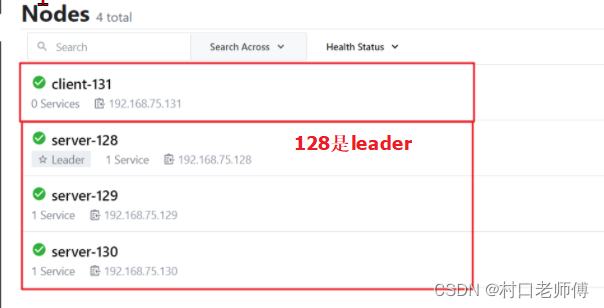
此时128是leader,我们关掉128,等一会发现重新进行了leader选举,129变成了leader,表名我们的集群的选举功能是正常的。
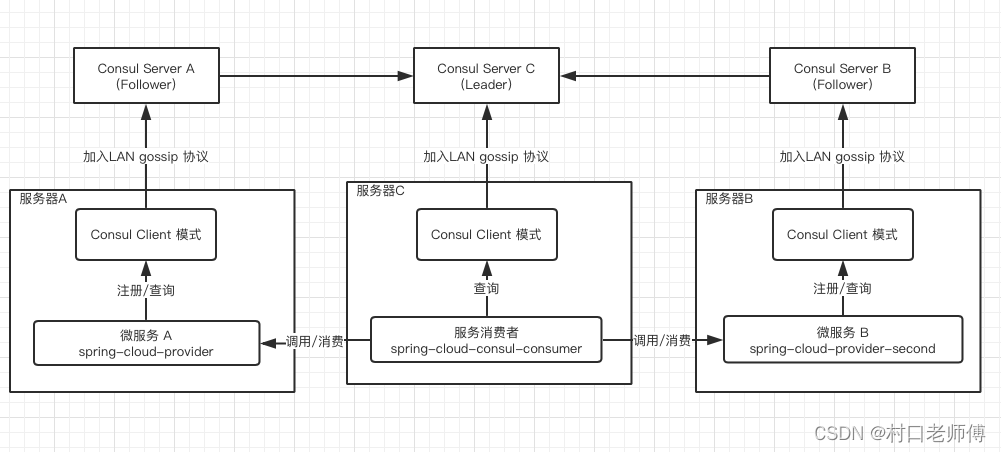
7、通过docker搭建集群(待完成)
7.1 启动server
参考:https://www.cnblogs.com/bluersw/p/11610711.html
docker run -i -t -p 8500:8500 --name=ConsulServer-C consul agent -server -ui -node=Server-C -bootstrap-expect=3 -client=0.0.0.0

docker run -i -t -p 8501:8500 --name=ConsulServer-A consul agent -server -ui -node=Server-A -bootstrap-expect=3 -client=0.0.0.0 -join=172.17.0.2

docker run -i -t -p 8502:8500 --name=ConsulServer-B consul agent -server -ui -node=Server-B -bootstrap-expect=3 -client=0.0.0.0 -join=172.17.0.2
8、测试Demo搭建
8.1 服务提供者provider
8.1.1 添加依赖
<!-- SpringBoot整合consul -->
<dependency>
    <groupId>org.springframework.cloud</groupId>
    <artifactId>spring-cloud-starter-consul-discovery</artifactId>
</dependency>
<!-- actuator健康检查-->
<dependency>
    <groupId>org.springframework.boot</groupId>
    <artifactId>spring-boot-starter-actuator</artifactId>
</dependency>
8.1.2 添加配置
注意点:
- 若使用了
server.servlet.context-path配置,则必须要重新配置spring.cloud.consul.discovery.health-check-path,否则无法进行健康检查 - 消费端若使用服务名调用,则是通过
spring.cloud.consul.discovery.service-name配置的服务名称,如果不配置这个,则使用spring.application.name名称调用
server:
  port: 8010
  servlet:
    context-path: /study

spring:
  application:
    name: cloud-consul-provider-payment8010-1
  devtools:
    restart:
      enabled: false  #关闭自启动
  cloud:
    consul:
      host: 192.168.75.131 #consul client代理地址。默认为本机地址
      port: 8500 #consul client代理端口号
      discovery:
        register: true
        #访问服务器时使用的主机名。该地址应该是用于consul与当前服务通信的地址,例如进行健康检查
        hostname: 192.168.0.103
        service-name: ${spring.application.name}-server-name #服务名称,默认是spring.application.name,其他服务需要通过该服务名称来调用服务

        instance-zone: yyyL-zone # 实例所属空间
        instance-group: yyyL-group # 实例所属组
        instance-id: yyyL-${spring.application.name}-${server.port} #唯一的服务实例ID

        health-check-path: ${server.servlet.context-path}/actuator/health #如果使用了server.servlet.context-path 则需要重写监控信息查询的路径
        health-check-interval: 10s #执行健康检查的频率(例如 10s),默认为 10s

        include-hostname-in-instance-id: false #注册服务时是否将主机名包含在默认实例 ID 中
8.1.3 服务提供者接口
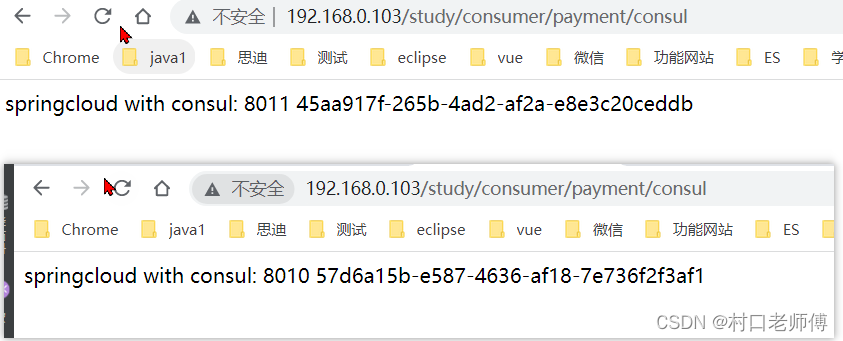
/payment/consul接口的功能是返回当前服务提供者的端口。
@RestController
public class PaymentController
{
    @Value("${server.port}")
    private String serverPort;

    // 127.0.0.1:8010/study/payment/consul
    @GetMapping("/payment/consul")
    public String paymentInfo()
    {
        return "springcloud with consul: "+serverPort+"\t\t"+ UUID.randomUUID().toString();
    }
}
8.1.4 启动服务
consul 是可以不用配置启动服务发现的注解@EnableDiscoveryClient。因为服务是直接连接consul的client。
@SpringBootApplication
@EnableDiscoveryClient
public class ConsulPayment8010Start {
    public static void main(String[] args) {
        SpringApplication.run(ConsulPayment8010Start.class,args);
    }
}
在8010和8011端口启动两台服务提供者。
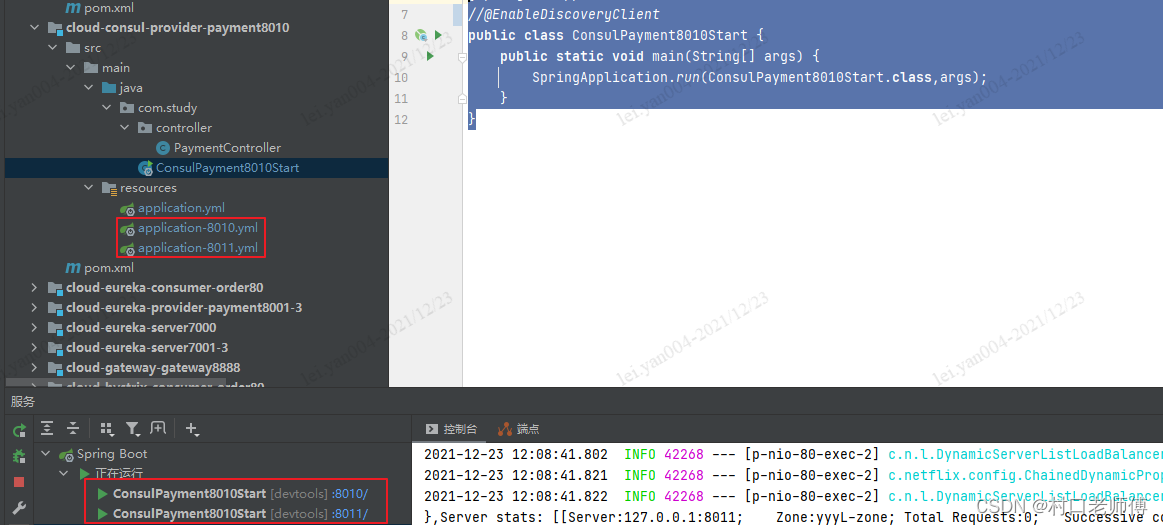
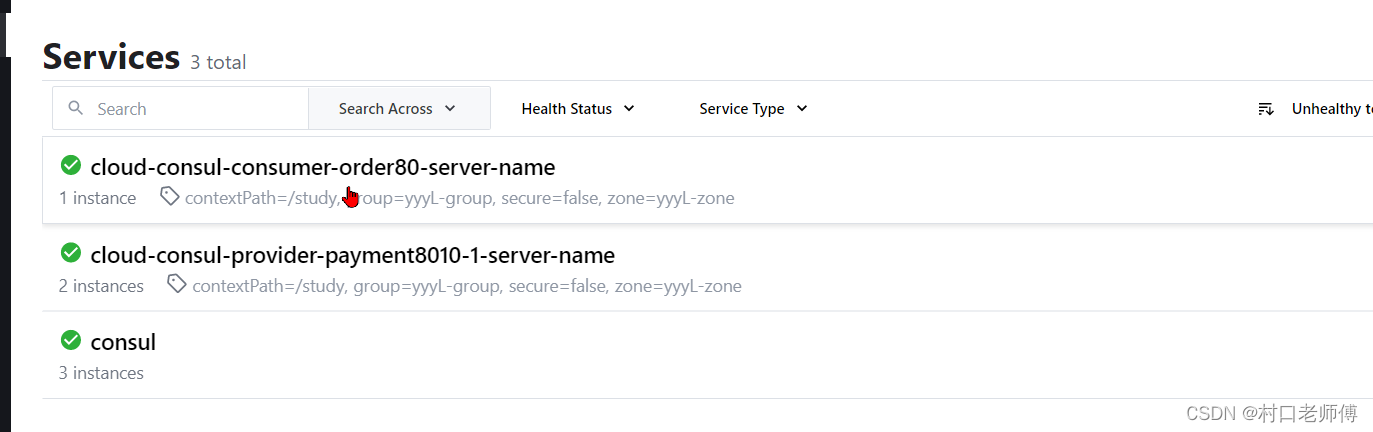
访问 127.0.0.1:8010/study/payment/consul和127.0.0.1:8011/study/payment/consul正常,consul WEB UI界面,可以看到注册的服务信息。
8.1.6 配置Demo地址
gitee地址中的cloud-consul-consumer-order80模块
8.2 服务消费者consumer
8.2.1 添加依赖
<!-- SpringBoot整合consul -->
<dependency>
    <groupId>org.springframework.cloud</groupId>
    <artifactId>spring-cloud-starter-consul-discovery</artifactId>
</dependency>
<!-- actuator健康检查-->
<dependency>
    <groupId>org.springframework.boot</groupId>
    <artifactId>spring-boot-starter-actuator</artifactId>
</dependency>
8.2.2 添加配置
consul的配置和provider一致
server:
  port: 80
  servlet:
    context-path: /study

spring:
  application:
    name: cloud-consul-consumer-order80
  cloud:
    consul:
      host: 192.168.75.131 #consul client代理地址。默认为本机地址
      port: 8500 #consul client代理端口号
      discovery:
        register: true
        #访问服务器时使用的主机名。该地址应该是用于consul与当前服务通信的地址,例如进行健康检查
        hostname: 192.168.0.103
        service-name: ${spring.application.name} #服务名称,默认是spring.application.name,其他服务需要通过该服务名称来调用服务

        instance-zone: yyyL-zone # 实例所属空间
        instance-group: yyyL-group # 实例所属组
        instance-id: yyyL-${spring.application.name}-${server.port} #唯一的服务实例ID

        health-check-path: ${server.servlet.context-path}/actuator/health #如果使用了server.servlet.context-path 则需要重写监控信息查询的路径
        health-check-interval: 10s #执行健康检查的频率(例如 10s),默认为 10s

        include-hostname-in-instance-id: false #注册服务时是否将主机名包含在默认实例 ID 中
8.2.3 服务消费者接口
/consumer/payment/consul功能就是调用服务提供者的/payment/consul
@RestController
public class OrderConsulController {
    public static final String INVOKE_URL = "http://cloud-consul-provider-payment8010-1-server-name"; //consul-provider-payment

    @Value("${server.servlet.context-path}")
    private String contentPath;

    @Resource
    private RestTemplate restTemplate;

    // 127.0.0.1:80/study/consumer/payment/consul
    @GetMapping(value = "/consumer/payment/consul")
    public String paymentInfo()
    {
        String result = restTemplate.getForObject(INVOKE_URL+contentPath+"/payment/consul", String.class);
        System.out.println("消费者调用支付服务(consule)--->result:" + result);
        return result;
    }
}
赋予RestTemplate负载均衡:
@Configuration
public class ApplicationContextBean {
    @Bean
    @LoadBalanced
    public RestTemplate getRestTemplate()
    {
        return new RestTemplate();
    }
}
8.2.4 启动服务
consul 是可以不用配置启动服务发现的注解@EnableDiscoveryClient。因为服务是直接连接consul的client。
@SpringBootApplication
@EnableDiscoveryClient
public class ConsulOrder80Start {
    public static void main(String[] args) {
        SpringApplication.run(ConsulOrder80Start.class,args);
    }
}
访问消费者,查看consul WEB UI 服务也已经注册进去了:
8.2.6 配置Demo地址
gitee地址中的cloud-consul-provider-payment8010-1模块
服务提供者和服务消费者都能在注册中心看到:

为开发者提供学习成长、分享交流、生态实践、资源工具等服务,帮助开发者快速成长。
更多推荐


 0
0 0
0- 0


 已为社区贡献2条内容

所有评论(0)