maven(三)最详细的profile的使用
文章目录前言1. 原理2. 应用演示2.1 项目结构2.2 激活方式1. 通过maven命令参数2. 通过pom文件里的activation属性3. settings.xml中使用activeProfiles指定(了解即可)前言    &amp
文章目录
前言
在开发过程中,我们的项目会存在不同的运行环境,比如开发环境、测试环境、生产环境,而我们的项目在不同的环境中,有的配置可能会不一样,比如数据源配置、日志文件配置、以及一些软件运行过程中的基本配置,那每次我们将软件部署到不同的环境时,都需要修改相应的配置文件,这样来回修改,很容易出错,而且浪费劳动力。
在前面的文章profile之springboot,springboot为我们提供了一种解决方案,而maven也提供了一种更加灵活的解决方案,就是profile功能。
1. 原理
1.1 先看一段pom文件中的profile定义
 <profiles>
        <profile>
            <!--不同环境Profile的唯一id-->
            <id>dev</id>
            <properties>
                <!--profiles.active是自定义的字段(名字随便起),自定义字段可以有多个-->
                <profiles.active>dev</profiles.active>
            </properties>
        </profile>
        <profile>
            <id>prod</id>
            <properties>
                <profiles.active>prod</profiles.active>
            </properties>
            <activation>
                <activeByDefault>true</activeByDefault>
            </activation>
        </profile>
        <profile>
            <id>test</id>
            <properties>
                <profiles.active>test</profiles.active>
            </properties>
        </profile>
    </profiles>
可以看到定义了多个profile,每个profile都有唯一的id,也包含properties属性。这里为每个profile都定义一个名为profiles.active的properties,每个环境的值不同。当我们打包项目时,激活不同的环境,profiles.active字段就会被赋予不同的值。
1.2 结合resource属性
这个profiles.active字段可以应用到许多地方,及其灵活。可以在配置文件里被引用(参考此博客);也可以结合pom文件里的resource和filter属性,作为文件名的一部分或者文件夹名的一部分,下面会详细讲解这个用法。
注意:maven的profile用法有许多种,但基本原理就是根据激活环境的不同,自定义字段被赋予不同的值。
2. 应用演示
2.1 项目结构
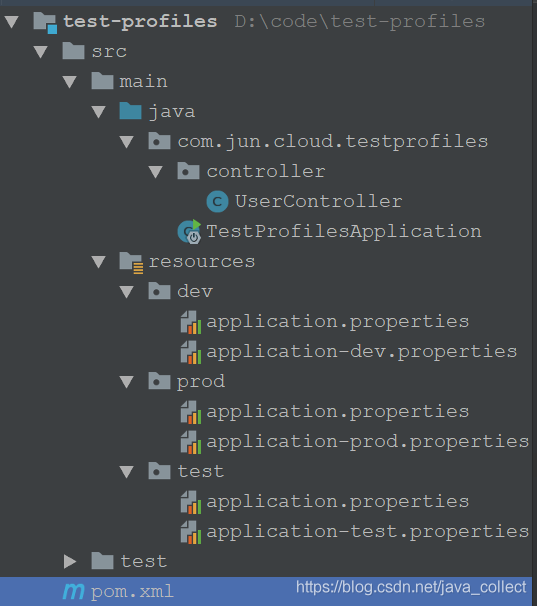
这里定义了dev,prod,test三个文件夹,用来演示maven中profile的使用。注意,每个文件夹里还定义了application-{xxx}.properties件,这里相当于结合springboot的Profile的使用,是我比较推荐的方式,和本文maven的profile使用无关系,在application.properties都有spring.profiles.active=xxx去加载对应的application-{xxx}.properties。
pom文件里的关键配置为
 <build>
        <plugins>
            <plugin>
                <groupId>org.springframework.boot</groupId>
                <artifactId>spring-boot-maven-plugin</artifactId>
                <executions>
                    <execution>
                        <goals>
                            <goal>repackage</goal>
                        </goals>
                    </execution>
                </executions>
                <configuration>
                    <executable>true</executable>
                </configuration>
            </plugin>
        </plugins>

        <resources>
            <resource>
                <directory>src/main/resources/</directory>
                <!--打包时先排除掉三个文件夹-->
                <excludes>
                    <exclude>dev/*</exclude>
                    <exclude>prod/*</exclude>
                    <exclude>test/*</exclude>
                </excludes>
                <includes>
                    <!--如果有其他定义通用文件,需要包含进来-->
                    <!--<include>messages/*</include>-->
                </includes>
            </resource>
            <resource>
                <!--这里是关键! 根据不同的环境,把对应文件夹里的配置文件打包-->
                <directory>src/main/resources/${profiles.active}</directory>
            </resource>
        </resources>
    </build>

    <profiles>
        <profile>
            <!--不同环境Profile的唯一id-->
            <id>dev</id>
            <properties>
                <!--profiles.active是自定义的字段,自定义字段可以有多个-->
                <profiles.active>dev</profiles.active>
            </properties>
        </profile>
        <profile>
            <id>prod</id>
            <properties>
                <profiles.active>prod</profiles.active>
            </properties>
            <!--activation用来指定激活方式,可以根据jdk环境,环境变量,文件的存在或缺失-->
            <activation>
                <!--这个字段表示默认激活-->
                <activeByDefault>true</activeByDefault>
            </activation>
        </profile>
        <profile>
            <id>test</id>
            <properties>
                <profiles.active>test</profiles.active>
            </properties>
        </profile>
    </profiles>
可以看到我们利用resource属性来配置打包时,根据激活的环境来选取要打包的文件夹。我们使用maven命令
mvn clean package
prod环境被默认激活,打包后的包结构为
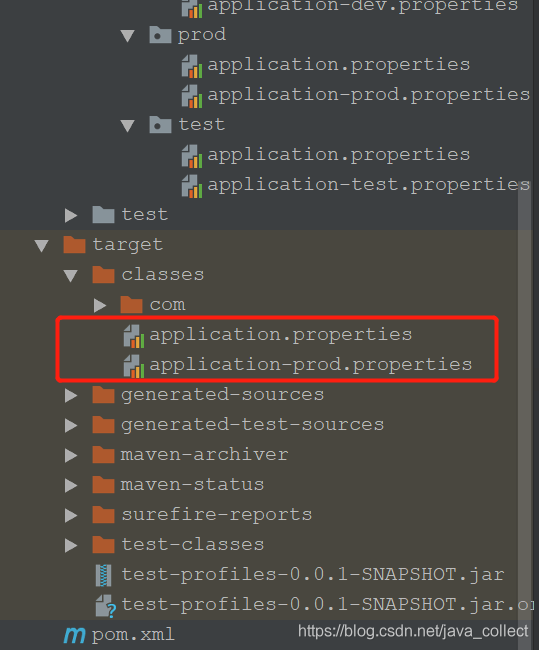
可以看到prod文件夹下的配置文件被打包进去,通过激活不同的profile也就实现了动态切换配置文件。
2.2 激活方式
profile的激活方式有很多种
1. 通过maven命令参数
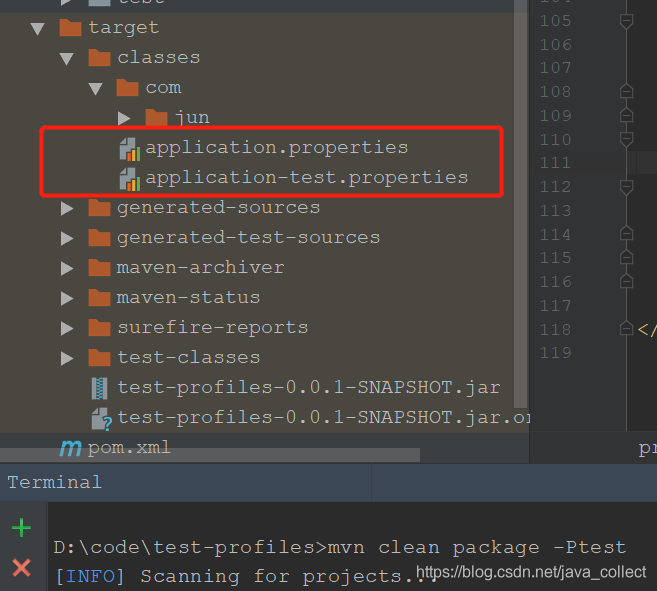
即在使用maven打包时通过-P参数,-P后跟上profile的唯一id,如
mvn clean package -Ptest
打包时test的profile被激活,打包后的包结构为:
2. 通过pom文件里的activation属性
	<profile>
            <id>prod</id>
            <properties>
                <profiles.active>prod</profiles.active>
            </properties>
            <!--activation用来指定激活方式,可以根据jdk环境,环境变量,文件的存在或缺失-->
            <activation>
                <!--配置默认激活-->
                <activeByDefault>true</activeByDefault>

                <!--通过jdk版本-->
                <!--当jdk环境版本为1.5时,此profile被激活-->
                <jdk>1.5</jdk>
                <!--当jdk环境版本1.5或以上时,此profile被激活-->
                <jdk>[1.5,)</jdk>

                <!--根据当前操作系统-->
                <os>
                    <name>Windows XP</name>
                    <family>Windows</family>
                    <arch>x86</arch>
                    <version>5.1.2600</version>
                </os>

                <!--通过系统环境变量,name-value自定义-->
                <property>
                    <name>env</name>
                    <value>test</value>
                </property>

                <!--通过文件的存在或缺失-->
                <file>
                    <missing>target/generated-sources/axistools/wsdl2java/
                        com/companyname/group</missing>
                    <exists/>
                </file>
            </activation>
        </profile>
这里我写了多种方式,可以通过activeByDefault、jdk版本、操作系统、系统环境变量(在win10我试了不成功,win7可以,不知道为啥)、文件的存在或缺失,实际项目可以根据需要选取一种即可。这种的优先级低于maven命令参数指定的方式。
3. settings.xml中使用activeProfiles指定(了解即可)
即mave目录下的settings.xml也可以添加下面的代码来指定激活哪个profile。
<activeProfiles>
     <activeProfile>profileTest1</activeProfile>
</activeProfiles>
值得注意的是1. setting.xml在当前系统用户的.m2文件夹有(如没有可手动拷贝过去也会生效),针对的当前用户的profile配置,在maven的安装目录下“conf/settings.xml”,针对的是全局的profile配置。2.profile也可以定义在setting.xml文件中,但是这种方式个人感觉并不实用的,不推荐。

为开发者提供学习成长、分享交流、生态实践、资源工具等服务,帮助开发者快速成长。
更多推荐


 86
86 0
0- 0


 已为社区贡献1条内容

所有评论(0)